An Introduction to Alteryx Generate Rows

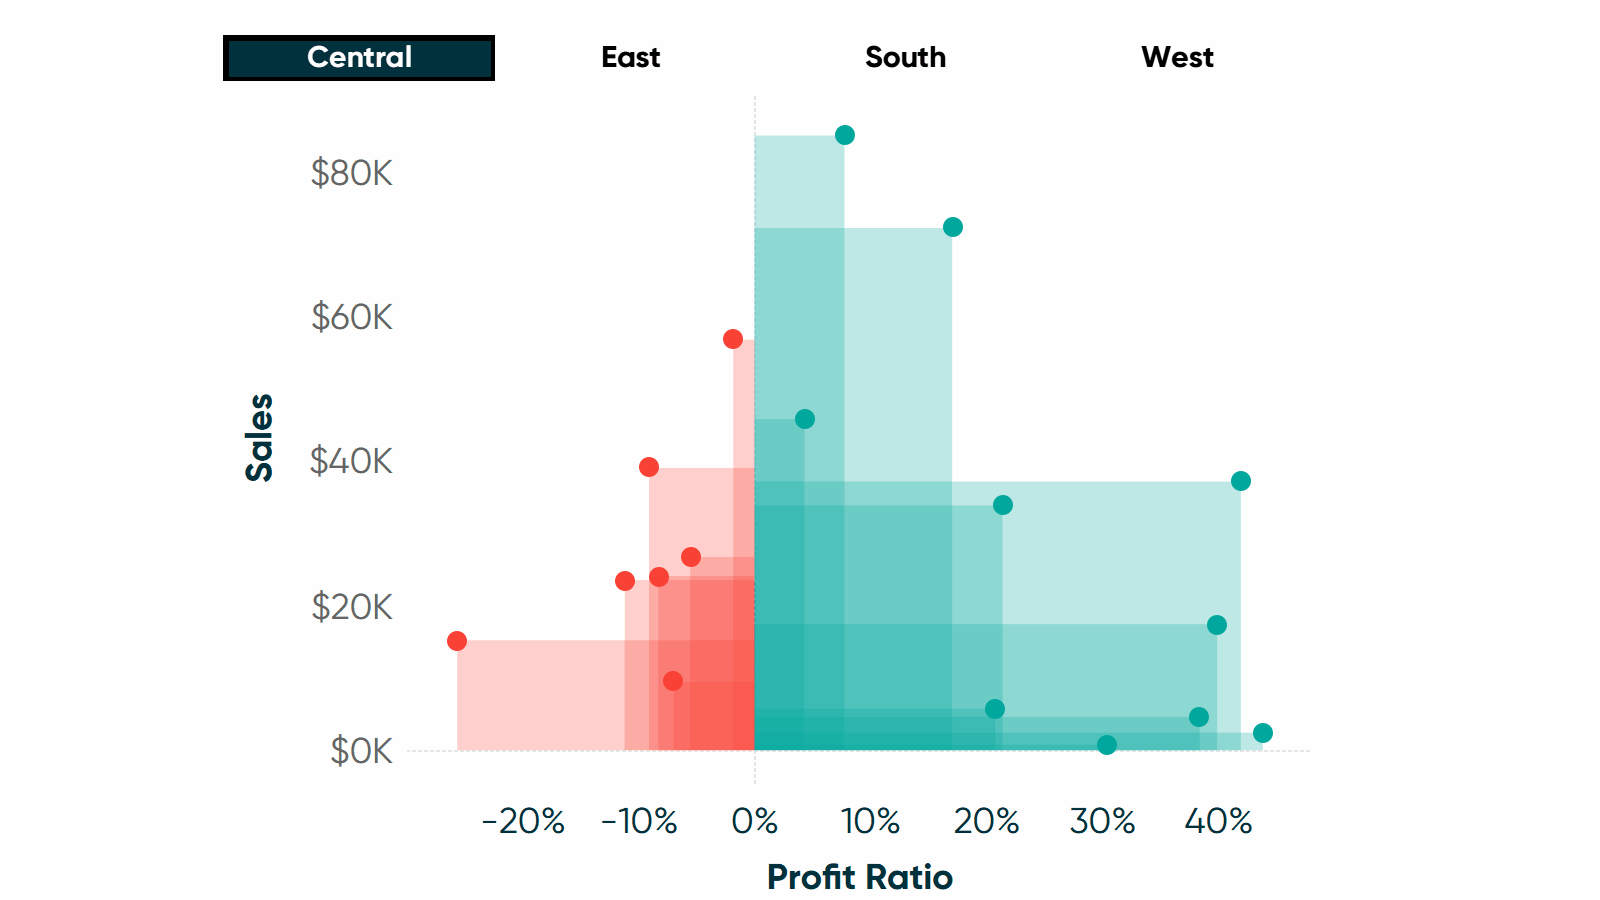
The Generate Rows tool in Alteryx is a great tool to explore when you need to expand your dataset. When it comes to creating dummy records or duplicating data already present, Generate Rows can quickly add rows of data into a dataset. In this post, the Generate Rows tool will be used to duplicate rows for a dataset that will feed a Polygon Scatter Plot Chart in Tableau Desktop.
Learn more data prep techniques with Playfair+
The rest of this article will walk you through an example of how Alteryx easily expanded and cleaned a Tableau Sample-Superstore dataset for the Polygon Scatter Plot chart. Along the way, we will highlight the Generate Rows tool with an in-depth explanation of how to configure this tool.

When to use Alteryx Generate Rows
By the end of this post, you will have a basic understanding of the Generate Rows tool, when to use the tool, and how to do the fundamental tool configuration. But to start off, lets explore the Polygon Scatter Plot use case and why Generate Rows was the tool of choice for the task.
If you read our Polygon Scatter Plot post, the post begins with an explanation behind the required structure of the dataset. To summarize it here, the Tableau Sample-Superstore data needed to be aggregated to the Region, Sub-Category level and would take the sum of sales and profit ratio. From there, the data needed to be duplicated times four so that it would have a row for each point of a rectangle (the shape of the Polygon). Finally, on certain rows, sales and profit ratio would be changed to a 0.
Below is a sample of the raw Tableau Sample-Superstore data (additional fields in data not pictured here):

Next is an example of what the data would look like on the back end of Tableau Desktop if we summed up Profit, Sales and Profit Ratio by Region and Sub-Category:

And finally, this is the required data structure for the chart. It takes the aggregated version from above, duplicates it four times, adds the Polygon Point field, and inserts 0s in a pattern.

We can achieve all of these steps within Alteryx. The duplication of data will be achieved easily with the Generate Rows tool.
Data prep for the Generate Rows tool – polygon scatter plot use case
To begin, hook up the Tableau Sample-Superstore Excel using the Alteryx Input Tool from the In/Out tab. I’ve connected Input directly into my Tableau Repository folder. Alternatively, you can save a copy of the Sample-Superstore dataset to a different folder and point Input to that location. Once you select the Sample-Superstore Excel in the Input tool, choose “Orders” as your sheet from the pop up.

After inputting the dataset, I like to trim down the fields to only the columns I will need. Take the Select tool from the Preparation tab onto your Canvas and connect it to your Input. Select only Region, Sub-Category, Sales, and Profit.
Tip: You can quickly unselect all fields by using the Options drop down in your Select tool configuration. From the Options menu, hover over Select and choose “Deselect All”. After that, you can just re-select the four fields you need.

We are ready to aggregate the data. This step will take the data to that higher level of detail we need for the chart – sum of Profit and Sales by Region and Sub-Category.
Drag down a Summarize tool from the Transform tab and add it after your Select tool. We will be grouping by both Region and Sub-Category and summing up Profit and Sales. In the Summarize configuration window, select Region so that it is highlighted and use the drop down menu labeled “Add” to select Group By. Repeat this exact step for Sub-Category. For Profit and Sales, instead of selecting Group By, select Sum.
To keep the data clean and organized, I’m going to remove the prefix names that the Group By tool natively adds. In your Group By configuration, under Actions, navigate to Output Field Name and delete “Sum_” from Sales and Profit as if you were renaming the field.

For our final dataset, we actually need Profit Ratio, not Profit. Now that we have the data aggregated, we can add a field that calculates Profit Ratio. Insert a Formula tool from the Preparation tab after the Summarize tool. Under Output Column, select “Add Column” and type in “Profit Ratio”. Change the Data Type to Float since Profit Ratio will be a decimal number. Add the Profit Ratio formula pasted below. The formula references the Sales and Profit fields that we already have in the data and divides Profit by Sales.
[Profit]/[Sales]

How to configure the Generate Rows tool
Now that our data is at the correct level of detail, we are ready to duplicate our data. Drag a Generate Rows tool from the Preparation tab onto your Canvas after the Formula tool. The first option in the configuration window is to Update Existing Field or Create New Field. Referring back to our desired data output, the dataset requires a field called PolygonPoint, which essentially counts each of our duplicated rows. This is a perfect field for our Generate Rows tool to add because it requires a reference to a field. Go ahead and select Create New Field, type in “PolygonPoint” as the field name, and we will keep it as an int32.

Our next option in the configuration window is the Initialization Expression. This will be the first value that the tool will “input” into our reference field. The default configuration is set to 1. If we keep it at 1, the tool would start off by inserting a 1 into our PolygonPoint field. Since our PolygonPoint final output actually does begin with 1, we are able to keep 1 in the Initialization Expression.
This will not always be the case, but if you are generating a specific number of duplicate rows this is a good place to start. Other ways you can use the Initialization Expression field are to reference another field, such as grabbing a date field you have, or a dollar amount field. You can even have the Initialization Expression be a calculation, maybe creating a first of the month of a date field you have in your data, or rounding up your dollar amount. If you click the “…” square, it will open up a box that resembles the Formula tool that will help you write these. These options are also available in all of the Expression fields in the Generate Rows tool.

The next field in the Generate Rows tool is the Condition Expression. This entry is what tells the tool to stop duplicating a row and move onto the next. I think it is easier to first think about how we want the tool to duplicate, so I’m going to move onto the next configuration, Loop Expression, and come back this one.
The Loop Expression will be how the Generate Rows tool increments our field for each generated row. For our Sample-Superstore Polygon Scatter Plot chart use case, we want the new PolygonPoint field to increase by 1 on each new row. Alteryx has already populated “RowCount + 1” in the Loop Expression. This is pretty close to what we need; the only adjustment we need to make is to the reference field. We do not have a RowCount in our data, but we do want Generate Rows to increment our PolygonPoint field by 1. Change out “RowCount” for “PolygonPoint” in the field. If you want to ensure that you entered the PolygonPoint field correctly, you can open the “…” edit formula box and select PolygonPoint from the list of fields.


Now that we’ve entered some configurations with our use case, let’s step back and quickly go over how the Generate Rows tool works to figure out what to enter for our Condition Expression. Generate Rows will start with your first row of data in your dataset and continue to run your Loop Expression on that row until the Condition Expression is no longer true. After the Loop Expression no longer satisfies your Condition Expression, it will move onto the next row and run all of the configurations again, repeating until it gets to the end of your dataset.
At this point in our use case, we have Generate Rows adding a field called PolygonPoint with a value of 1. It will then duplicate our row of data and adjust PolygonPoint by +1 on each duplicate row. Because each row of our final dataset will represent a corner of a rectangle in our visualization, we want our data duplication to stop at four rows each time and have the PolygonPoint field contain a value 1-4. We can accomplish this by telling Generate Rows Condition Expression to stop duplicating once PolygonPoint has reached 4, or = 4. It can then move onto the next row. So, for Condition Expression, we will enter the following:
[PolygonPoint] <= 4

Why do we need the formula to be <= instead of just =? This is because Generate Rows will only continue to run your Loop Expression, aka duplicate your row, as long as the Condition Expression is true. The data snapshot below details what is happening at the row level with our Generate Rows tool configuration.

All of the Expressions (Initialization Expression, Loop Expression, and Condition Expression) provide options for field references and formulas. This means that the Generate Rows tool can meet most of your use cases that require some type of row insertion.
Go ahead and run your workflow to check the duplicated data. It should look like the following:

How to finish the polygon scatter plot dataset
If you are following along to create the Tableau Sample-Superstore Polygon Scatter Plot dataset, we are going to add one more Alteryx Tool to finish out the data for the Tableau chart.
After duplicating our aggregated data, the next step is to insert the 0 anchor point pattern for each polygon point. Below is a reminder of where we want our anchor points to be. The anchor point pattern is based on the PolygonPoint value. PolygonPoint = 1 has a 0 for both Sales and Profit Ratio. PolygonPoint = 2 has a 0 for Profit Ratio. PolygonPoint = 3 does not have any 0 anchors. PolygonPoint = 4 has a 0 for Sales.

Drag a Formula tool down to your Canvas from the Preparation tab. We are going to use IF statements to adjust the Profit Ratio and Sales fields.
For your first formula, select Profit Ratio as your output column. We will write a formula that replaces Profit Ratio with 0 if PolygonPoint = 1 or 2.
IF [PolygonPoint] = 1 or [PolygonPoint] = 2
THEN 0
ELSE [Profit Ratio]
ENDIF
Add another formula to the current Formula tool by clicking the blue box with a + in it. Select Sales as your output column. Sales needs to be changed to 0 anytime PolygonPoint = 1 or 4.
IF [PolygonPoint] = 1 or [PolygonPoint] = 4
THEN 0
ELSE [Sales]
ENDIF

We now have our final output – a cleaned Polygon Scatter Plot dataset! You can output your data to an Excel, TDE, or Hyper to feed into Tableau desktop.
Thanks to some quick tools and Generate Rows, Alteryx quickly cleaned our dataset, enabling us to prep data to build the Polygon Scatter Plot chart.
Keep delivering more than expected,
Ariana

Written By
Ariana Cukier
Related Content
How to Make a Polygon Scatter Plot in Tableau
Scatter plots are a great way to explore correlations and visually identify outliers in your data. But what if your…
How to Manipulate Dates in Alteryx

Whether you work with data as a hobby or as your career, it is all but certain that you will…
3 Tips for Data Quality Assurance (QA) in Alteryx
Anyone who works with data would probably say that ensuring accuracy is half the battle. While a final Quality Assurance…