How to Let Users Choose Measures and Dimensions in Tableau
I’ve often discussed how powerful Tableau parameters are because outside of filters and dashboard actions, they’re one of the only methods for putting control into the hands of your end users. In other posts I’ve shown you how to toggle between a line graph and slope graph, how to create bilingual dashboards in Tableau, and how to highlight a dimension member – all using the power of parameters. This post will walk you through how to leverage this same functionality in Tableau to allow you and your dashboards’ end users to decide which dimensions or measures are displayed on your views by using a method called field swapping. This is a great approach for keeping analyses focused as well as saving real estate on your dashboard by displaying only one dimension and measure at a time.
How to Allow Users to Choose Dimensions and Measures in Tableau
How to use parameters to select a measure in Tableau
In this example, let’s assume we have a continuous line trend showing the measure that we care about by month. We want to set up the view so that we (and our end users) have the ability to change which trend is being displayed between sales, profit, quantity, and discount. We will be using the Sample – Superstore data that comes prepackaged with every download of Tableau.
![]()
Step 1 – Create a Parameter for Your Four Measure Choices
The most intuitive way to create a parameter is to right-click somewhere in the parameters shelf in the bottom left corner of an individual sheet, and clicking “Create Parameter…”. You are presented six data type options for your parameter. To allow users to select which measure is displayed on a view, we are going to be using a data type of String. You will also want to change the allowable values to List so that you can specifically define which options the users will have. Once you choose List you will see a new menu that allows you to input the values for each of the choices. Type in the names of each measure, give the parameter a name, and your parameter should end up looking like this:

Step 2 – Create Calculated Measure
Parameters are dependent in that they don’t do anything on their own. In order to make them work, you also have to provide Tableau with instructions on what each of the parameter inputs should do. This can be accomplished through a calculated field. Since we are starting with a way to allow users to choose between one of four measures, we will create a calculated measure that will tell Tableau which measure to display based on the parameter value selected. In case you are not familiar with the syntax, the definitions will look like this in the calculated field:
CASE [Measure Parameter]
WHEN “Sales” THEN SUM([Sales])
WHEN “Profit” THEN SUM([Profit])
WHEN “Quantity” THEN SUM([Quantity])
WHEN “Discount” THEN AVG([Discount])
END
Note that I gave every measure an aggregation. If I didn’t assign the aggregations here, all four measures would share the same aggregation. It doesn’t make sense for us to sum up the discounts, so I assigned that measure an aggregation of average using AVG. My final calculated field looks like this:

Step 3 – Create the View
At this point, we are ready to create our continuous line graph with our newly created calculated measure. I know this is meant to be a continuous monthly trend over time, so I start by putting my date dimension on the Columns shelf with an aggregation of continuous month. To create the line graph, I put my newly created “Measure Selected” measure onto the Rows Shelf. At this point, we see a monthly trend for whatever measure is the current value in the parameter that we created. By default, the current value will be the first value (Sales) in the parameter. The view currently looks like this:

Step 4 – Add Parameter Control to View
There is just one last step to allow your end users to choose between the four options you have created. Right-click on the parameter that was created on the Parameter Shelf and select “Show Parameter Control”. You will see a new menu appear in the top right corner that will allow you and your end users to choose between the four different measures. Changing the selection will change the measure being displayed on the line graph.
How to use parameters to swap fields in Tableau
If you want to allow users to select a dimension instead of or in addition to a measure, follow the same four steps above with your dimension options instead of your measure options. The only difference is that the dimensions in your calculated field will not need an aggregation. For example, let’s say that in addition to allowing our users to choose between the measures of sales, profit, quantity, and discount, we also want them to be able to slice and dice those measures by the dimensions of segment, product category, and region.

We would follow the steps above and create a new string parameter with an entry for each of our dimensions. We would create a calculated field that looks like this:

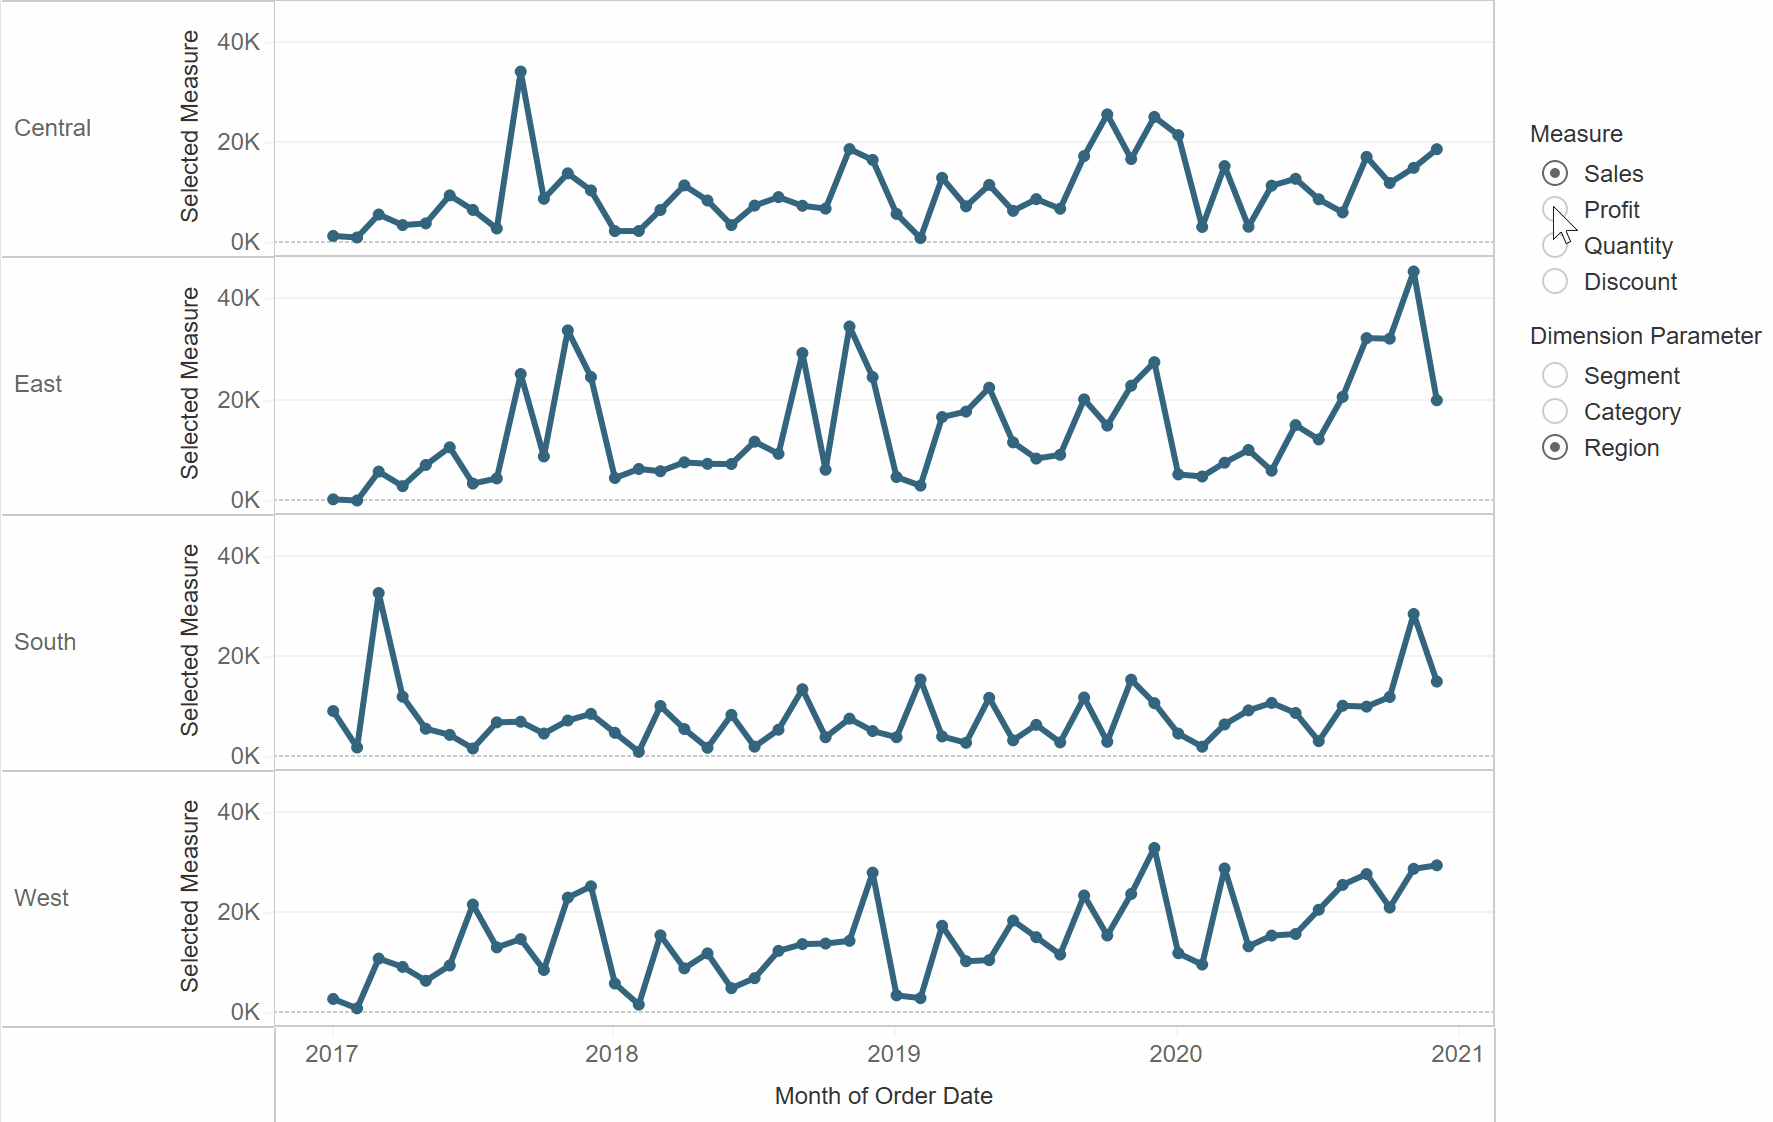
This newly created calculated field can now be placed on the rows shelf of our line graph to allow users to view the trends of not only four different measures, but also by three different dimensions. The final product looks like this:

With three different dimension and four different measure choices, we have provided users with twelve different field swap options – all controlled by them without any Tableau development experience needed!
Thanks for reading,
– Ryan
This content is excerpted from my book Practical Tableau: 100 Tips, Tutorials, and Strategies from a Tableau Zen Master published by O’Reilly Media Inc., 2018, ISBN: 978-1491977316. Get the book at Amazon.


Written By
Ryan Sleeper
Related Content
How to Let Users Choose Between Chart Types in Tableau
Data visualization allows you to look at the same data in different ways often leads to new insights (or storylines,…

Ryan Sleeper
Transfer the Control of a Prescriptive Analysis to Your Audience Ryan shows you how to use parameters that control the…
3 Essential Ways to Use Dynamic Parameters in Tableau

Dynamic parameters were introduced with Tableau Desktop version 2020.1 and rightfully created a lot of buzz among Tableau authors due…