Tableau Hack: How to Sort by Multiple Data Types

Have you ever wanted to sort data in Tableau by both measures and dimensions? For example, it is typically best practice to sort a bar chart in descending or ascending order by the measure being analyzed to compare not only the length or height of the bars, but by the rank order as well. Then there are other times when you have a long list of categories, and it would be easiest to find a specific one if the user could sort the view alphabetically instead.
How to Change Sort Order Across Multiple Sheets in Tableau
How to create a custom sort in Tableau using a combination of data types
With enhancements added as recently as Tableau Desktop version 2020.2, the default sort options in Tableau have come a long way. That being said, the approach I’m about to share has at least three major benefits: (1) you can use it when table headers are hidden, (2) it works with alphanumeric IDs, and most importantly, (3) you can use it with the popular scaffolding technique to conditionally format individual rows and/or columns.
By the end of this post, you will be able to sort a Tableau text table or visualization in descending or ascending order by multiple data types using a parameter control.
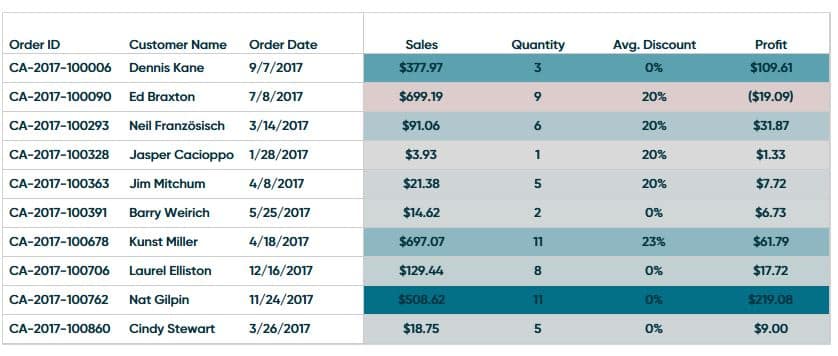
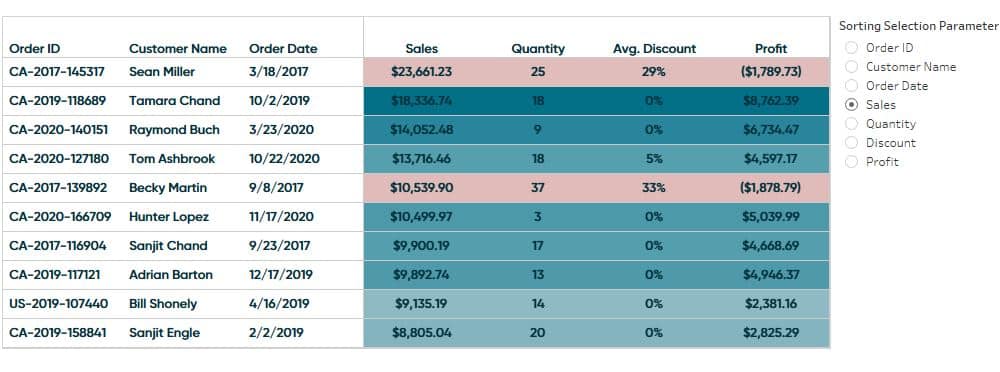
To begin, I have connected to the Sample – Superstore dataset and created a highlight table that shows Sales, Quantity, Discount, and Profit by Order ID, Customer Name, and Order Date.
3 Ways to Make Handsome Highlight Tables in Tableau
I want my user to be able to sort the table using any of these measures or dimensions and I also want them to be able to sort Order ID specifically on the Year-Order Number, ignoring the first two characters of that dimension.
![]()
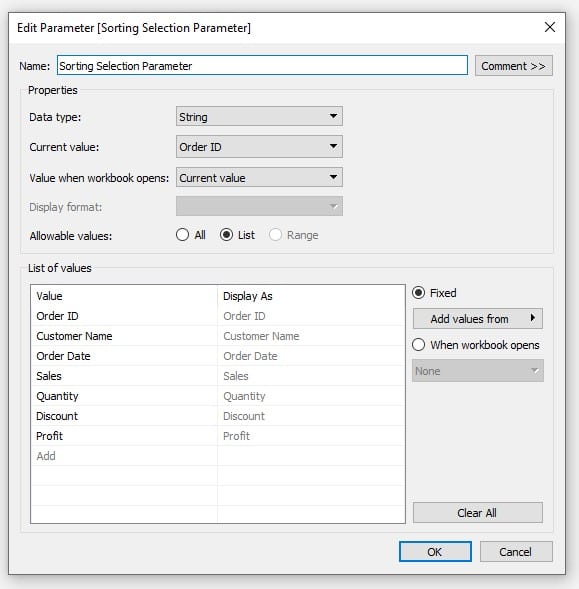
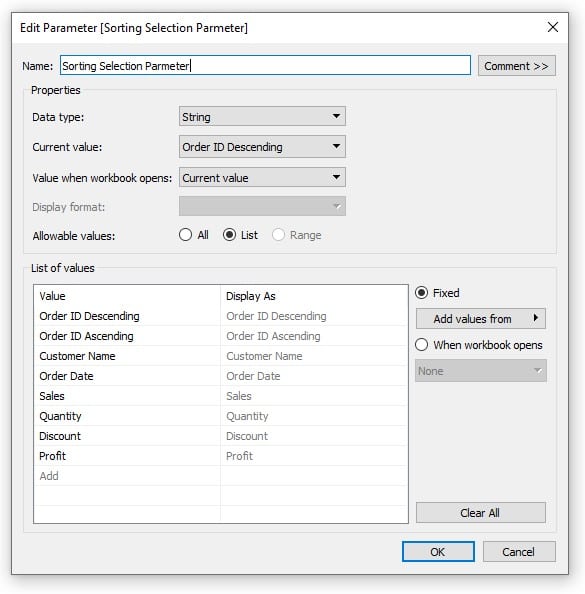
To do that, I will create a new parameter by right-clicking in any blank space in the Data pane and selecting Create Parameter. I will title the parameter “Sorting Selection Parameter” and change the data type to String. Then I will select the List radio button and type in each of my measures and dimensions.
Continue reading with a free account, or login.
Unlock this tutorial and hundreds of other free visual analytics resources from our expert team.
Already have an account? Sign In
By continuing, you agree to our Terms of Use and Privacy Policy.
Next, I will create a new measure that will drive my sort by right-clicking any blank space in the Data pane and selecting Create Calculated Field. I am going to name my new calculated field “Sort By” and will use CASE – WHEN logic to create the sort – but first let’s explain each piece and how the sort works.
Sorting A Measure
To sort on a measure, we just aggregate it appropriately. So, for Sales we would use SUM, for discount we would use AVG, and so on. If you are using a calculated field that is already aggregated, such as Profit Ratio, you don’t have to add an aggregation function in this calculation.
Sorting A String With Ordinal Numbers
To sort a string with numbers like Order ID we want to split the string and isolate the numbers we want. Order ID in the Sample – Superstore dataset actually has two numbers we are interested in: Year and the Order Number itself. We want to split Order ID into these separate parts, then combine them before transforming the string into a number. We use the SPLIT function (as seen below) to get the order number then another SPLIT function to get the Year.
To combine them, all we do is use a + sign between the two functions and it will add Year to the Order Number. Now we convert that string to a number using the FLOAT function and aggregate it using the SUM function. This will sort that dimension by the numbers contained in that string.
Sorting By Strings
To sort by a string like Customer Name or Product Name, we will use the ASCII function. The ASCII function looks at the first character in a string and returns a numerical ASCII code value for that character. These values start at 65 for the character “A” and go up to 90 for the character “Z”.
There are a few things to be aware of when using the ASCII function. For starters, the character “A” and the character “a” have different ASCII values. Depending on the dataset you are working with, you may have to also use the UPPER or LOWER function to get all of your string characters to the same casing. Just to be on the safe side I decided to use UPPER in my calculation.
Another thing to note is that the ASCII function is only going to return a value for the first character of the string. If this is as precise as you need you could stop there. However; if you need to be more precise you can convert the value to a string using the STR function and continue to concatenate additional values to increase your accuracy. To demonstrate this, I wrote my calculation using the first and second characters of Customer Name. If you need additional characters for your use case, you can simply use my code and continue adding more characters by copying and pasting the second half of the calculation, then adjusting the MID function to the next character.
To aggregate this number, we will want to use the MIN function.
Sorting By Dates
To use a data type of Date in our custom sort, we want to convert that date into a number. To achieve this, we will use the FLOAT function to convert it to a number; then aggregate it using the MIN function.
Creating the sort by calculated field
Note: This calculation may look intimidating to some but know that it is really straightforward. To help you understand it, I broke it into sections with comments identified by the “//”. This way you can follow what I explained above written in the code. Also, if some of these functions are new to your toolbelt, simply click the function in the editor, then click the arrow to the right of the Calculation pane. This will open a box to the right that explains the syntax and gives an example of what the function does.
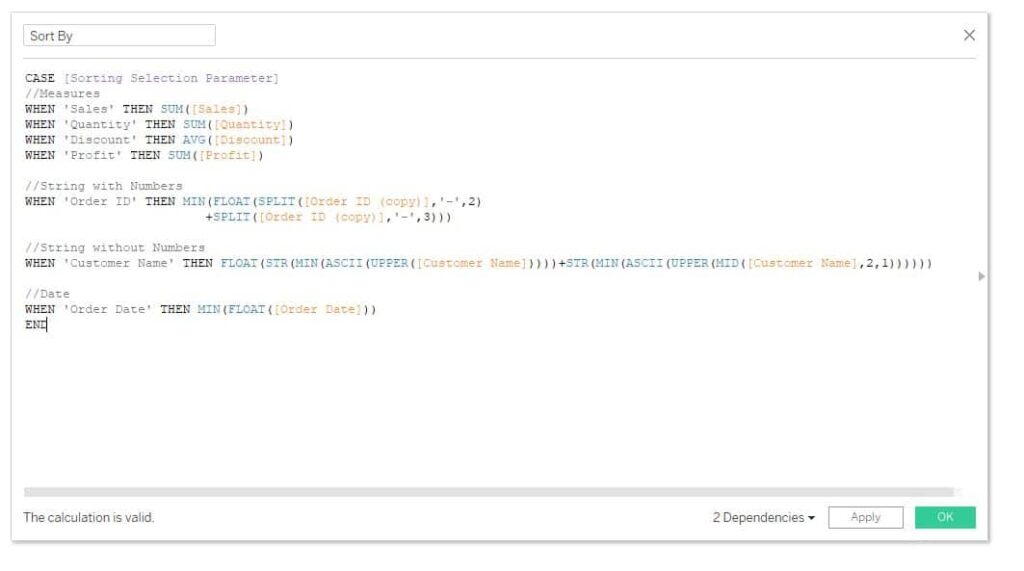
Using the best practices above I have created the following calculated field:
CASE [Sorting Selection Parameter]
//Measures
WHEN ‘Sales’ THEN SUM([Sales])
WHEN ‘Quantity’ THEN SUM([Quantity])
WHEN ‘Discount’ THEN AVG([Discount])
WHEN ‘Profit’ THEN SUM([Profit])
//String with Numbers
WHEN ‘Order ID’ THEN MIN(FLOAT(SPLIT([Order ID (copy)],’-‘,2)
+SPLIT([Order ID (copy)],’-‘,3)))
//String without Numbers
WHEN ‘Customer Name’ THEN FLOAT(STR(MIN(ASCII(UPPER([Customer Name]))))+STR(MIN(ASCII(UPPER(MID([Customer Name],2,1))))))
//Date
WHEN ‘Order Date’ THEN MIN(FLOAT([Order Date]))
END
We are ready to implement the sort into the highlight table and test it out. To do this, I will drag the “Sort By” calculated field to the Detail Marks Card on my view. Then I will right-click Order ID and select Sort.
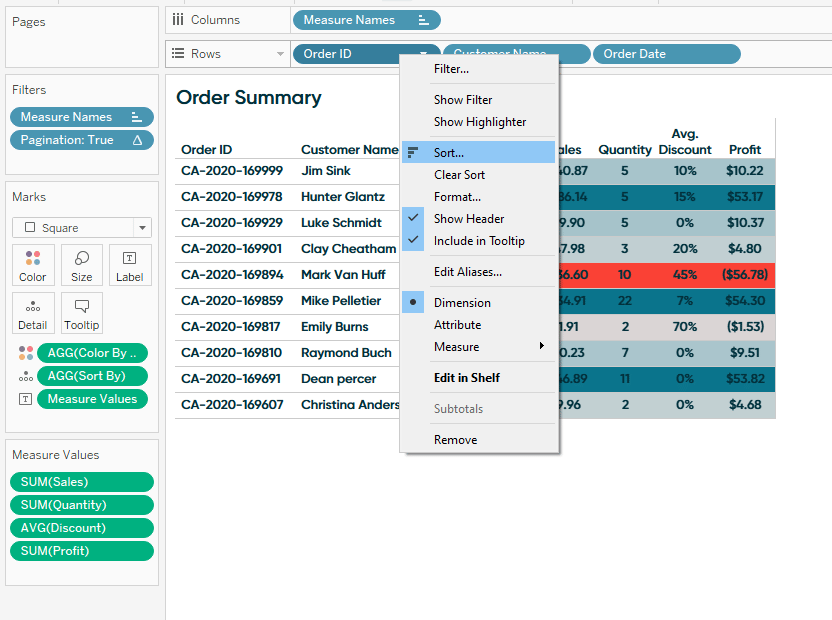
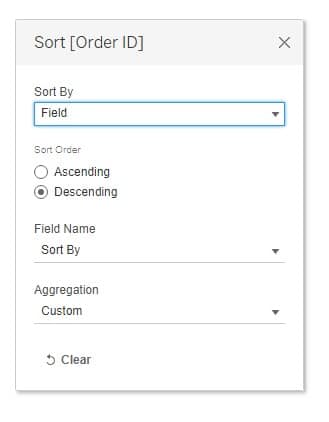
In the pop-up dialog box, I will use the Sort By dropdown and choose Field from the menu. For Sort Order, I will select Descending and for Field Name I will choose the “Sort By” calculated field we just created.
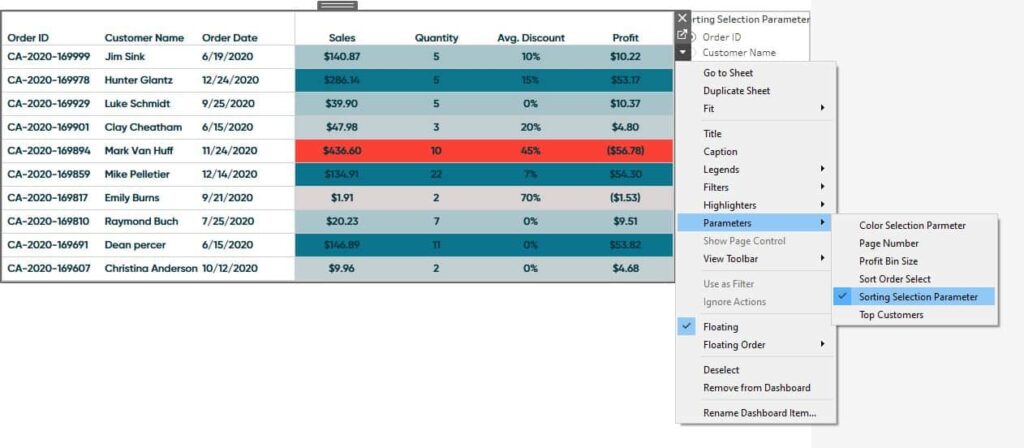
To test out our new custom sort I will navigate back to my dashboard and click on my sheet. There is an arrow option that appears in the border menu, which I will select, then Parameters, then I will select the Sorting Selection Parameter. This will show the parameter control on my dashboard.
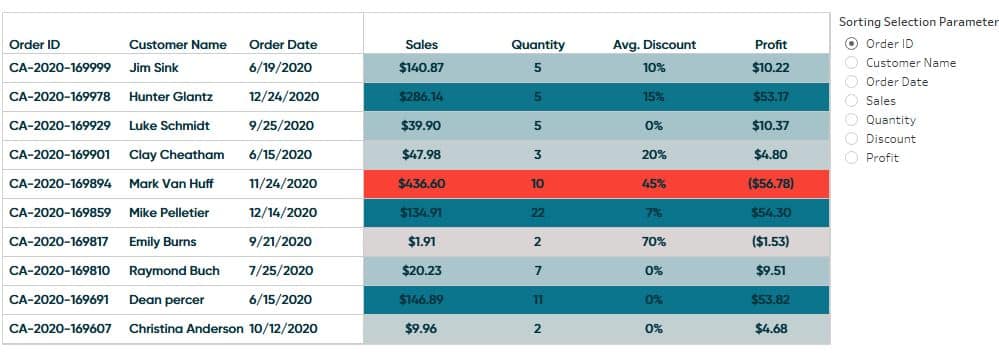
By default, Order ID is selected because that was the first field I added into the parameters list. Looking at our highlight table all looks good so far.
Now Let me change the parameter control to Sales.
Now we are sorting on Sales and it looks as if everything is working the way it should be. However, what if we need to sort Sales in Descending order and Order ID in Ascending order. We can actually make those options available as well.
Because we have converted everything to an aggregate number, all we have to do to change the sort order is add a negative sign next to the calculation in our Sort By calculated field.
How to create descending and ascending sort options
To give the user the option to select between the ascending and descending orders, I want to add that option to our Sorting Selection Parameter. I will right-click the Sorting Selection Parameter and click Edit. I will change “Order ID” to “Order ID Descending” by double-clicking it in the Value column and editing the text. Then I will add a new item to our list called “Order ID Ascending”. To reorder the list, I will click and drag Order ID Ascending and move it to the top under Order ID Descending.
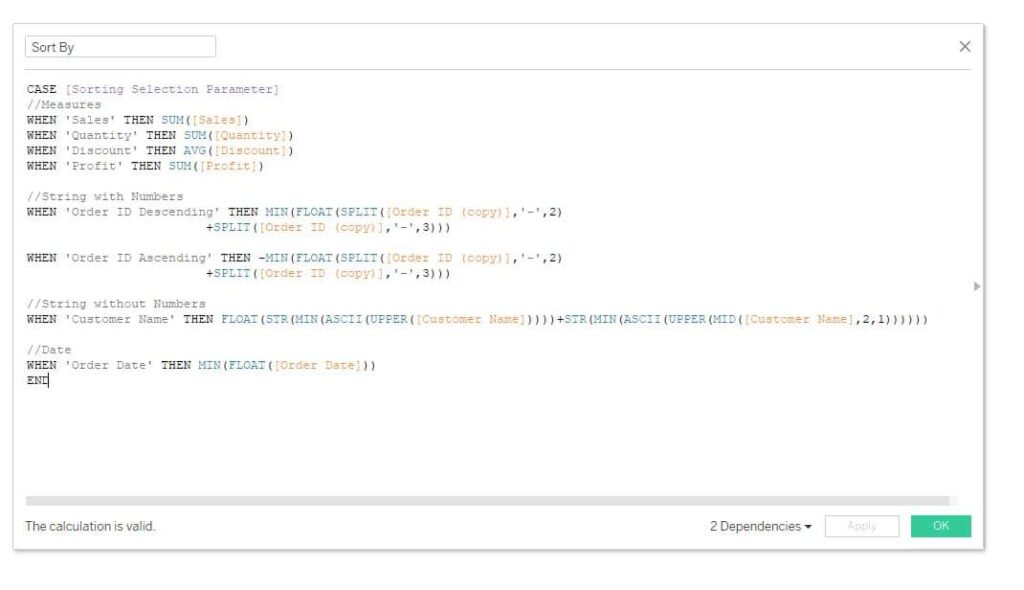
Now we will need to add that option to our Sort By calculated field. To do so, I will right-click the Sort By measure and select Edit. In the dialog box that appears, I am going to copy and paste the code in the String With Numbers section, then change the first WHEN clause to ‘Order ID Descending’, and then copy WHEN clause to ‘Order ID Ascending’. In the Ascending option I will also add a negative sign in front of the aggregation, which leaves me with the following calculation.
CASE [Sorting Selection Parameter]
//Measures
WHEN ‘Sales’ THEN SUM([Sales])
WHEN ‘Quantity’ THEN SUM([Quantity])
WHEN ‘Discount’ THEN AVG([Discount])
WHEN ‘Profit’ THEN SUM([Profit])
//String with Numbers
WHEN ‘Order ID Descending’ THEN MIN(FLOAT(SPLIT([Order ID (copy)],’-‘,2)
+SPLIT([Order ID (copy)],’-‘,3)))
WHEN ‘Order ID Ascending’ THEN -MIN(FLOAT(SPLIT([Order ID (copy)],’-‘,2)
+SPLIT([Order ID (copy)],’-‘,3)))
//String without Numbers
WHEN ‘Customer Name’ THEN FLOAT(STR(MIN(ASCII(UPPER([Customer Name]))))+STR(MIN(ASCII(UPPER(MID([Customer Name],2,1))))))
//Date
WHEN ‘Order Date’ THEN MIN(FLOAT([Order Date]))
END
To test this new calculation, I am going to navigate back to my dashboard and select Order ID Descending from the parameter control.

These results look good. Now let me select Order ID Ascending.
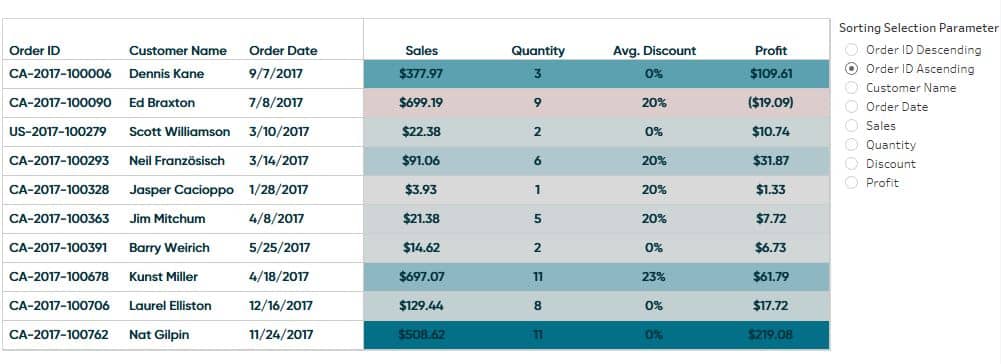
This looks good as well.
![]()
We have created a custom sort that allows the user to choose which measure or dimension to sort on. We have also added a technique to allow the user to choose which sort order they want. Another tactic which would take this one to the next level is using a control sheet to drive the interaction. Check out our related content below if you aren’t familiar with parameter control sheets.
How to Use Control Sheets for Better Parameter Actions
Until Next Time,
Ethan Lang
Director, Analytics Engineering
[email protected]


Written By
Ethan Lang

Graphic Design
Jason Penrod
Director, Information Design
Related Content
How to Change Sort Order with Buttons in Tableau
Sorting marks within bar charts in ascending or descending order is good practice because it allows you to compare not…

Ryan Sleeper
Improve on the ‘gateway’ chart to data visualization Highlight tables help smooth the Excel transition by introducing the preattentive attribute…
Ryan Sleeper
How to sort in ascending, descending, alphabetical, manual order, and more Sorting is a best practice for charts built with…