How to Add a Date Period Notification to a Tableau Dashboard
When you show a date filter or the parameter controls for a start date and an end date, the end user is able to see what dates are being shown on the view. However, these filters / controls are not always shown to the end user (if you have a relative date filter showing the last 30 days, for example). Further, even when the dates are visible, it has been my experience that it’s not always apparent to end users what date range is being included in a dashboard, which is why a date notification in Tableau can be important.
This tutorial will show you how to add a date range notification to a Tableau dashboard. I previously shared how to add a “filter in use” alert to a Tableau dashboard, but this one goes a step further. The following approach will not only alert the end users that the date range is being filtered, but will also communicate what date range is being displayed and how many days are in the selected period.
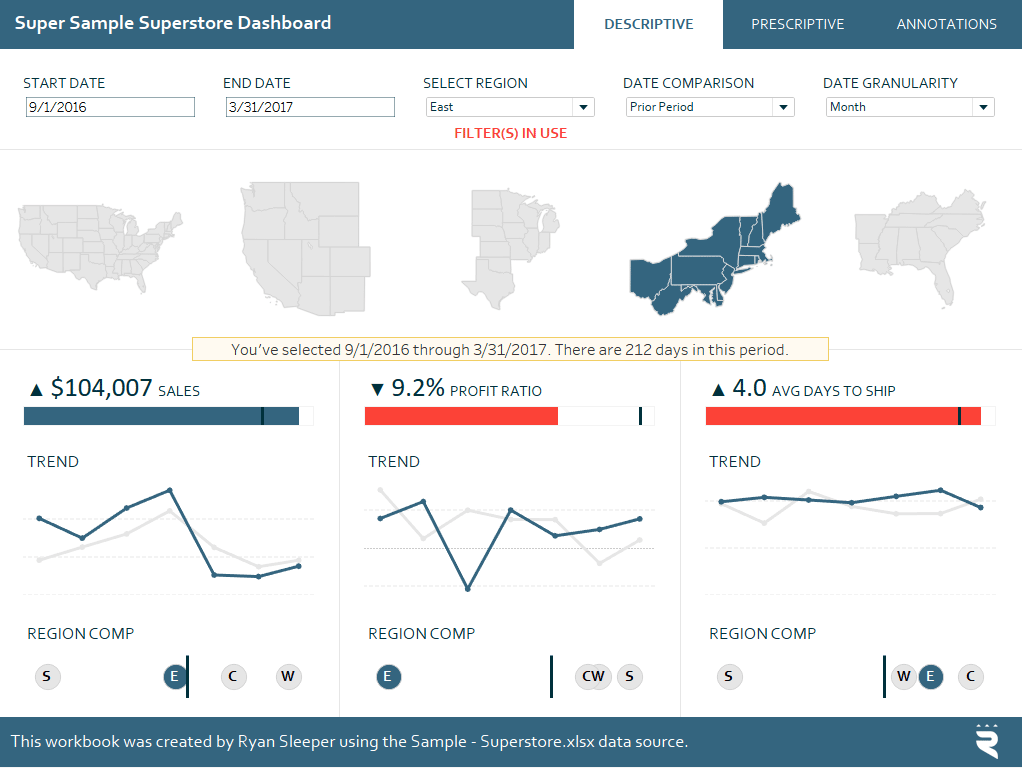
This post will use the Super Sample Superstore dashboard to walk you through adding a date period notification to a Tableau dashboard. The end result will look like this. Note the highlighted band communicating the date range being used as well as the period in days.
This is the third in a series of five “you are here” Tableau tutorials. These tips will help improve the user experience of your Tableau dashboards by helping guide your end users. Subscribe here to receive new updates.
I will be showing how to do this when two parameters are being used to select a date range (one for start date and one for end date). This is often my preferred approach to filtering dates because the parameters can be used in so many different ways for calculations and comparisons. That being said, the steps are very similar if you prefer to use a continuous date filter. To begin, start a new worksheet.
![]()
Continue reading with a free account, or login.
Unlock this tutorial and hundreds of other free visual analytics resources from our expert team.
Already have an account? Sign In
By continuing, you agree to our Terms of Use and Privacy Policy.
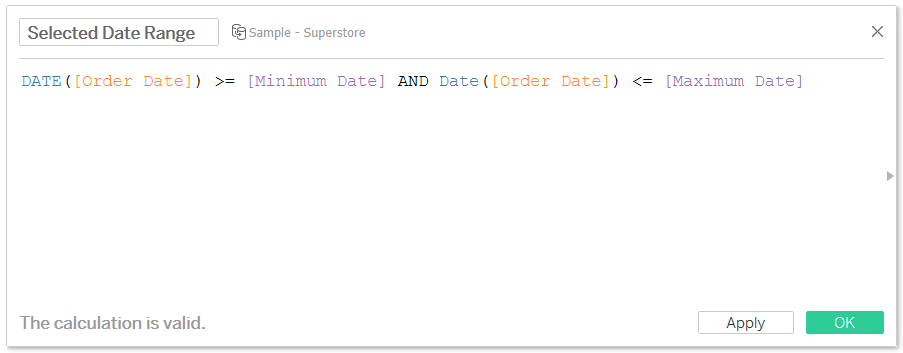
There are a couple of calculations we need. First, a Boolean formula that keeps only dates on or after the “Minimum Date” (i.e. Start Date) and on or before the “Maximum Date” (i.e. End Date). The formula is:
DATE([Order Date]) >= [Minimum Date] AND Date([Order Date]) <= [Maximum Date]
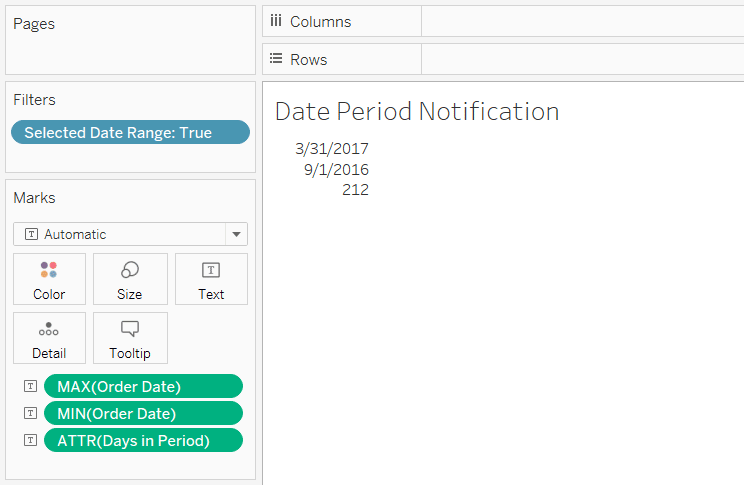
Place the newly created calculated field on the Filters Shelf and keep only the “True” values. To test it out and lay the foundation for our notification, place the Date field being used in your formula onto the Text Marks Card twice; once with an aggregation of MAX and once with an aggregation of MIN. Here’s how my view looks so far:
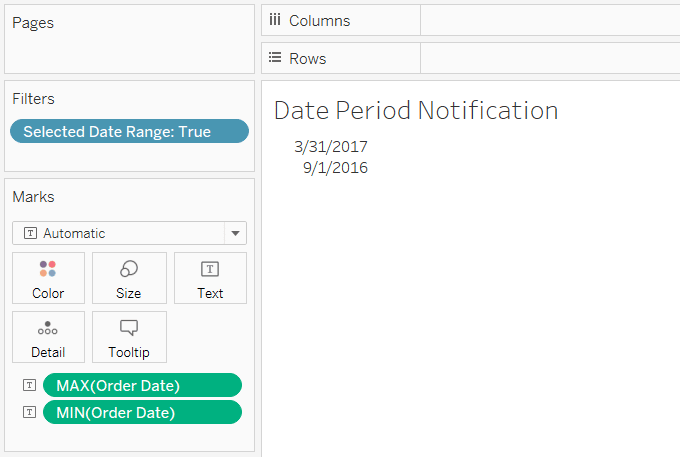
I can tell it’s working so far because the MIN date and MAX date match the Minimum Date parameter (9/1/2016) and the Maximum Date parameter (3/31/2017).
The next calculation is optional, but if you also want to compute the number of days in the selected time period, create a calculated field with this:
DATEDIFF(‘day’,[Minimum Date],[Maximum Date])+1
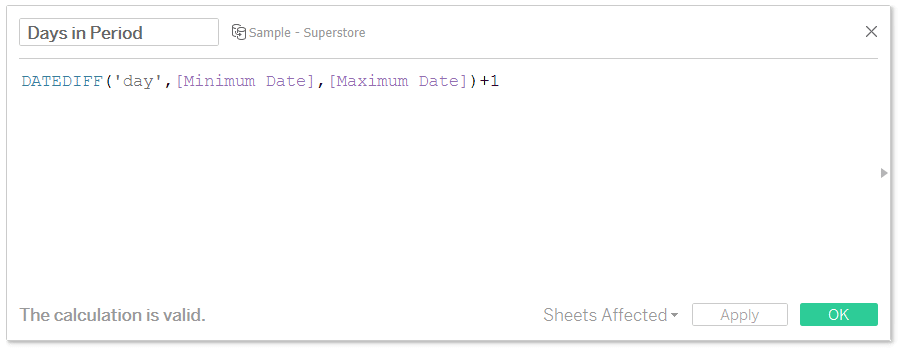
The “+1” at the end of the formula ensures the last day in the period is included in the count. You can also quality check this formula by placing it on the Text Marks Card; just be sure to change the aggregation to Minimum, Maximum, Average, Median, or use Attribute to deduplicate the count and get the correct answer.
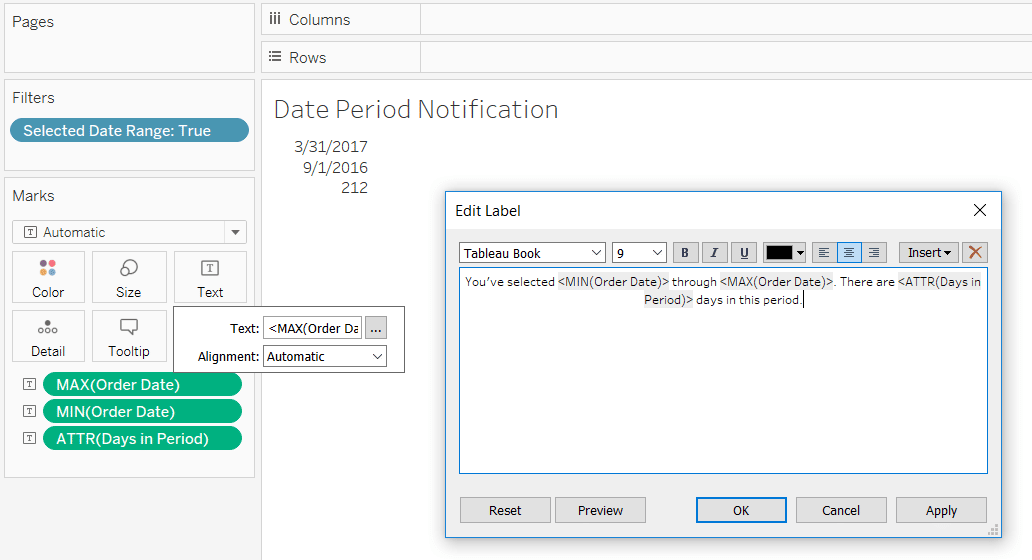
Once all of the “ingredients” for the notification are on the view, we’re ready to format the text. This is accomplished by clicking the Text Marks Card, and clicking the “…” next to “Text:”. Here you can re-order the fields, change the font, and add hard-coded words.
To finalize the view, I will add some formatting to give it a highlight look and feel. These options are all up to you and can be found by right-clicking anywhere in the view and choosing “Format”. Here’s how my completed sheet looks.

Lastly, add this to the dashboard(s) as you wish and you have a date period notification that will update whenever a change is made to the date filters!
Thanks for reading,
– Ryan

Written By
Ryan Sleeper
Related Content

Ryan Sleeper
An easy-to-code friendly reminder Use this simple 4-step tutorial to add a ‘filter in use’ alert to a Tableau dashboard…
An Introduction to Parameters in Tableau
As you make your way through Practical Tableau, see me present, or attend one of my Tableau trainings, there is…
Ryan Sleeper
Automatically Compare Full Days, Weeks, Months, Quarters, or Years Learn a calculated field that (1) looks at today’s date, (2)…