How to Do Better Sheet Swapping with Tableau’s Dynamic Zone Visibility
Tableau’s “Dynamic Zone Visibility” – released with version 2022.3 – promises to be a game changer when it comes to user experience design. This is because you can now toggle entire views on and off by changing the value of a field or a parameter, whether the values are changed via a dropdown or dashboard action. I’m still experimenting and processing all the ways this can improve both the user and author experience, but the first one that came to mind is sheet swapping – a must-have in your repertoire for elegant dashboard design. This tutorial will show you how to do “traditional sheet swapping” in Tableau (sooo 2021…), how to implement dynamic zone visibility to make sheet swapping easier on the author and more user-friendly for stakeholders, and a use case that swaps in a filled map or symbol map depending on the geographic granularity selected.
How to Zoom Into Different Geographies on a Tableau Map
By the end of this tutorial, you will be able to use the dynamic zone visibility feature to do sheet swapping in Tableau.
Traditional sheet swapping in Tableau
To implement either traditional sheet swapping or dynamic zone visibility sheet swapping, you first need sheets to swap. You can swap any and as many views of your choosing, but we will be swapping between a filled map and symbol map for these examples.
While you can technically swap as many sheets as you wish with traditional sheet swapping, a small amount of white space is added for each sheet, which can look unintentional.
Continue reading with a free account, or login.
Unlock this tutorial and hundreds of other free visual analytics resources from our expert team.
Already have an account? Sign In
By continuing, you agree to our Terms of Use and Privacy Policy.
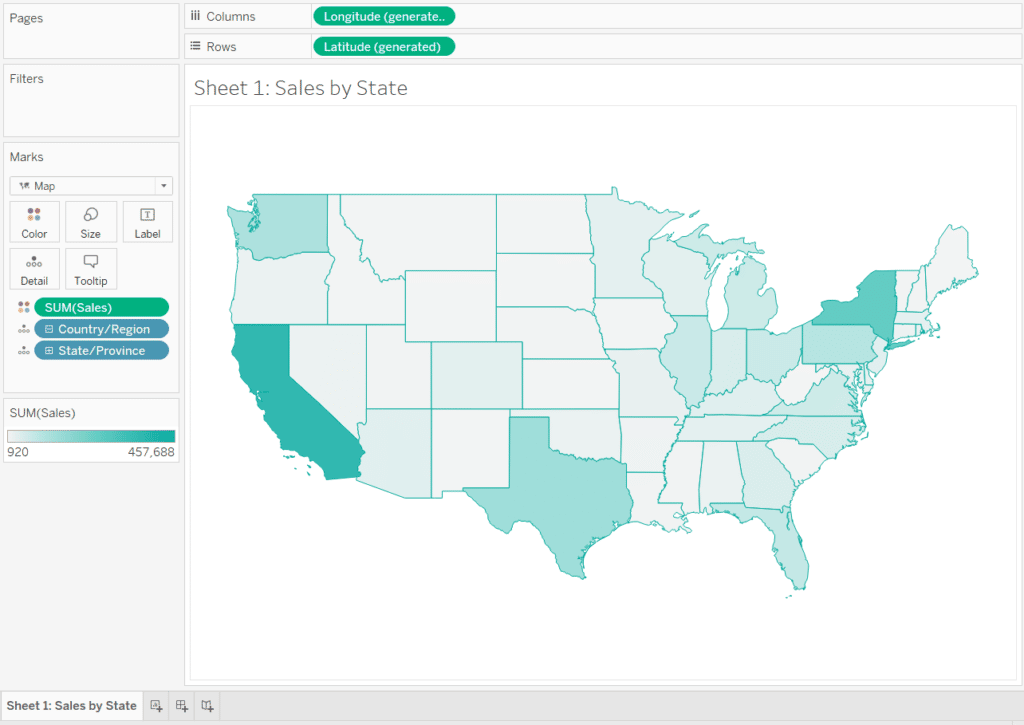
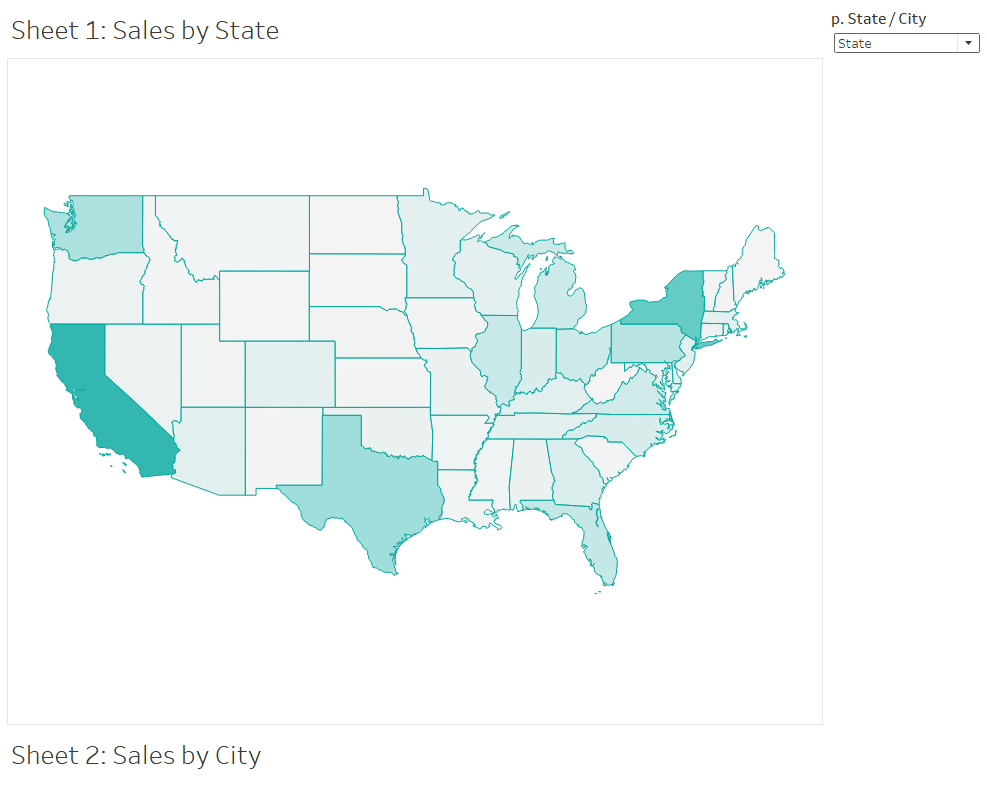
Sheet 1: Filled map, sales by state from the Sample Superstore data
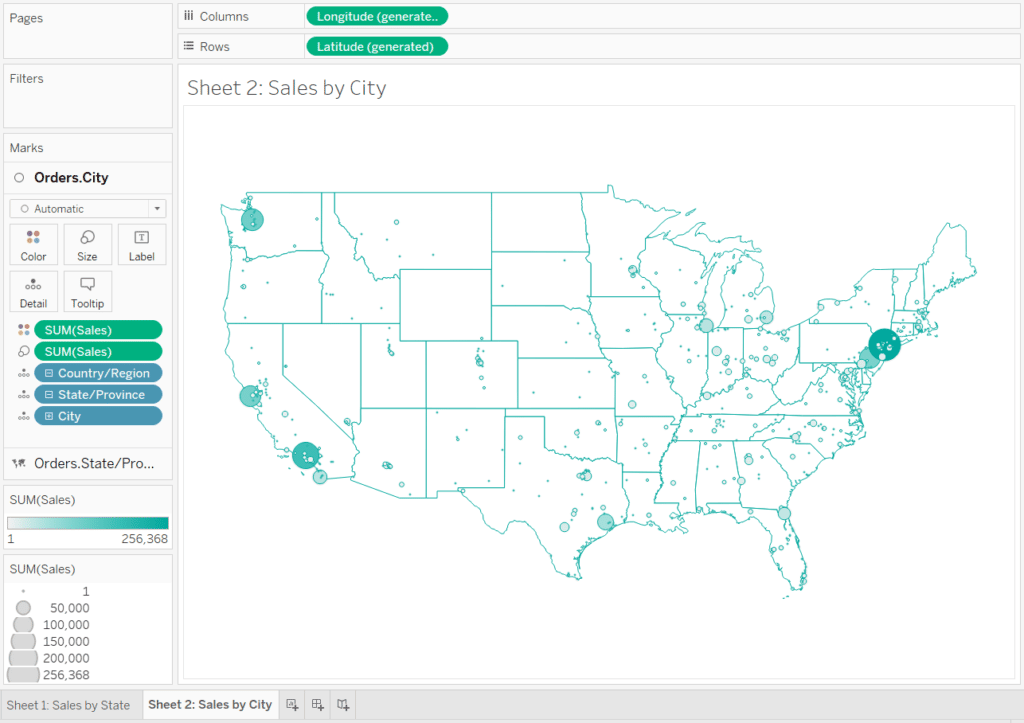
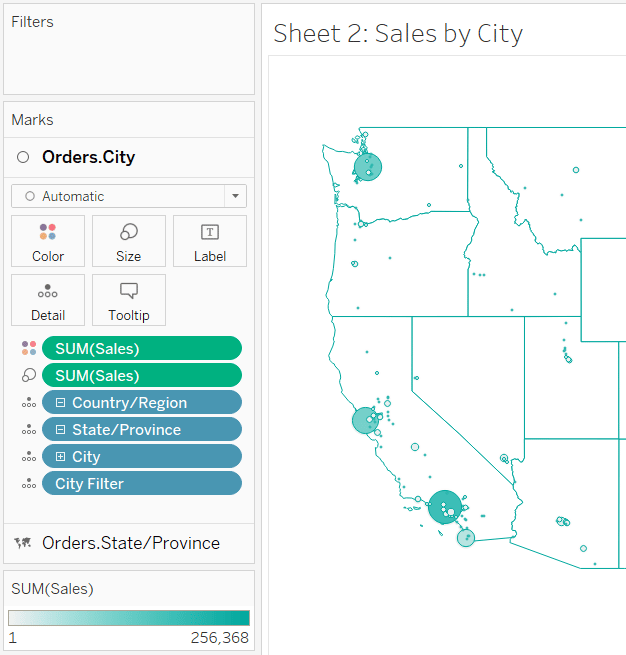
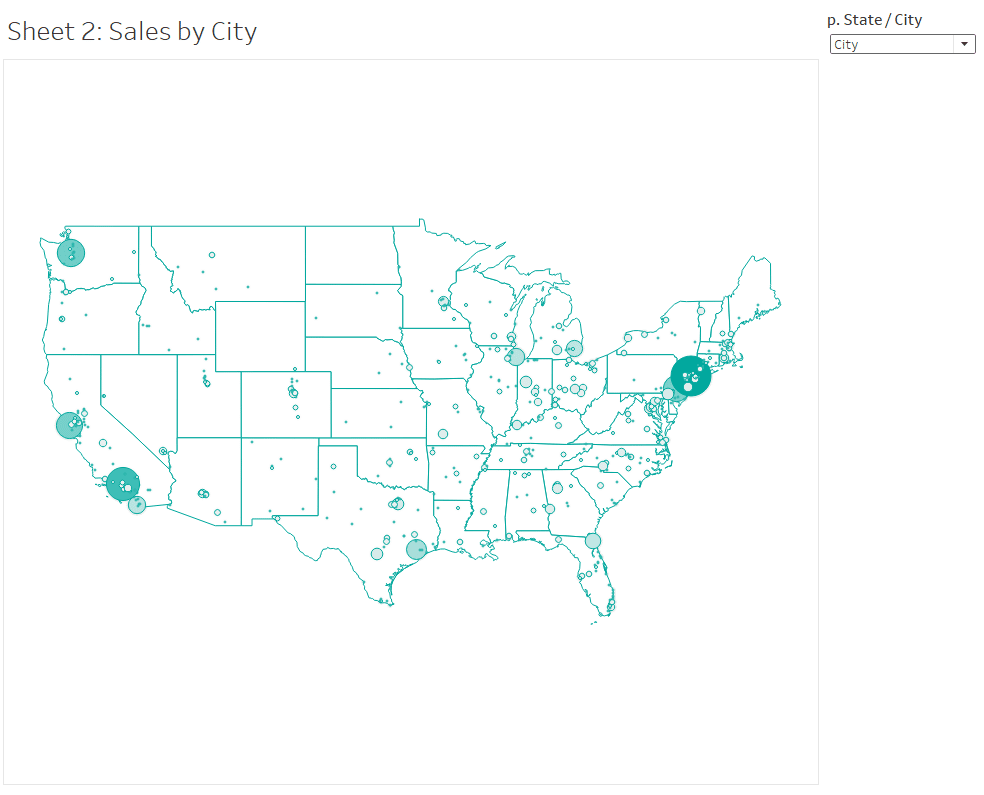
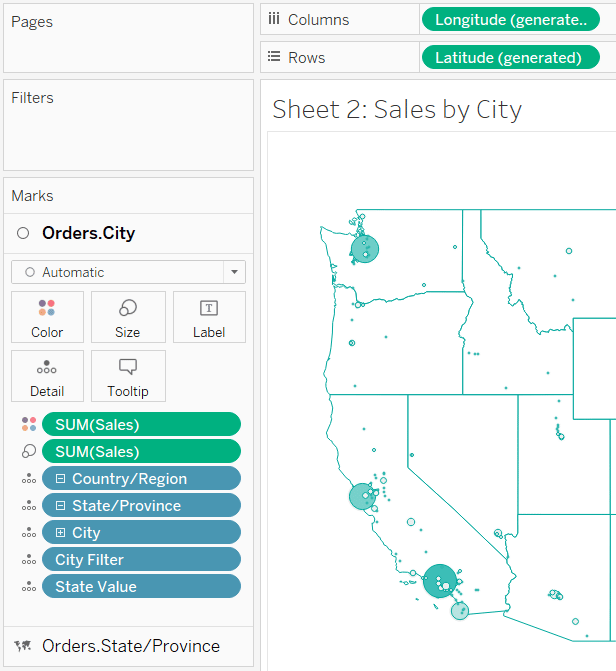
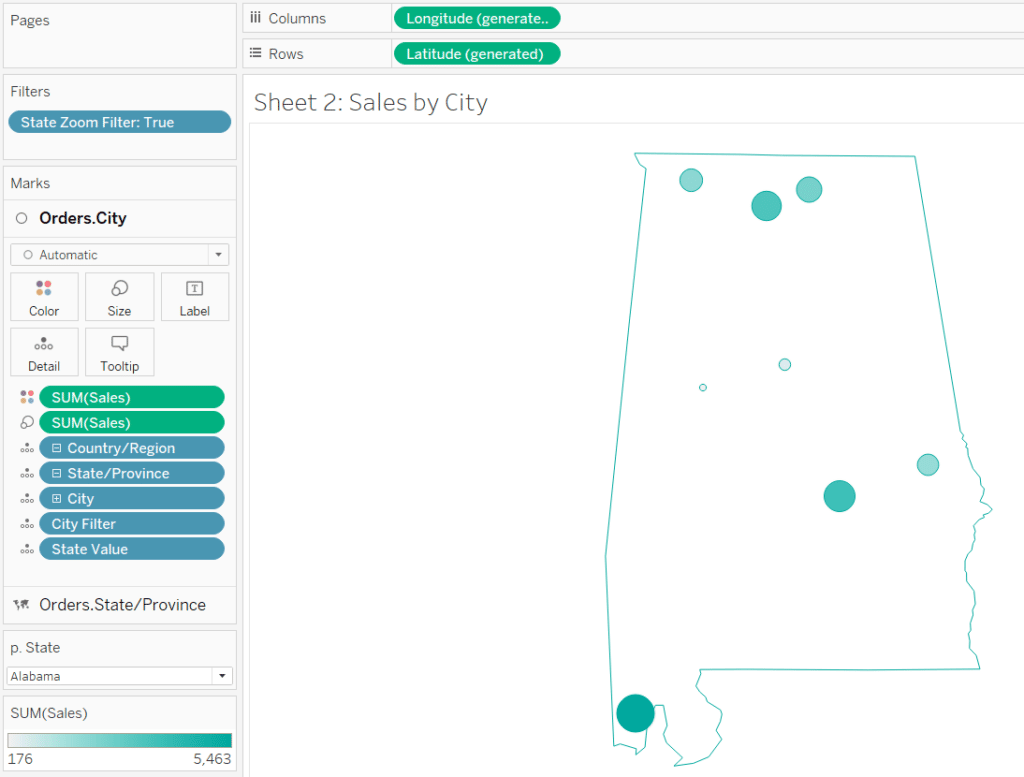
Sheet 2: Symbol map, sales by city from the Sample Superstore data
An Introduction to Mapping in Tableau
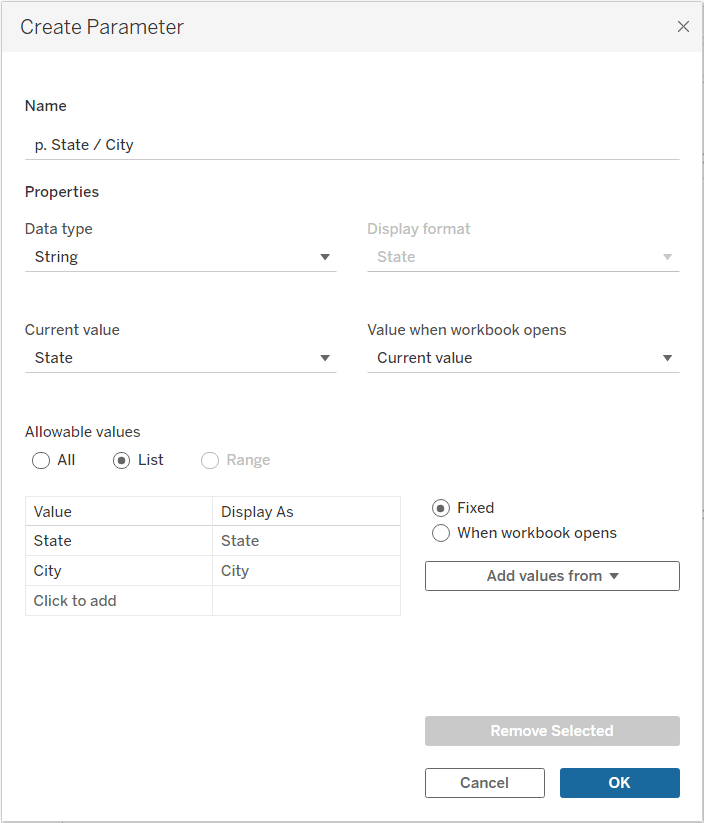
Next, create a parameter that will eventually be used to toggle between the sheets. Here’s an example of a parameter with a data type of String and the allowable values of “State” or “City”.
Next come the key formulas that make both approaches to sheet swapping “go”. We will create a calculated field for each sheet that will eventually only display the sheet when a specific value in the parameter is selected. You can think of these as on / off switches for each sheet.
![]()
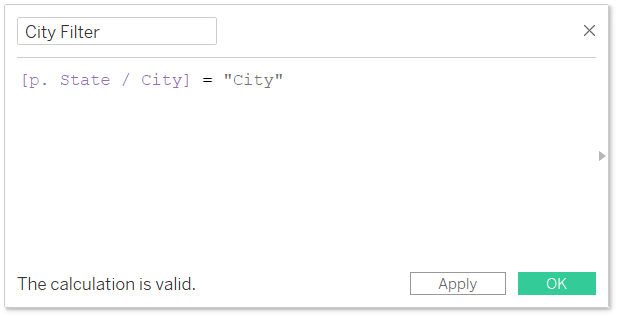
For the State sheet, the calculated field is [p. State / City] = “State”. For your use case, you would replace [p. State / City] with the name of the parameter you created in the last step and replace “State” with whatever allowable value is related to the sheet you want to toggle on and off.
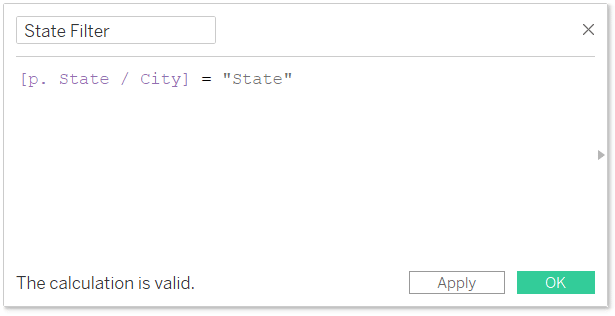
For the City sheet, the calculated field is [p. State / City] = “City”.

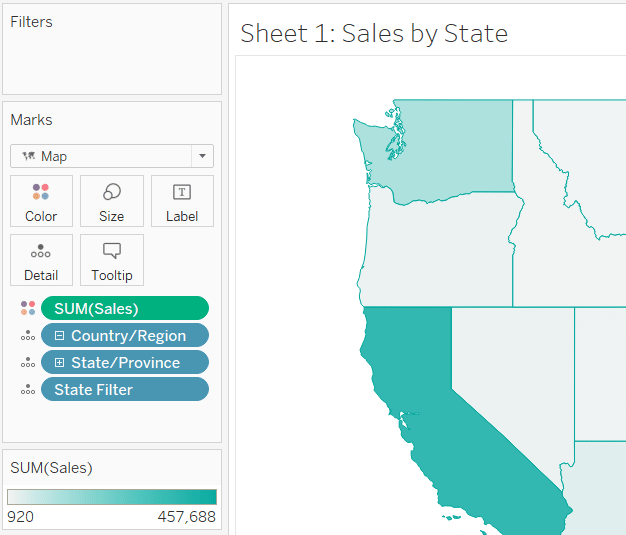
Next, place the respective filters on the Filters shelf of each sheet you want to toggle on and off and choose “True”. For the State sheet, I will place the State Filter calculated field on the Filters shelf and choose “True”.
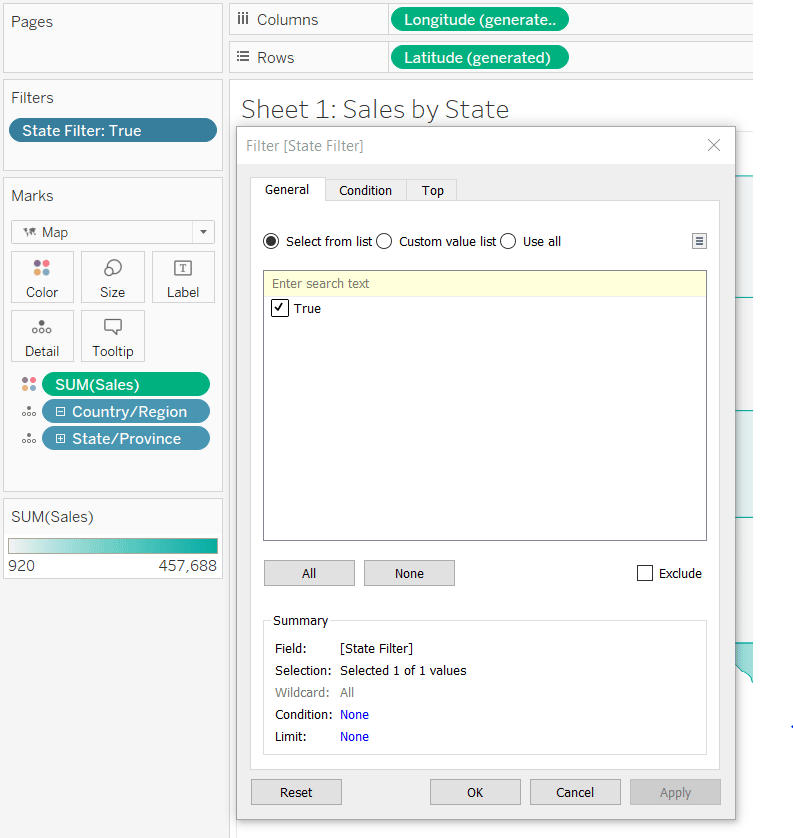
Notice how the only option on the General tab of this filter is True? That’s because the parameter is currently set to “State”, and since the formula for the State Filter calculated field is [p. State / City] = “State”, we’re seeing the outcome, True, as the only option in this filter.
This means that before we can add a similar filter to the Sales by City sheet, we will need to change the current value of the parameter from State to City. To demonstrate, I will show the parameter by right-clicking on it and choosing “Show Parameter”, then change the value in the dropdown from State to City.
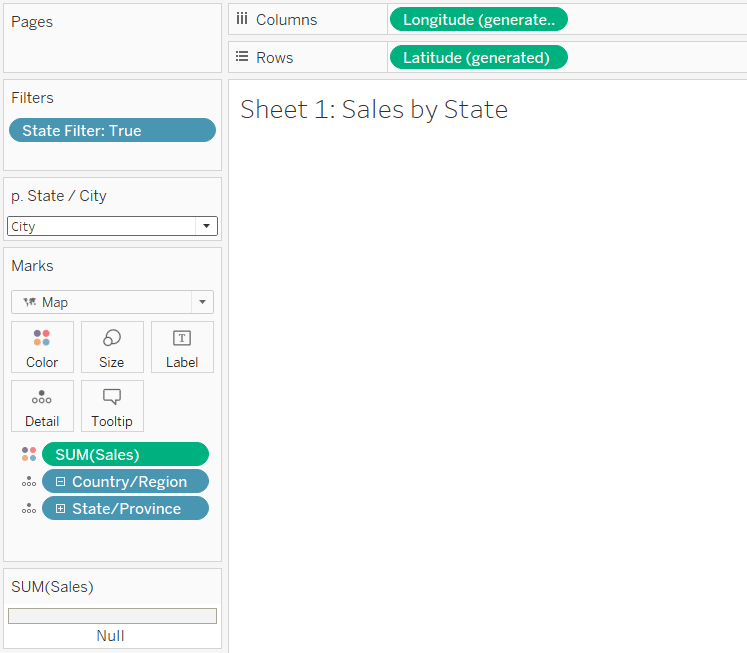
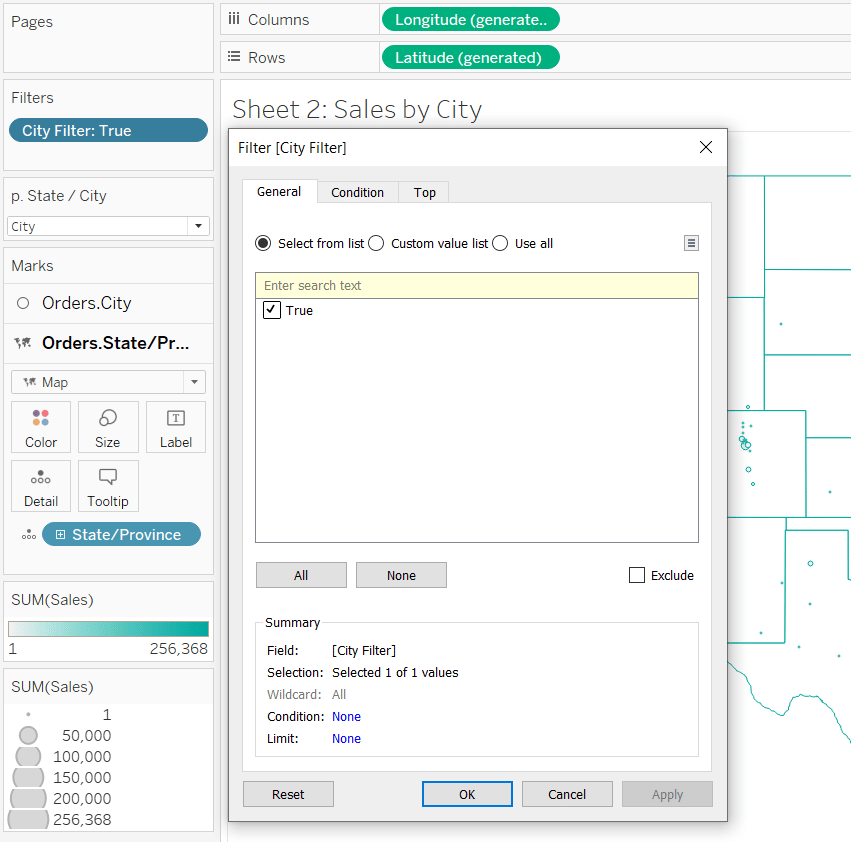
Now that the parameter value is City, the State sheet goes blank. That’s because we added a filter that only displays the State view when the parameter equals State. But now that the parameter value is City, I can add the City Filter calculated field on the Filters shelf of the City sheet and choose “True”. You will do the same thing for every sheet you are using, ensuring you are adding the filter that is linked to the respective allowable value in your parameter.
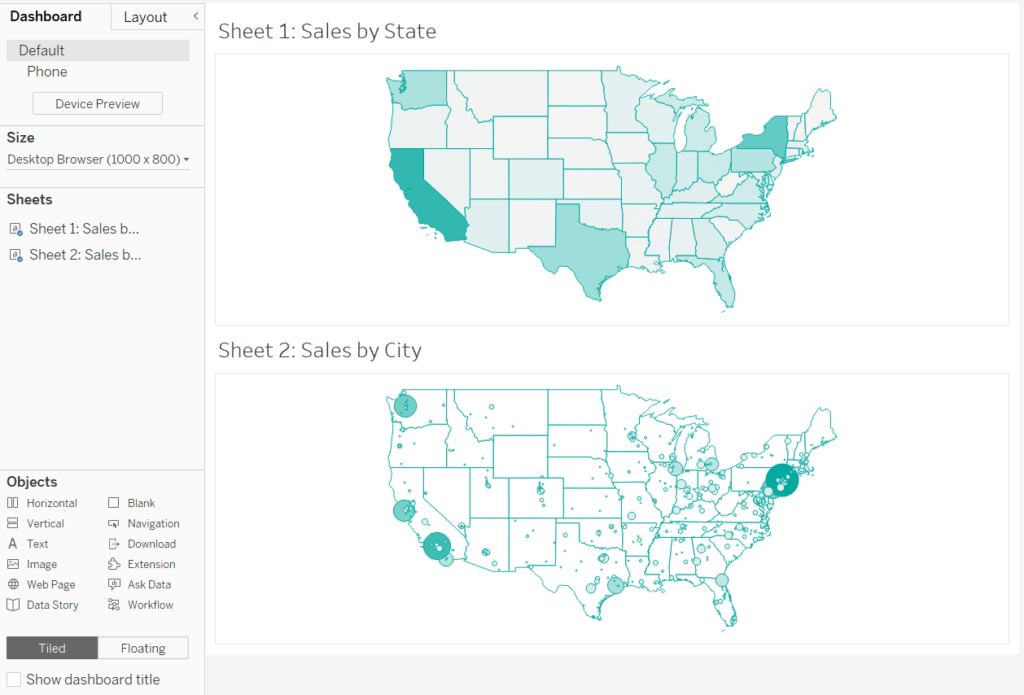
The last step is to place all individual sheets into a layout container on a dashboard. Here is how my view looks after creating a dashboard, adding a vertical layout container by dragging Vertical from the objects on the left to the white space that says “Drag sheets here”, placing the Sales by State and Sales by City sheets into the container, and removing the second container which includes all legends and parameter controls (and which was automatically added).
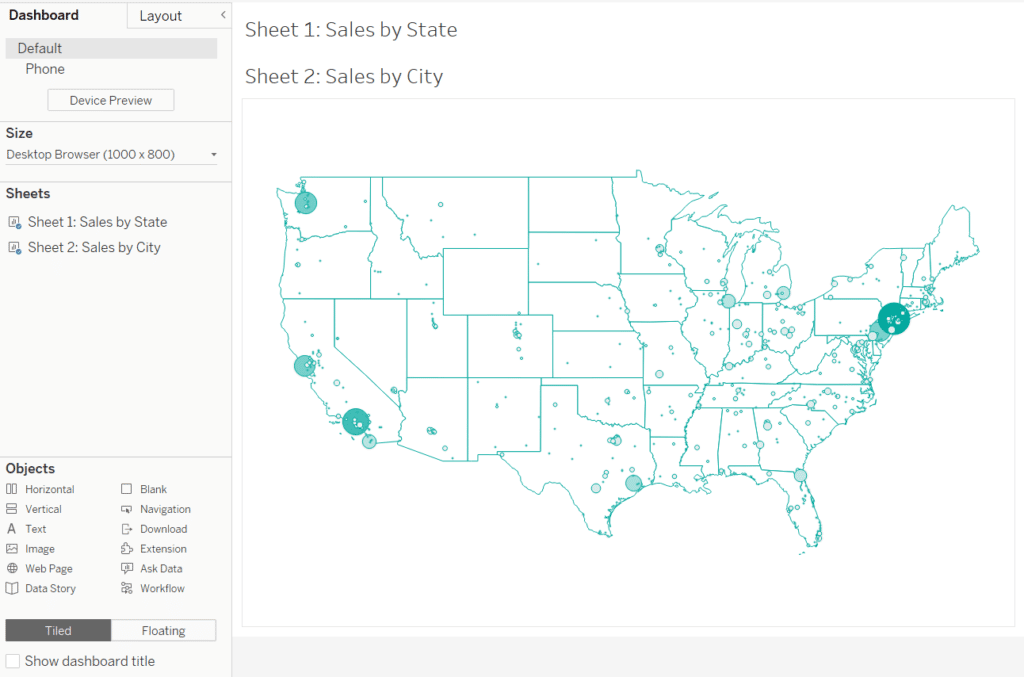
With the City value selected in the p. State / City parameter, only the City view is being displayed within the container. To demonstrate this is working, I will show the p. State / City parameter and change the current value from City to State.
With State selected, the City view goes away, and the State view expands to fill the layout container – traditional sheet swapping in action!
One drawback with traditional sheet swapping is while the views dynamically disappear, their respective titles do not. That’s why it is always recommended to hide sheet titles when using this technique, which you can do by right-clicking on each one and choosing “Hide Title”.
Or better yet, use the new and improved dynamic sheet swapping….
Dynamic zone visibility sheet swapping
As of Tableau version 2022.3, you can skip a couple of steps needed with traditional sheet swapping and, more importantly, improve the user experience of sheet swapping, by using a feature called Dynamic Zone Visibility.
The first three steps are the same as described earlier with traditional sheet swapping.
First, create all of the sheets that you want to eventually toggle and off. I will be using the same two, Sales by State and Sales by City, for this example.
Second, create a parameter with an allowable value that is related to each individual sheet. I will use this same p. State / City parameter, which contains one allowable value for each of my two sheets. Remember, you can do this with as many sheets / allowable values as you need.
Third, create a calculated field for each sheet that you want to toggle on and off. The formula for each is the name of the parameter created in step 2 equals the allowable value related to the sheet that you want to toggle.
For my Sales by State sheet, I will create a calculated field with the formula [p. State / City] = “State”.

For my Sales by City sheet, I will create a calculated field with the formula [p. State / City] = “City”.
Where dynamic sheet swapping begins to diverge from traditional swapping is instead of placing the calculated fields created during the third step onto the Filters shelf of each sheet, you place them on the Detail property of the Marks card for each sheet.
For my Sales by State sheet, I will place the State Filter calculated field on the Detail property of the Marks card.
For my Sales by City sheet, I will place the City Filter calculated field on the Detail property of the Marks card.
The first improvement with dynamic sheet swapping is we did not have to change the current value of the parameter before adding the respective filters to the sheets.
Next, place each sheet that you want to toggle on and off onto a dashboard. For best results and to allow the individual sheets to individually scale to fill all available white space, I still recommend placing the sheets into a vertical layout container with this new feature.
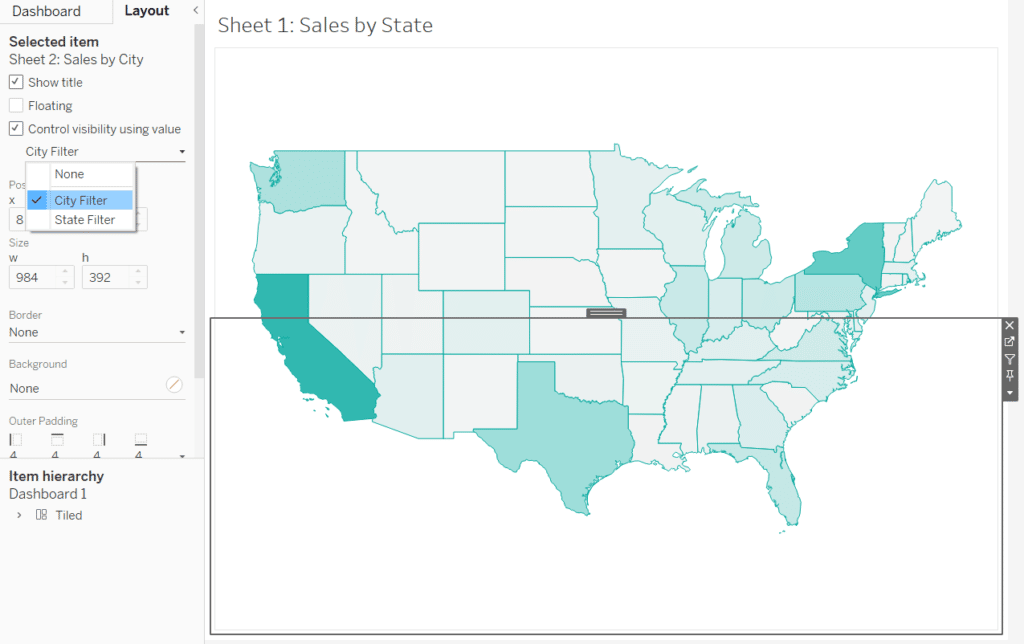
To control when each sheet is being shown using the new Dynamic Zone Visibility feature, select an object by clicking on it and navigate to the Layout pane within the Dashboarding interface.
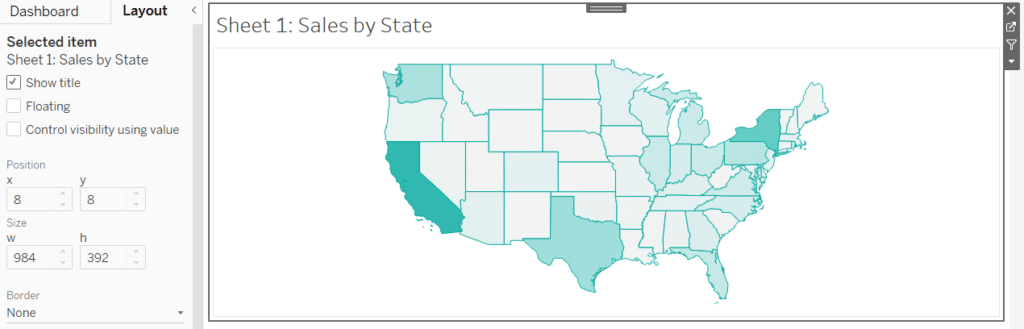
Here you will see a new option as of Tableau 2022.3 called “Control visibility using value”. If I turn that on by checking the box next to its name, then click the dropdown and select State Filter, the Sales by State sheet that I’ve selected will only appear when the current value of the p. State / City parameter is State.
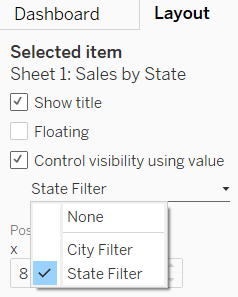
I haven’t seen anything change yet because the current value of the parameter was already State, but if I do the same thing for Sheet 2: Sales by City, setting the Dynamic Zone Visibility to City Filter, the second sheet will disappear until the current value of the parameter is changed.
We now have sheet swapping working with Dynamic Zone Visibility! If I show the p. State / City parameter and change the current value to City, the State sheet disappears and the City sheet fills all the white space within the layout container.
Another advantage to dynamic sheet swapping compared to traditional sheet swapping is you can keep the sheet titles because the entire sheet, including the title, is toggled on or off with this approach. Lastly, one more benefit of this technique is there is no extra white padding added within the layout container, meaning you can scale this type of sheet swapping to include as many sheets as you need.
This is all great, but wouldn’t it be even better if we could swap the sheets when the view is clicked instead of using a parameter dropdown?
Learn how in the next section with dummy values for better parameter actions….
Use case: Using dynamic zone visibility for geographic drilldown
We can theoretically swap these sheets without changing the value within the dropdown list of allowable parameter values, but only if we can pass the values of “State” or “City” via a parameter action.
Unfortunately, the Sample Superstore dataset does not have a field containing a single value of “State” or “City”, so let’s make one!
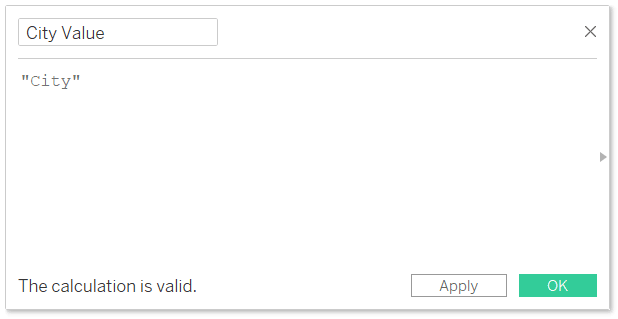
If you ever need to pass a specific value to a parameter using a parameter control, simply create a calculated field called “[Value you are using] Value” and type the value within quotation marks. Here is how my State Value calculated field looks.

I will do the same thing for the City value.
Now here’s where this trick gets interesting. If I want the view to swap to the City sheet when a state is clicked on the State sheet and the view to swap to the State sheet when a city is clicked on the City sheet, I need to place the City Value calculated field on the State view and the State Value calculated field on the City view.
That’s a mouthful, so here’s a screenshot. I will place the City Value calculated field on the Detail property of the Marks card within the Sales by State sheet.
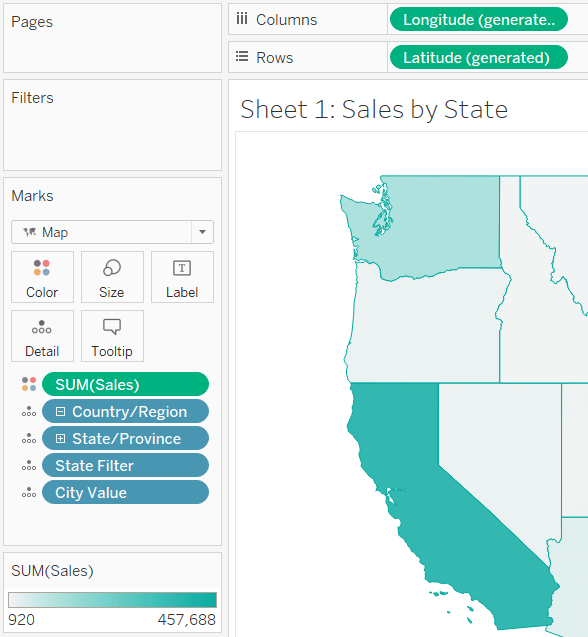
I will also place the State Value calculated field on the Detail property of the Marks card within the Sales by City sheet.
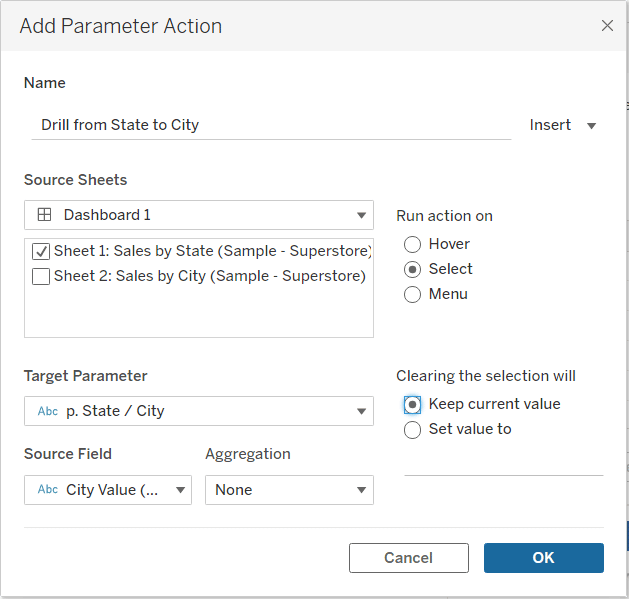
I will now pass each of these values to the p. State / City parameter with two different parameter actions. For the first, I will click Dashboard > Actions in the top navigation, choose “Add Action”, and click “Change Parameter”.
How to Use Tableau Parameter Dashboard Actions
Within this interface, I will target the p. State / City parameter and pass the City Value field. By placing the City Value field on the Detail property of the marks card in the last step, the value of “City” appears on every mark. This means when I click any state, the value of “City” will be passed to the p. State / City parameter, swapping the state view to the city view!
I must add one more parameter action for the Sales by City sheet to be able to zoom both from State to City and City to State.

At this point, I have dynamic sheet swapping that is being controlled with parameter actions, and I no longer need the parameter dropdown. When I click anywhere on the Sales by State map, the view will zoom into the Sales by City map. When I click anywhere on the Sales by City map, the view will swap in the Sales by State map, zooming back out.
To make this as user-friendly as possible, I will conclude this tutorial by making the State to City zoom state-specific. Meaning that whatever state is clicked in the Sales by State view will be the specific state being shown when the Sales by City view is swapped in.
![]()
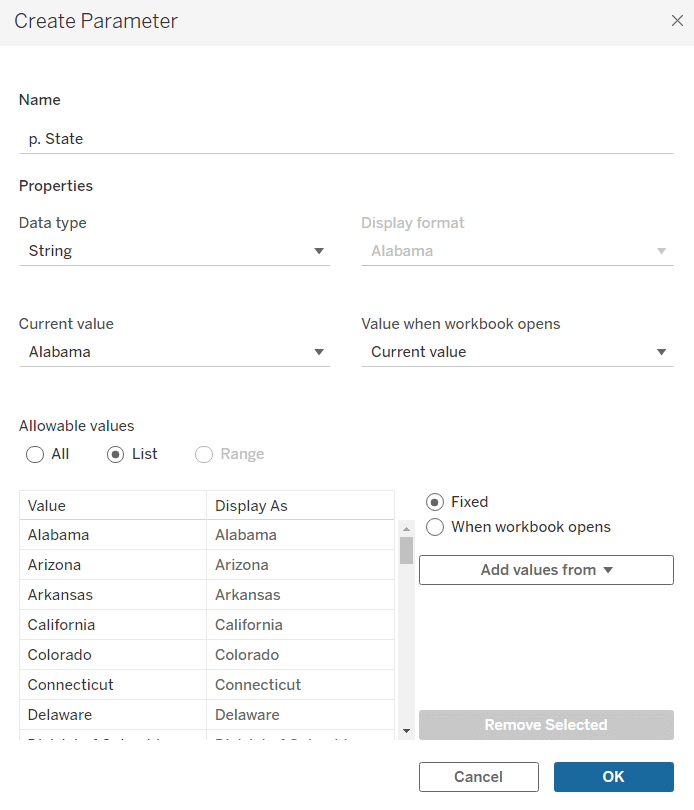
To do so, navigate to the Sales by City view and create a parameter containing all state names as the allowable values. The easiest way to do this is to right-click on the State dimension within the Data pane, hover over Create, and choose Parameter. This is a shortcut that creates a parameter with the same data type as the dimension and pre-populates the list of allowable values with the dimension members from the dimension it was created from.
Next, create a calculated field with the formula “[p. State] = [State]”.
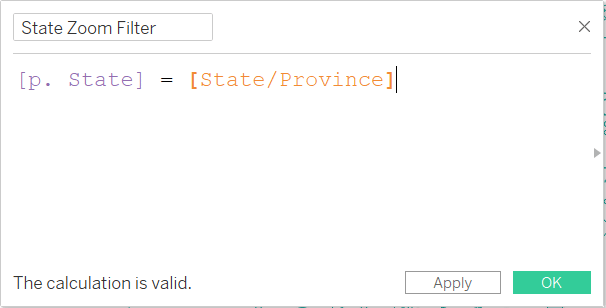
This creates a Boolean filter, so after you place it onto the Filters shelf of the Sales by City sheet and choose True, only the state matching the current value of the parameter will be displayed.
And lastly, to hook this up on the dashboard, we need to add one more parameter action that passes a state value to the p. State parameter whenever a state is clicked on the Sales by State sheet.
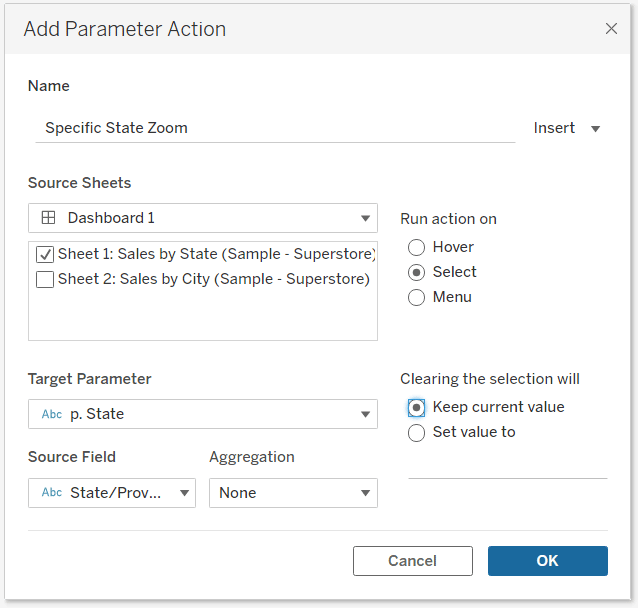
Now, when you click any state, both the state name and the dummy “State” value are passed to their respective parameters, swapping in the City sheet and filtering to the state that was clicked on! Then clicking anywhere within the Sales by City view passes the dummy “City” value to the p. State / City parameter, which swaps in the State view.
Thanks for reading,
– Ryan


Written By
Ryan Sleeper
Related Content
How to Do Advanced Dynamic Zone Visibility in Tableau

Released with version 2022.3, Dynamic Zone Visibility is a relatively new feature in Tableau. In a previous post, Playfair Data…
How to Let Users Choose Between Chart Types in Tableau
Data visualization allows you to look at the same data in different ways often leads to new insights (or storylines,…

Ryan Sleeper
Control any parameter actions scenario with a second data source One drawback to parameter actions is the value you want…