How to Use Secondary Data Sources for Tableau Parameter Actions

In this post you will learn how to connect to a secondary data source and use it for easier parameter actions in Tableau. Implementing this tactic in your dashboards creates a great user experience and lessens the need for drop down menu boxes. This tactic has many applications, but I’ll start by showing you how to use it to allow users to select measures and date parts.
How to Use Control Sheets for Better Parameter Actions
Creating a secondary data source for parameter actions
By the end of this post, you will be able to create a secondary data source that allows you to create control sheets to change the measure values and date part being used on a line graph in Tableau.
To start us off I have connected to the Sample – Superstore dataset and created a line graph. I have also created two Parameters that allow the user to choose which measure they want to analyze and what date part they want the data displayed. If you are unfamiliar with these tactics, I encourage you to check out the links to our related content below.
How To Use Parameter Actions To Change Date Parts In Tableau
How To Allow Users To Choose Dimensions And Measures In Tableau
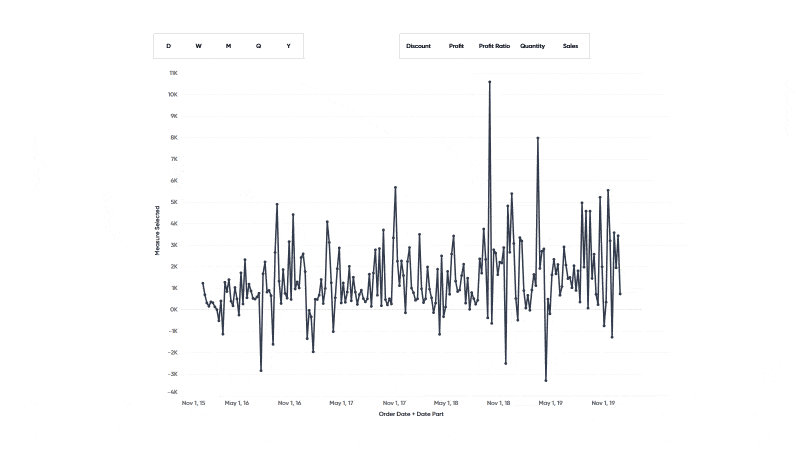
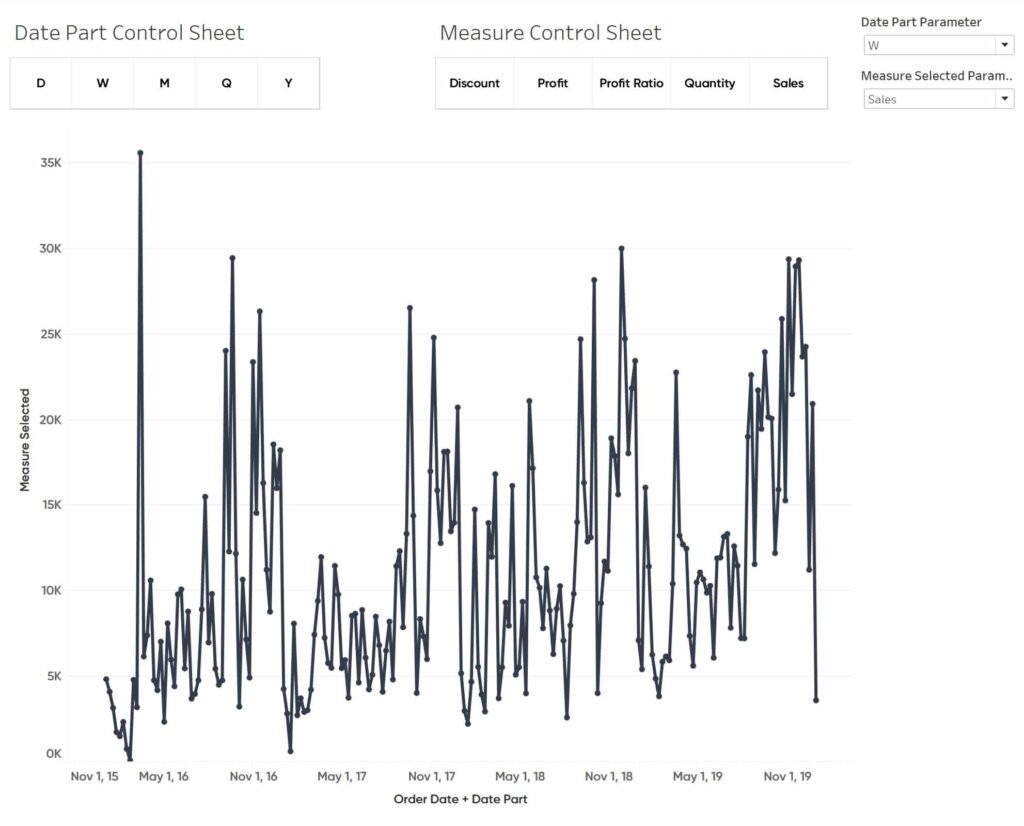
Currently I have Quantity chosen and a date part of month selected. To demonstrate this setup, I am going to choose Sales from our Measure Selected Parameter Control and then I will choose week from the Date Part Parameter Control.
As you can see, the x-axis is now displaying data on a weekly cadence and my y-axis updated to reflect our Sales data.
![]()
Both of these tactics were done using parameters and these tactics have become even more robust with the introduction of parameter dashboard actions. Parameter dashboard actions allow the user to overwrite the current value by clicking different buttons from the dashboard.
However, one big drawback with parameter actions is the value has to be somewhere on the dashboard in order to overwrite the current value in the parameter.
If you’re working with measures it’s easier to get around this because you can just make a chart that has the values of those measures and add that sheet to your dashboard.
Continue reading with a free account, or login.
Unlock this tutorial and hundreds of other free visual analytics resources from our expert team.
Already have an account? Sign In
By continuing, you agree to our Terms of Use and Privacy Policy.
How To Use Measure Names In Tableau Calculated Fields
This is not so easy when working with dimensions or anything text based. For example, I don’t have a dimension that contains the values of my date parts to pass into the Date Part Parameter.
To overcome this challenge, we can set up a control sheet as a secondary data source and create these values on the fly. This is possible due to the nature of a parameter. In Tableau, a parameter is the only field that can be shared across multiple data sources. As I add a second, third, fourth data source, I can pick up and use those same parameters I created across them all.
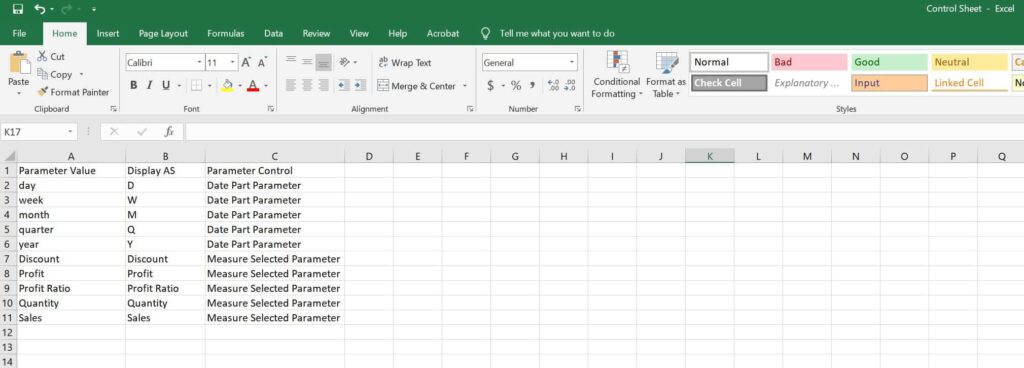
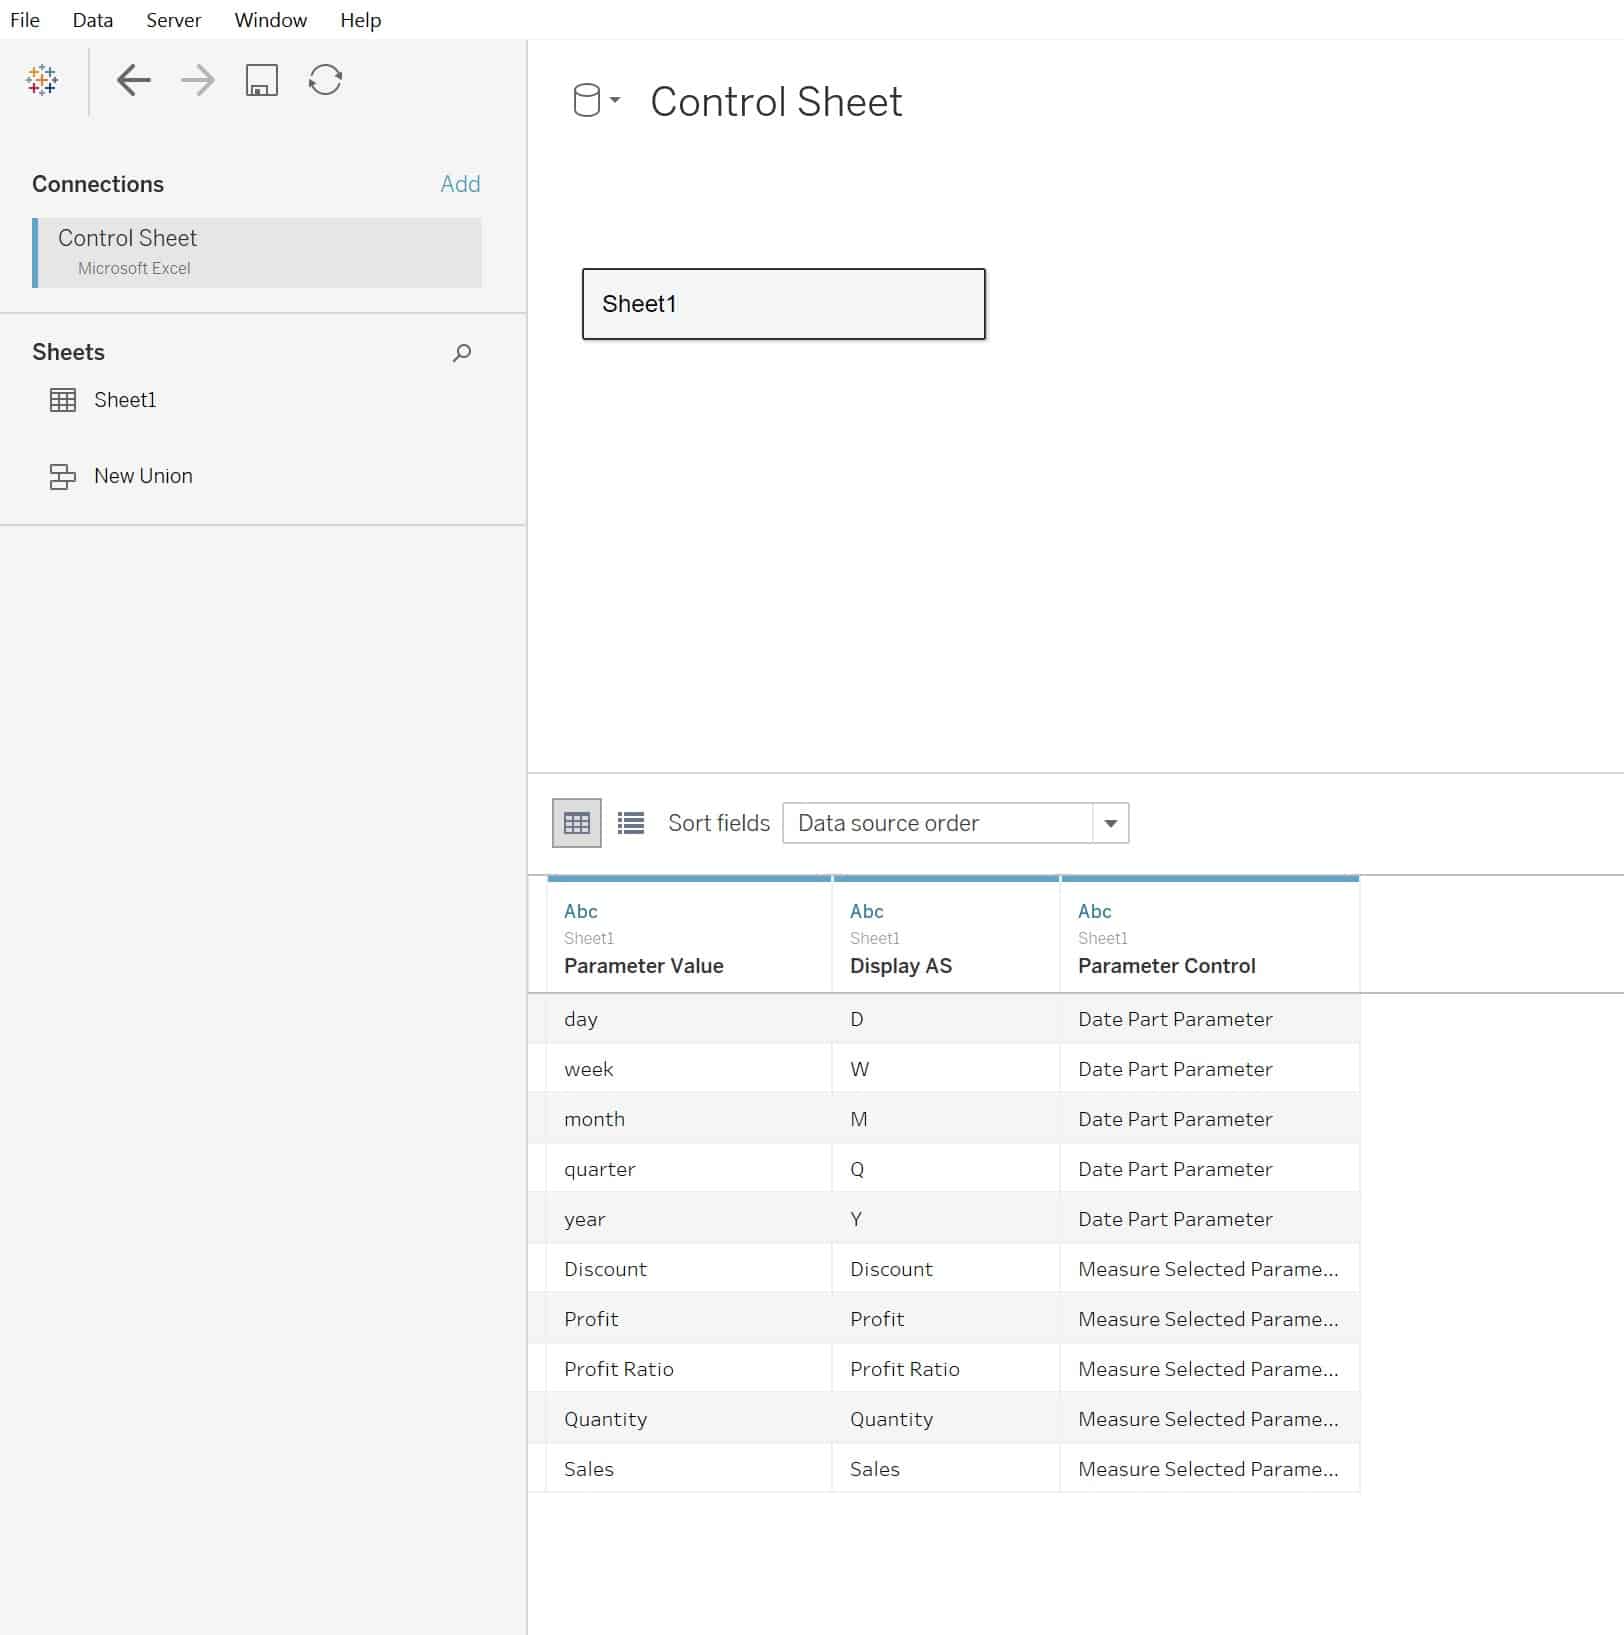
Now let’s open Excel and create our control sheet by adding three column headers: Parameter Value, Display As, and Parameter Control. There are a few important things to note before we start inputting the values in our control sheet. First, when working with date parts, in particular, we have to be aware that the DATETRUNC function we will use later only works when the values you pass in the date part section of that function are lowercase. Second, the parameter values and display as values we enter here should match the structure we originally set up when creating the parameters in Tableau.
The values in the ‘Parameter Value’ column will be the value that is passed to the parameter to overwrite the current value. Here you will note that I used the lowercase date part values. The next column ‘Display As’ are the values that will be displayed as buttons on the dashboard. You can change the Display As values to anything that would resonate with your users. Last, the ‘Parameter Control’ column will be a filter we will use in Tableau to display only relevant values to the user for each control sheet we will create.
I will input my values in the corresponding columns, save this Excel file to my computer, and title it Control Sheet.
With the control sheet created, let’s go back to Tableau and connect to it as a new data source. I’ll click “Data” from the options at the top of the interface, select new data source, and choose Microsoft Excel from the options.
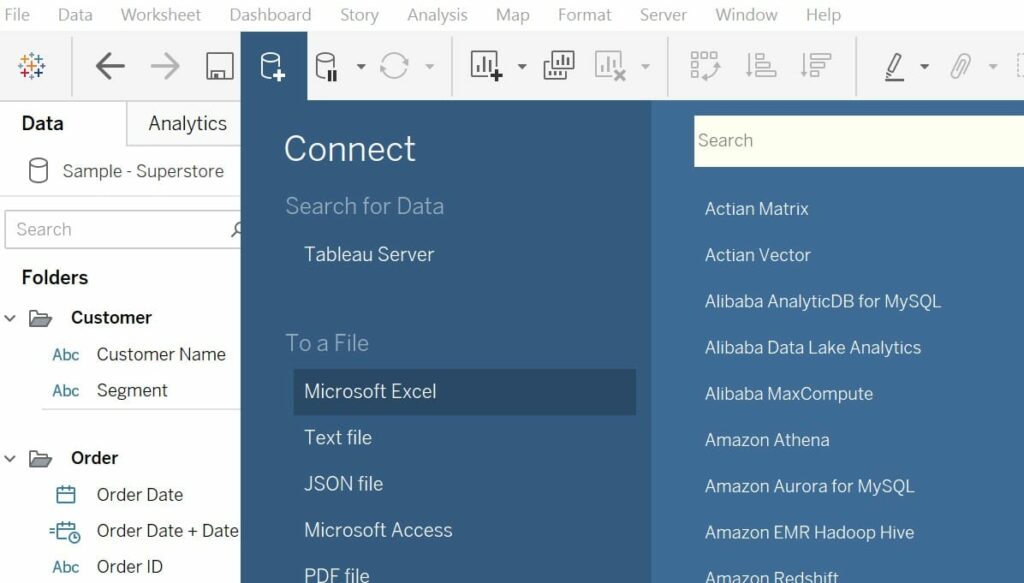
I will select Control Sheet from my files and will Title the data source “Control Sheet”.
How to create a parameter control sheet in Tableau
With the connection complete, I will create a new sheet and begin making our control sheets.
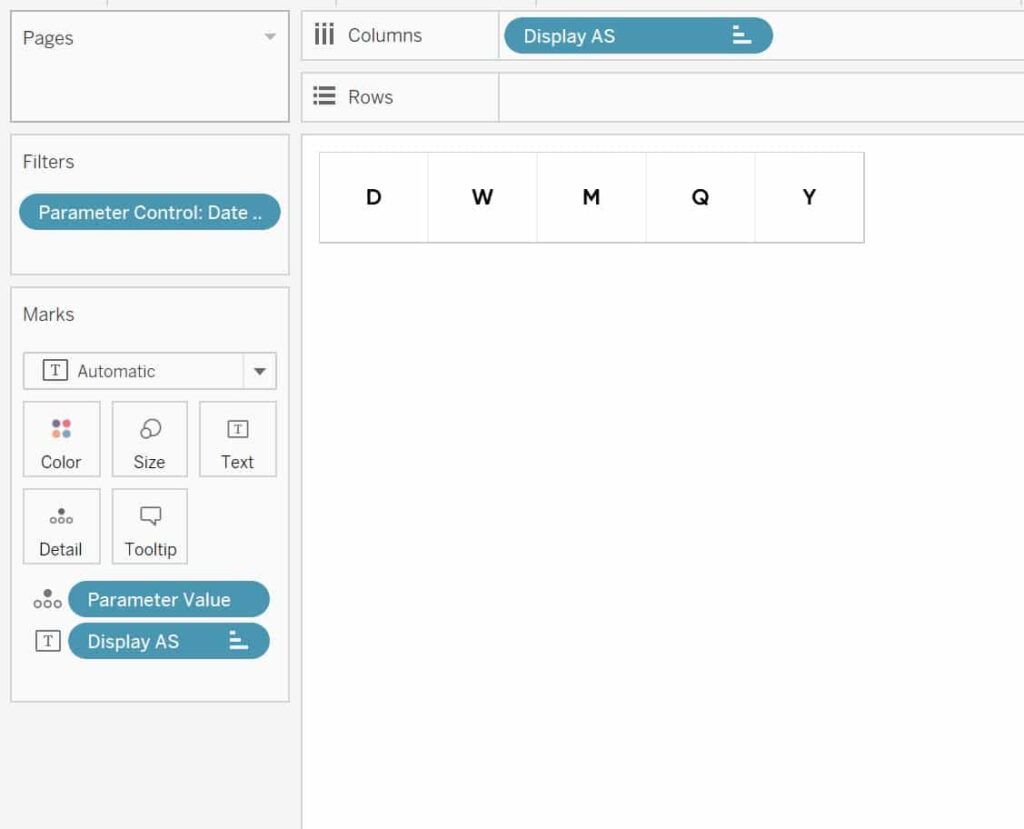
I will start with the date part control sheet by adding Display As to the Columns Shelf, Display As to the Text Marks card, Parameter Control to the Filters Shelf, and then select Date Part Parameter as the filter.
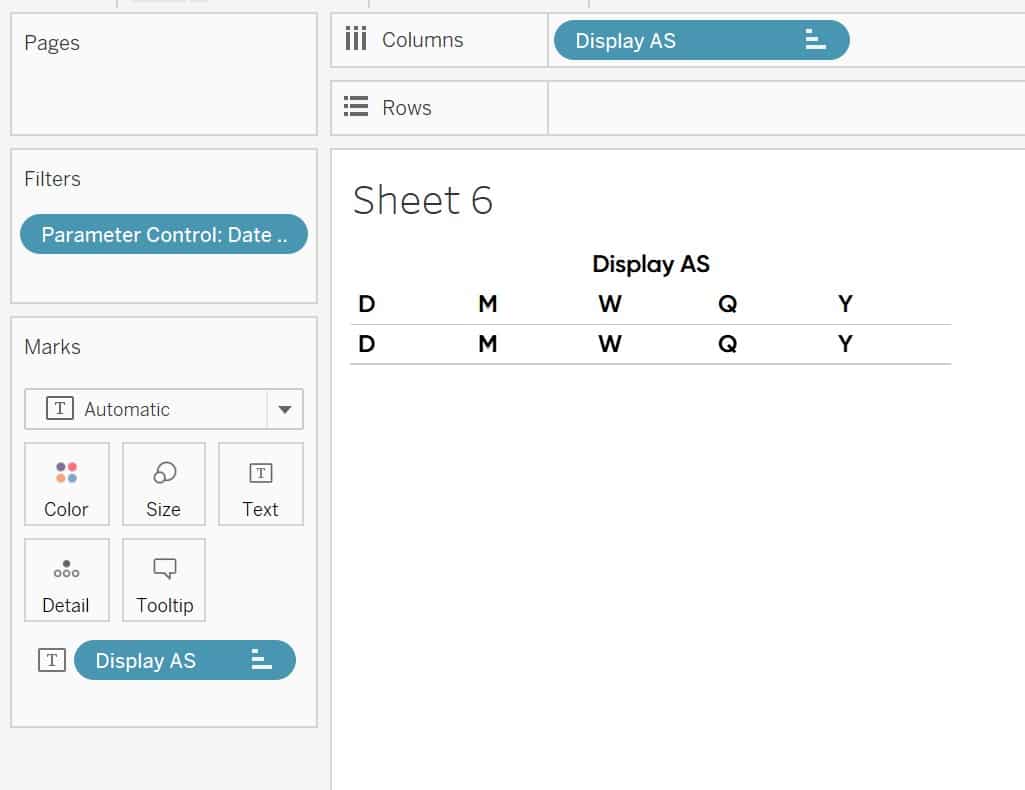
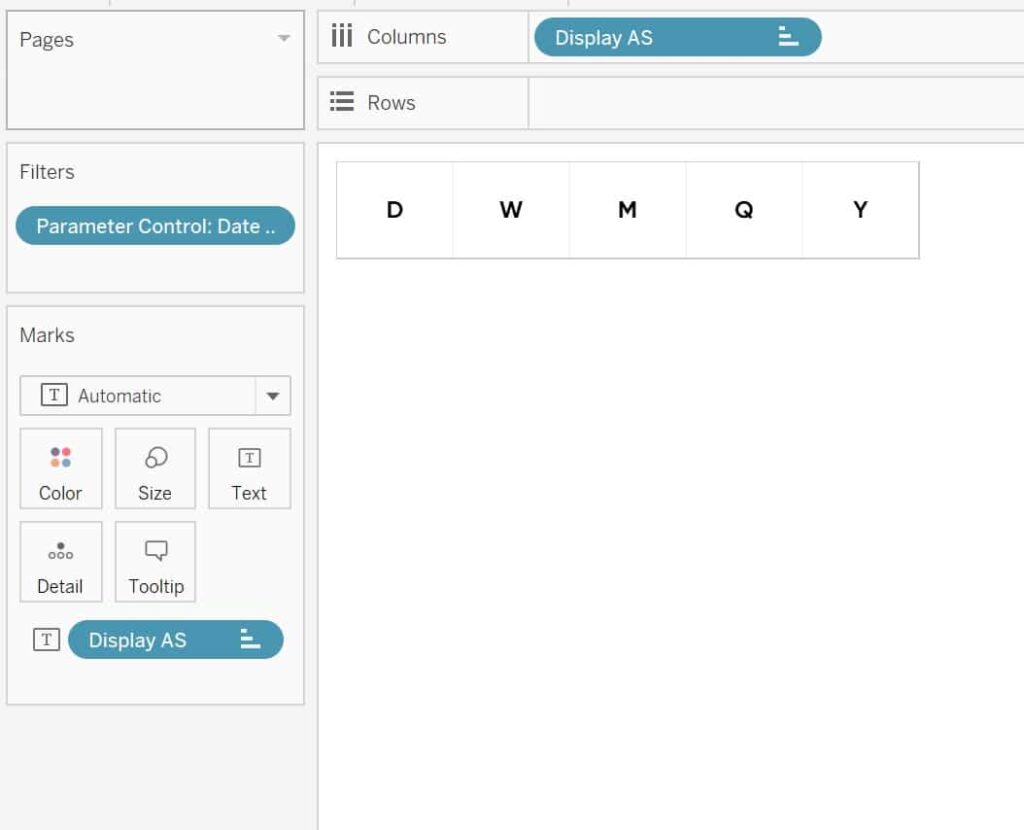
I am also going to reorder the values so that it is a little more intuitive to my end user by clicking and dragging the ‘W’ value between ‘D’ and ‘M’. Now my buttons are lined up in order from day to year.
Another thing to note, the user actually cannot click on the headers. To avoid confusion and to polish it up I am going to right-click on the Display As pill on the Columns Shelf and deselect Show Header from the menu. You can also take the formatting as far as you want here. I am going to center align them and add some vertical lines to make them appear more like buttons.
The most crucial step is to add the parameter values we want to pass when using the dashboard action. The best way to tackle this without changing the appearance of our sheet is to add Parameter Value to the Details Marks Card.
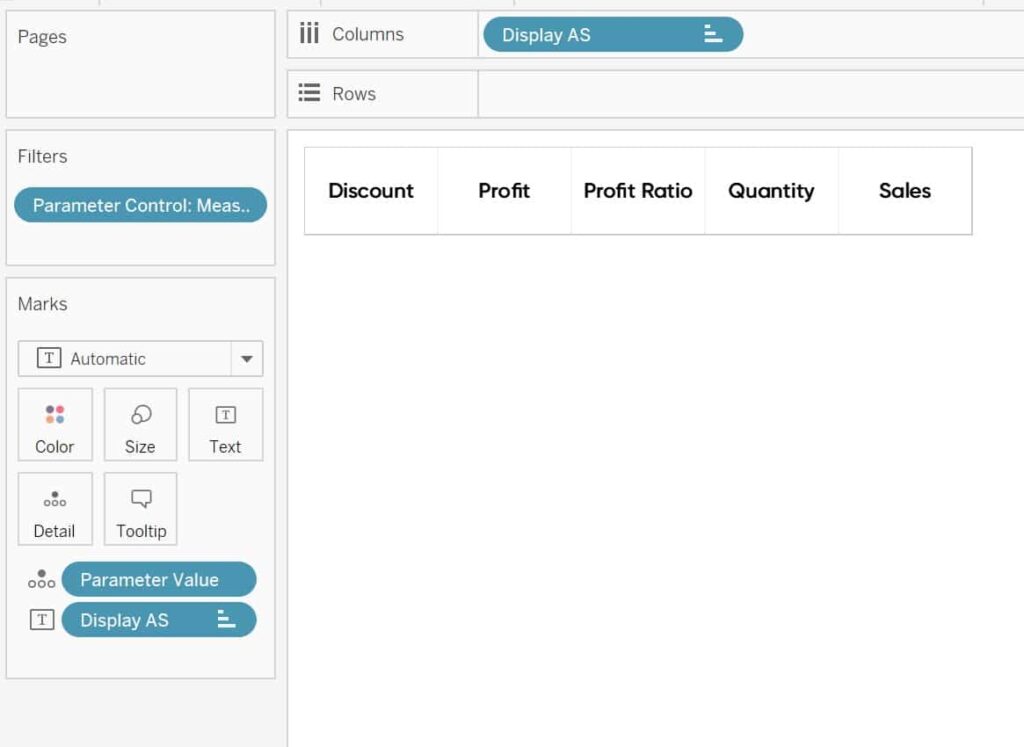
To set up the other control sheet for our measures parameter, I will duplicate this sheet, title it Measure Control Sheet, and change the Parameter Control filter to include Measure Selected Parameter.
How to add Tableau parameter dashboard actions
With our control sheets created I am going to go back to my dashboard and add these to the top.
I purposefully left the parameter controls so we can make sure everything is working once we start testing our dashboard actions.
To set up the dashboard actions I am going to select Dashboard from the top then Actions from the menu.
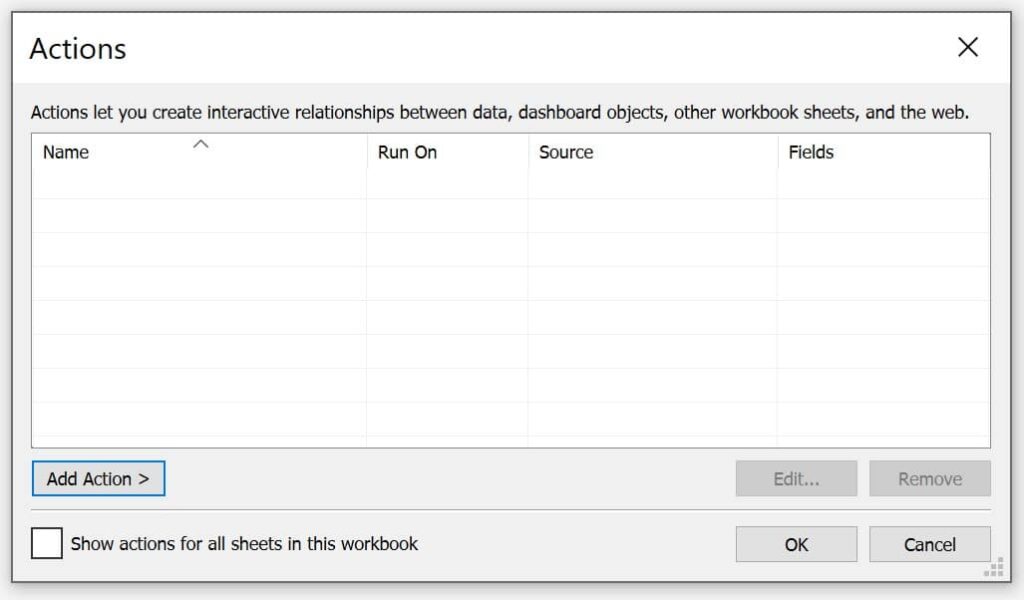
From this menu I will hit Add Action and select Change Parameter from the menu.

If you are new to setting up dashboard actions or are unfamiliar with these options, I encourage you to check out our related content below.
How To Use Tableau Parameter Dashboard Actions
I will deselect everything but my Date Part Control Sheet from the Source Sheets, change my Target Parameter to my Date Part Parameter, and chose Parameter Value as the field I would like to pass.
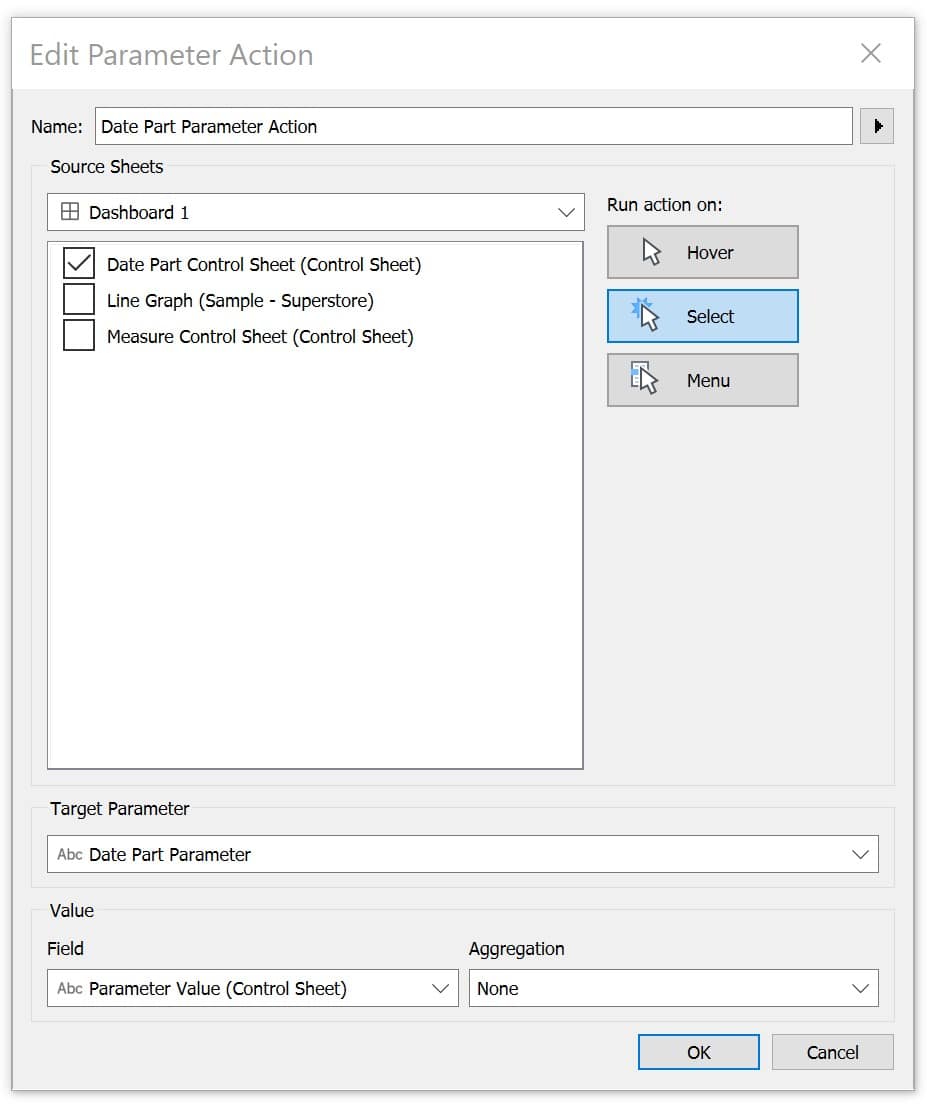
Then I will click OK.
To test it I will go back to my Dashboard.

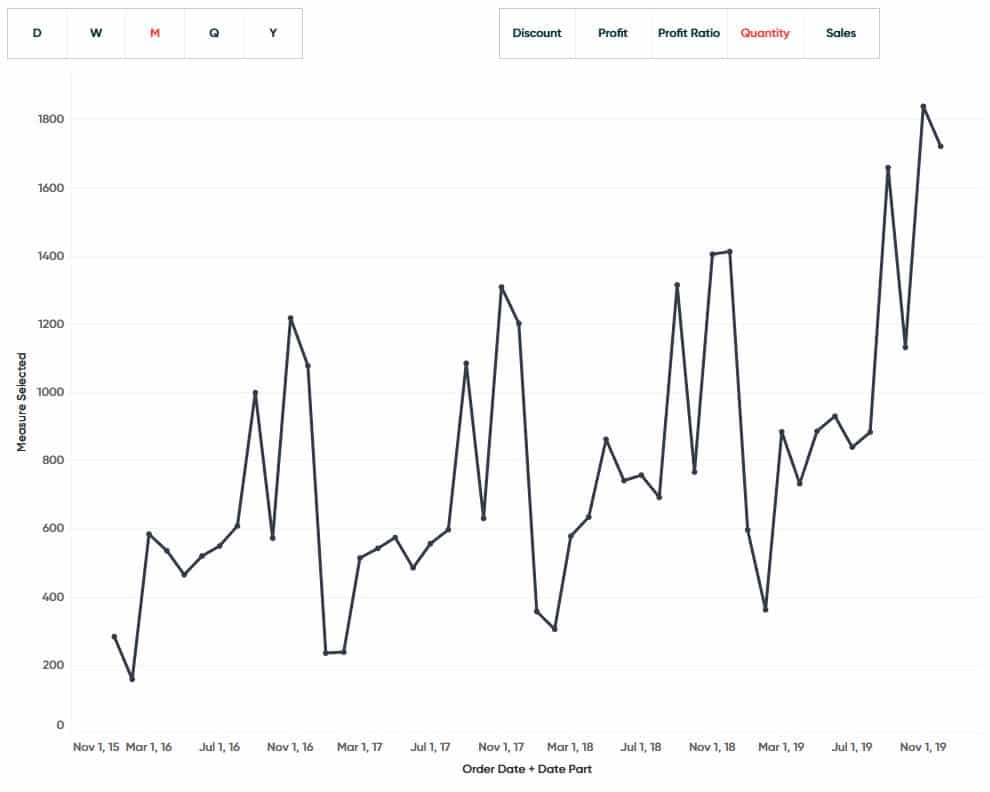
Currently, I have week selected as my date part which we can see in the Date Part Parameter Control in the top right. Now using my Date Part Control sheet I am going to select month represented by the ‘M’.
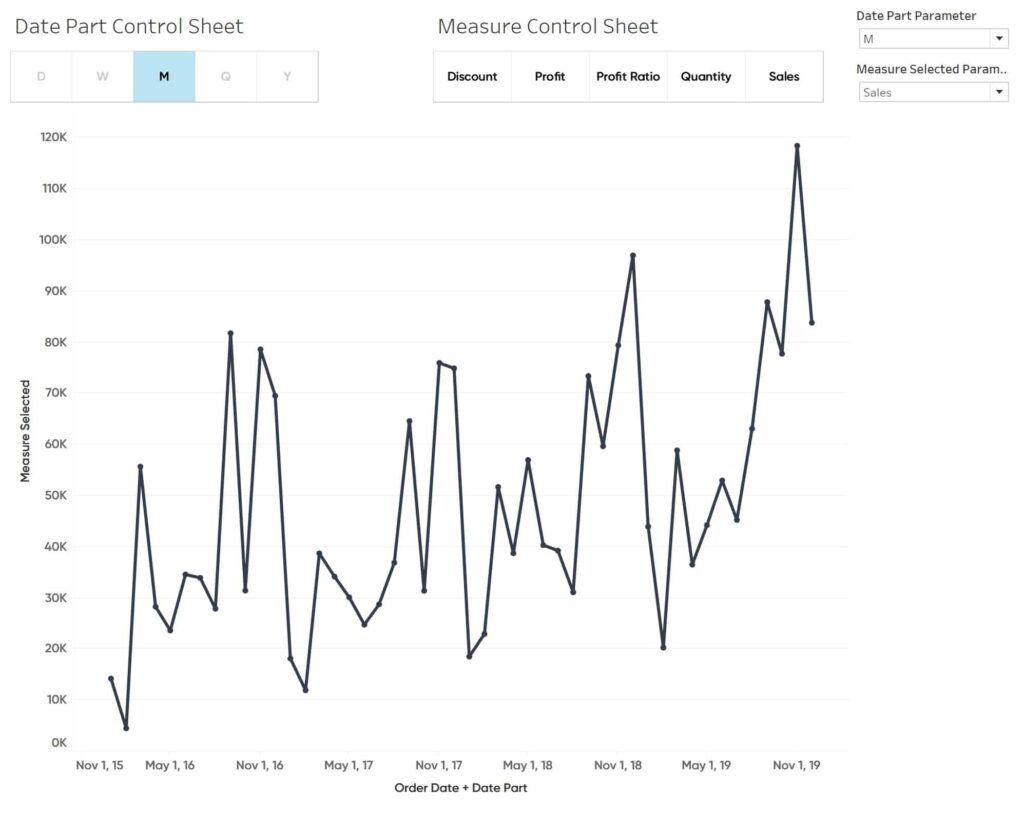
You can see that once I selected ‘M’ from the control sheet the dashboard action we set up fired and sent the ‘month’ value to overwrite the Date Part Parameter. We can verify this by looking at the Date Part Parameter control at the top right again; it now has ‘M’ as its current value.
With our date part dashboard action working I am going to set up the second action for our measure selected.
I will select Dashboard, Action, then Add Action, and Change Parameter. I will name this Measure Selected Parameter Action, deselect everything but Measure Control Sheet from the Source Sheets, add Measure Selected Parameter as the target parameter, and Parameter Value as the field we would like to pass to the target parameter.
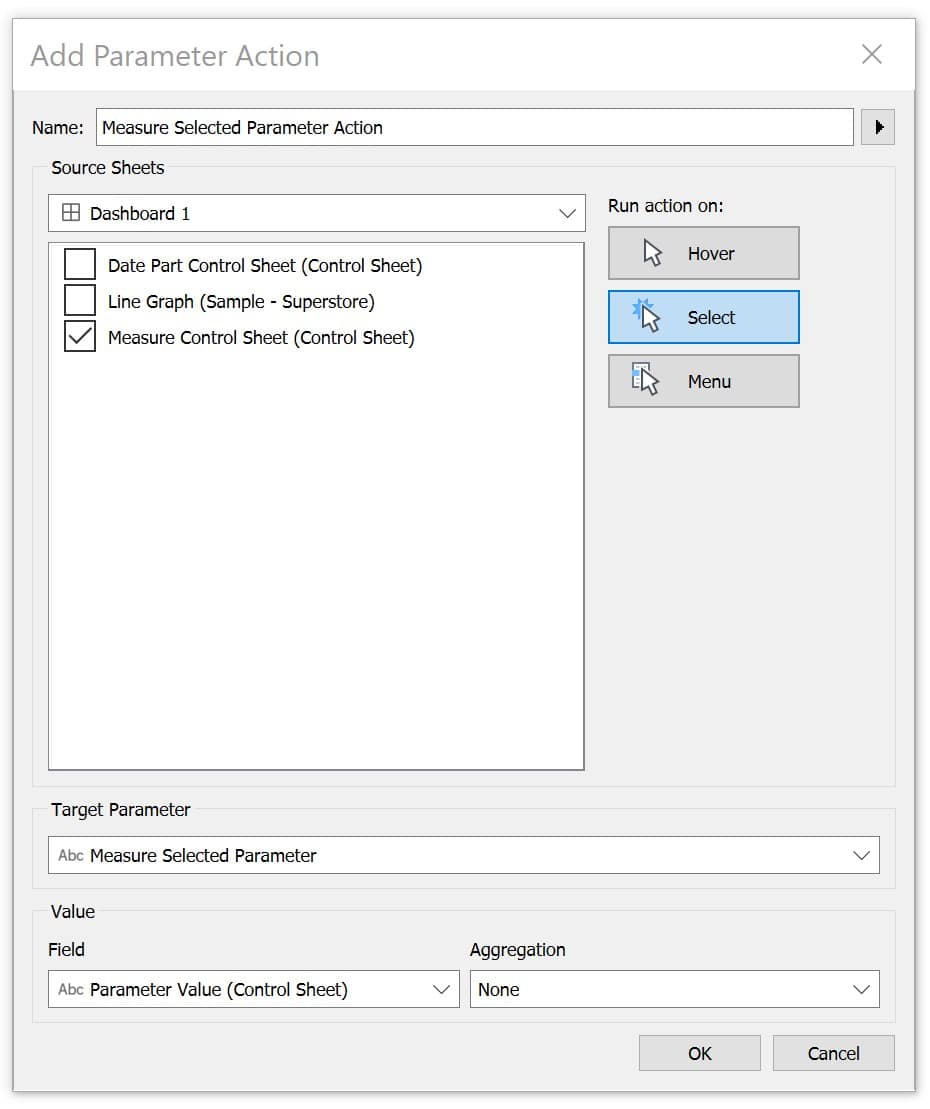
Select OK and OK again.
I am going to test this the same way we tested the Date Part Control.
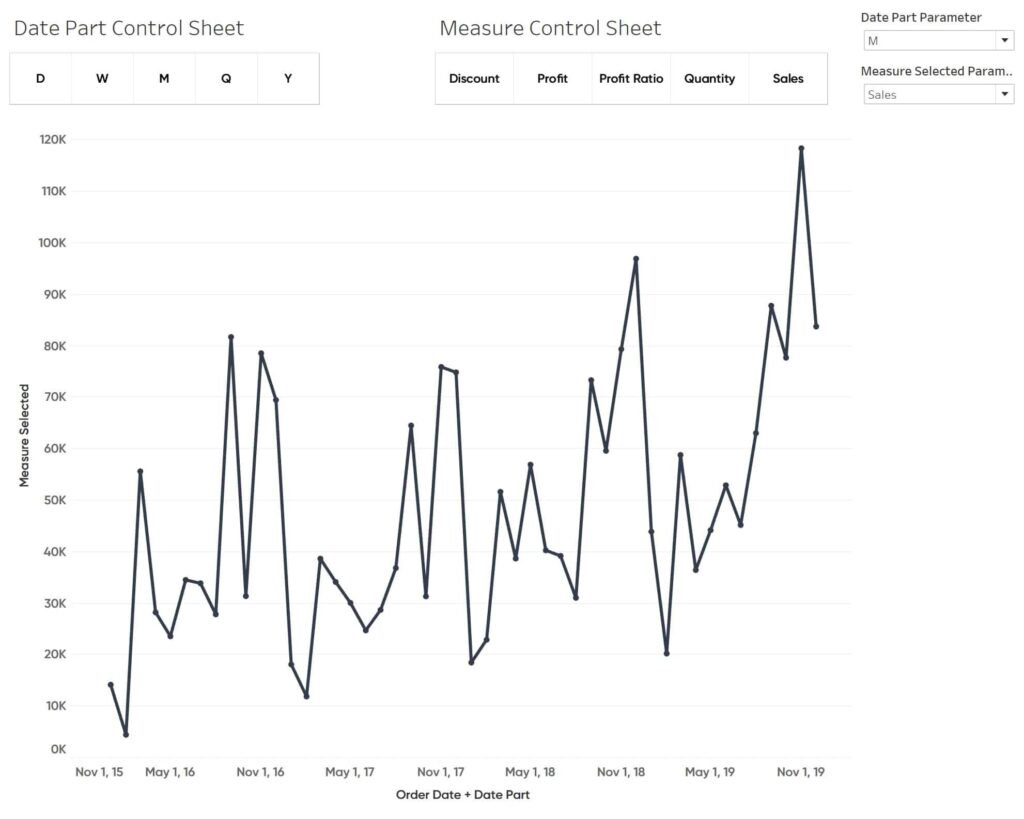
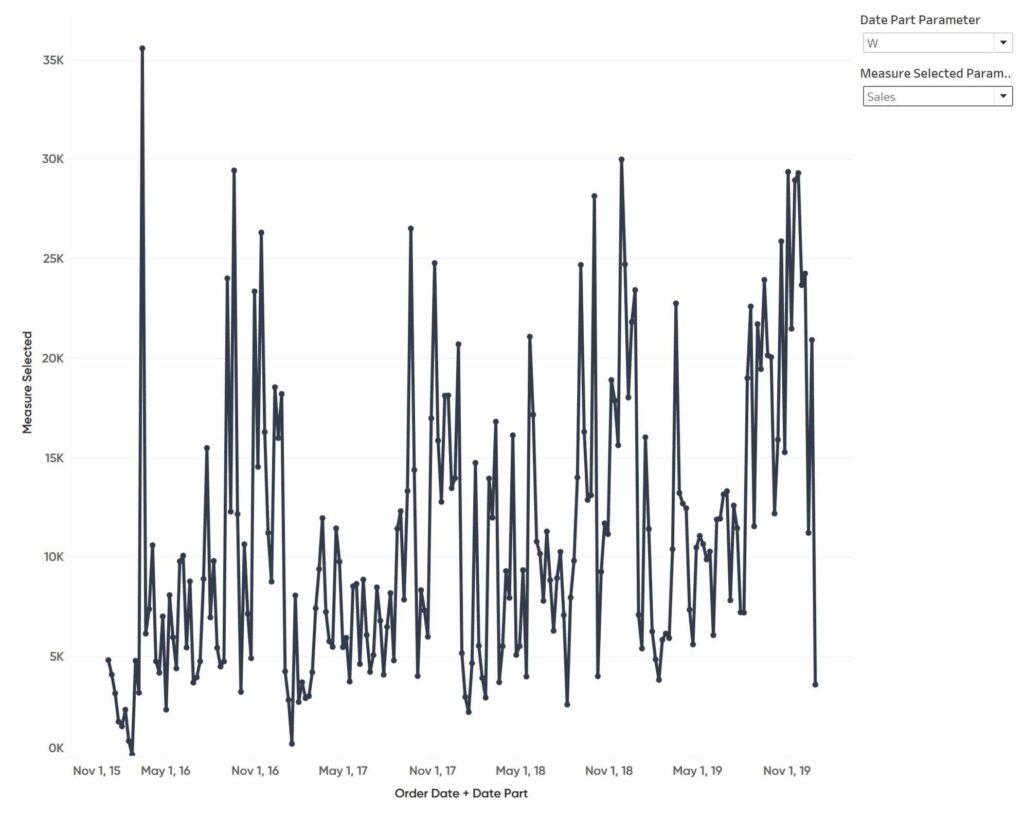
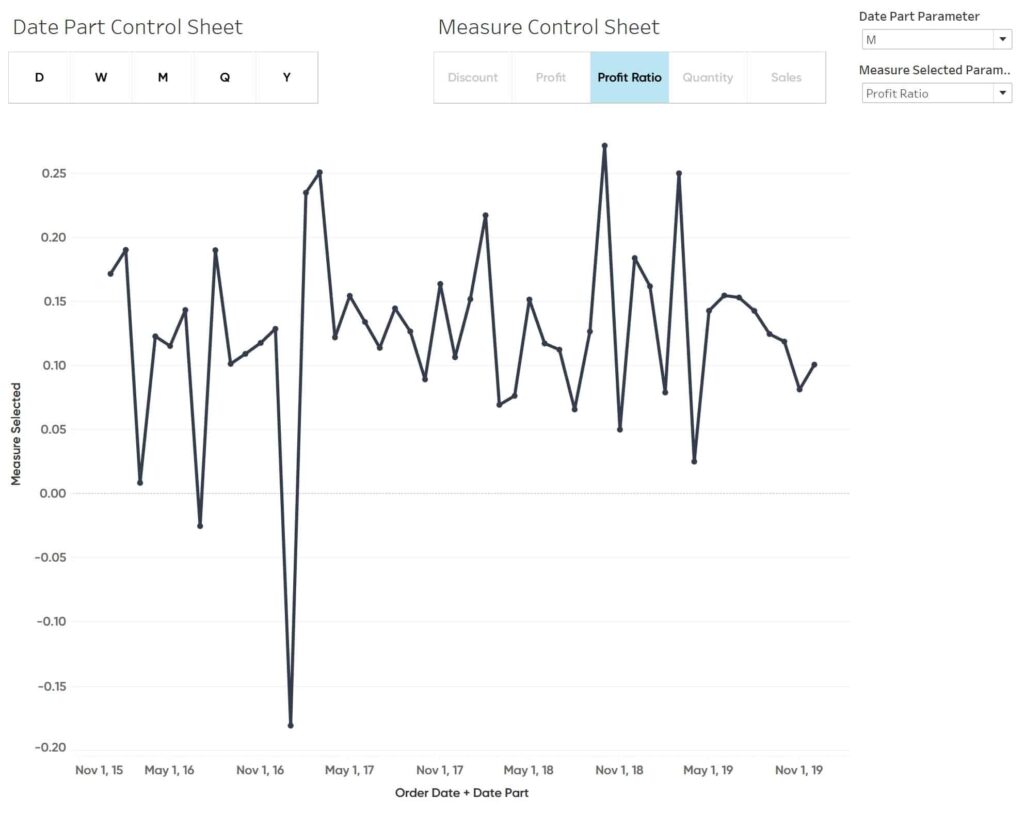
You can see the Measure Selected Parameter Control in the top right has Sales as its current value.
![]()
I will click on ‘Profit Ratio’ from our Measure Control Sheet. You can see that when I did our graph updated and the current value of the Measure Selected Parameter was overwritten to Profit Ratio.
Now that we have our control sheets working, I am going to remove the parameter controls from my dashboard. This gives our dashboard a cleaner look and removes some of the drop downs which can start to crowd our dashboards.
Again, you can take the formatting as far as you want from here but I will call this good for now.
If you are looking for more ways to use this tactic, I recommend checking out our blog on Pagination. This is a unique implementation to clean up your dashboards and add more professional polish to them.
Until next time,
Ethan Lang
Director, Analytics Engineering
[email protected]


Written By
Ethan Lang

Graphic Design
Jason Penrod
Director, Information Design
Related Content
3 Creative Ways to Use Tableau Parameter Actions
I have always described Tableau parameters as a Swiss Army knife due to their infinite applications. In case you are…

Ryan Sleeper
Overwrite parameter values by simply interacting with a dashboard Learn how to add a “Change Parameter” action to a dashboard;…
3 Innovative Ways to Highlight Selections in Tableau
In this tutorial I will demonstrate three ways to use different mark types with transparent sheets to highlight a selection…