How to do “Button Swapping” in Tableau
You’ve likely heard of sheet swapping in Tableau; a well-known tactic that allows your users to choose what type of chart is shown on a view. With the introduction of set actions in Tableau 2018.3, you can now also do what I’m calling button swapping.
Let’s say you are using images to filter marks on a view. You can now improve the user experience by changing the image for the selection so it appears to be highlighted!
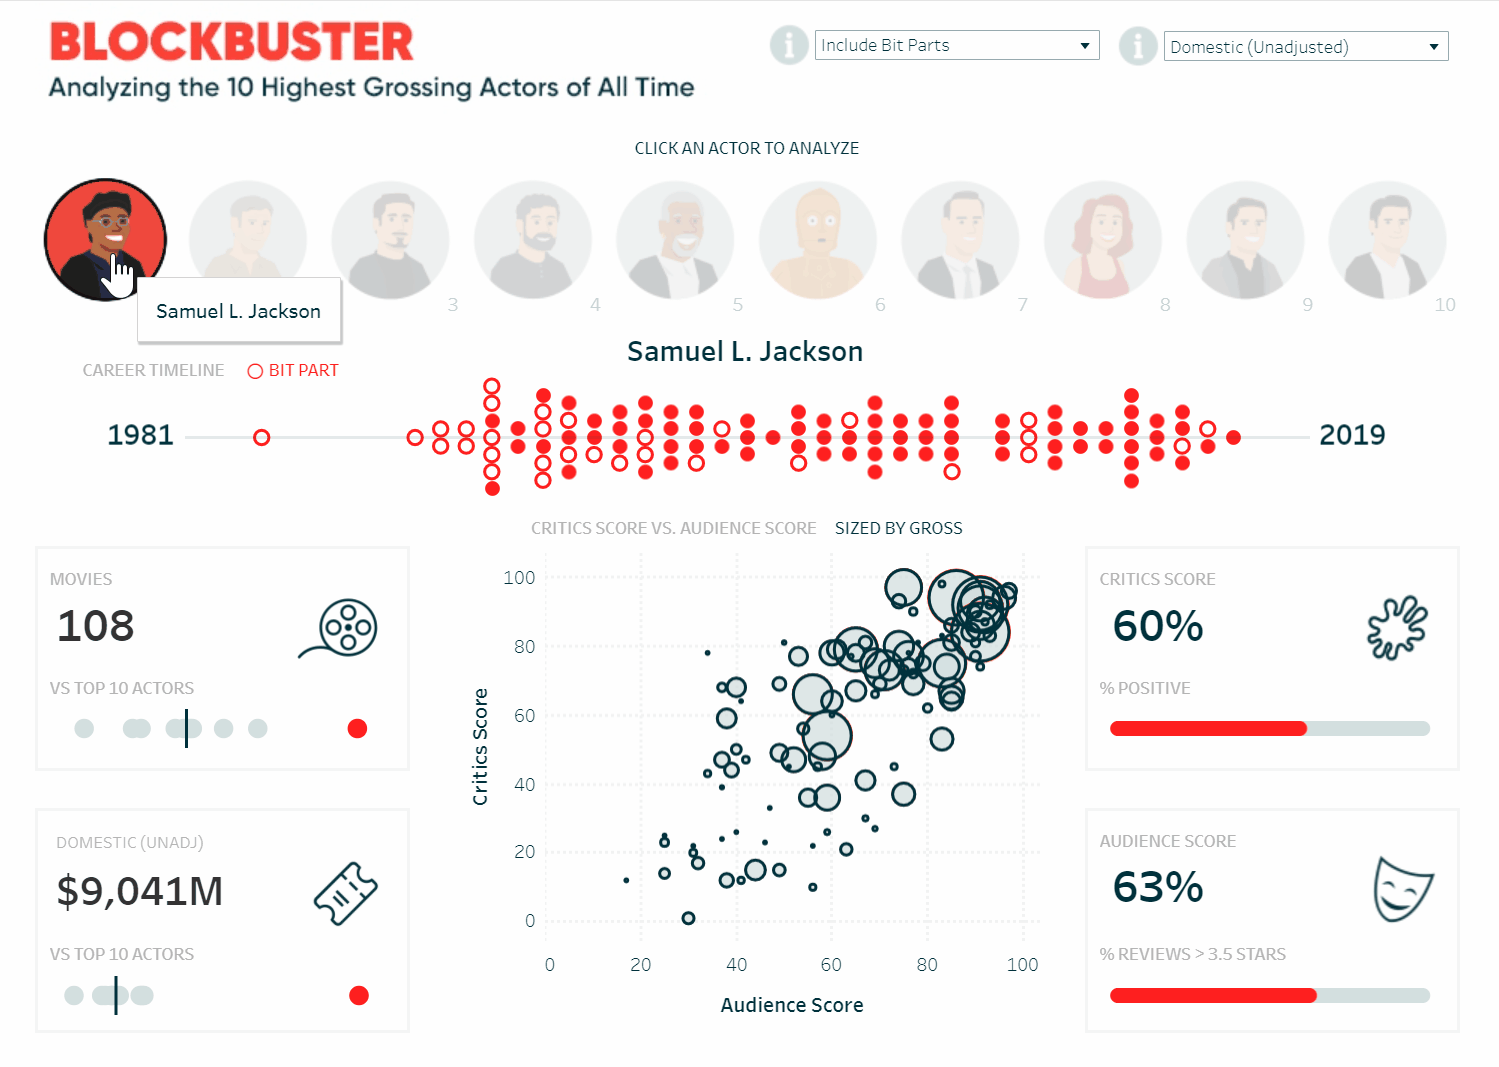
By the end of this post, you will be able to recreate the user experience from my visualization, BLOCKBUSTER. By default, each button’s background color is gray. When a button is clicked on to filter the view, the background color gets swapped for red to show what has been selected.
This content is excerpted from my book, Innovative Tableau: 100 More Tips, Tutorials, and Strategies, published by O’Reilly Media Inc., 2020, ISBN: 978-1492075653. Get the book at Amazon.
Watch the related video with Playfair+
Add images to your tableau repository
The foundation of button swapping involves using images to filter marks on a view, so it would be helpful to know how to create icon-based navigation or filters in Tableau as a prerequisite to improving on this user experience.
![]()
Continue reading with a free account, or login.
Unlock this tutorial and hundreds of other free visual analytics resources from our expert team.
Already have an account? Sign In
By continuing, you agree to our Terms of Use and Privacy Policy.
For this tutorial, I will start a new workbook and recreate five of the ten actor buttons from BLOCKBUSTER. You can follow along using any images you want for your use case.
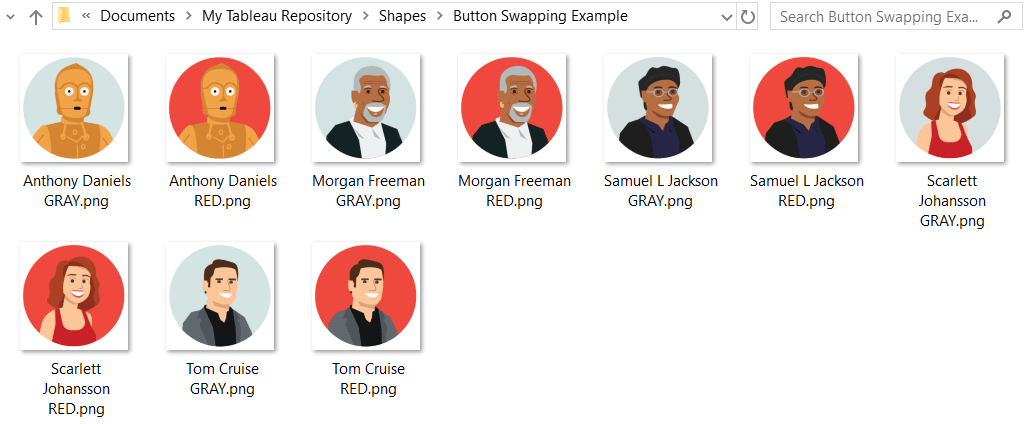
First, you need two sets of images that will act as your buttons. The first set of images is for buttons in their unselected state; the second set of images will be used to highlight selections. Here’s how my two sets look for my five actor buttons / filters.

Next, save or copy / paste these images into the following directory on your computer: Documents > My Tableau Repository > Shapes. Each folder within “Shapes” is a custom shape palette that you can use in Tableau Desktop. You can save the images into an existing custom palette, but you can also create a new folder and name it something intuitive so you can find it later in Tableau Desktop. Here’s how my custom shapes palette looks for “Button Swapping Example”.
Create the custom navigation for button swapping in Tableau
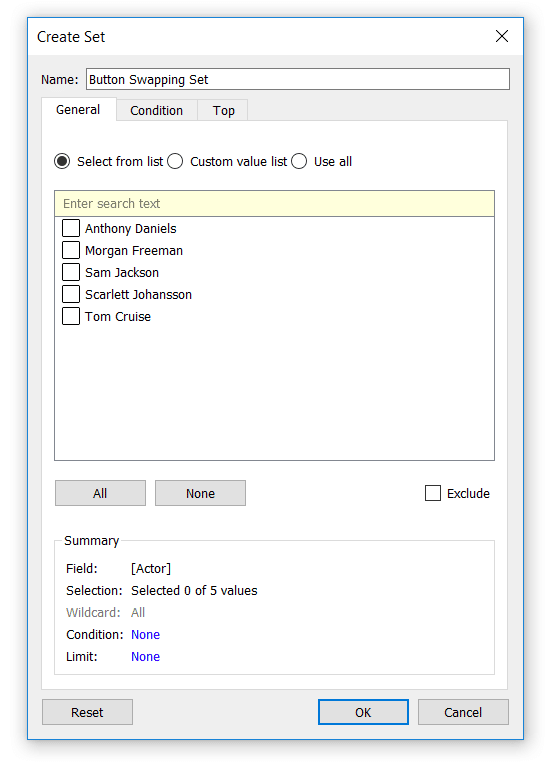
Now we’re ready to move to Tableau Desktop and create the navigation. We need to create a set that will eventually be used to tell Tableau what has been selected. I’m creating this example from a dimension called Actor, so I’ll right-click on the Actor dimension in the Dimensions area of the Data Pane, hover over “Create”, and click “Set…”. For now, I’m not going to add anything to the set because I want to map shapes for each button in its deselected state.
Sets are Boolean, meaning there are only two outcomes: the dimension member is either in the set or not. Behind the scenes, if the dimension member is in the set, it gets classified with a “t” that represents True. When it is out of the set, it gets assigned an “f” for False.
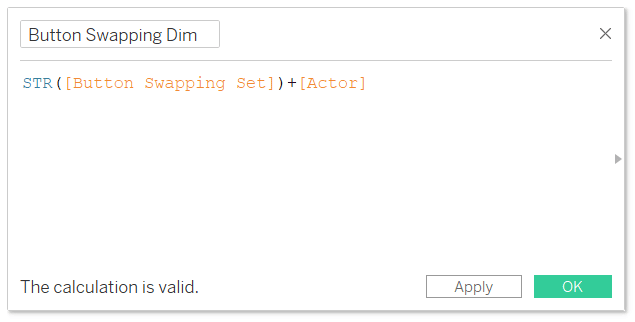
Here’s the trick. Create a calculated field that equals the string of the set we just created (which will generate a t or f), plus the dimension that’s being used for the buttons. This calculation creates a dimension member for each button preceded by a t or f to classify what has been selected.
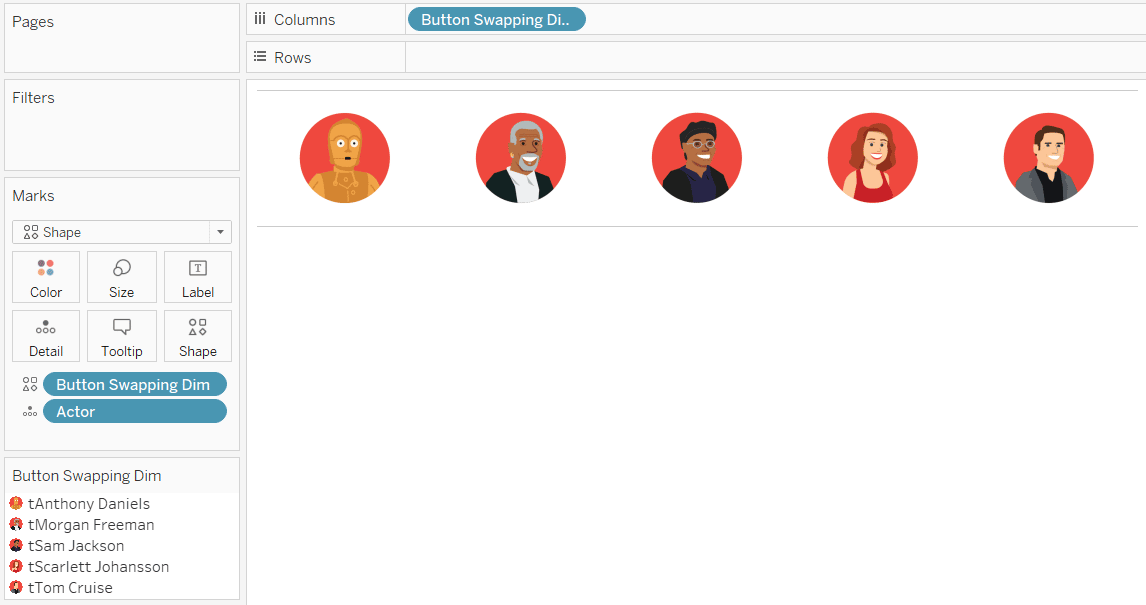
Next, set up a control sheet that includes the calculated dimension members that will be used as your buttons. The most important aspect of this control sheet is the mark type needs to be set to “Shape” so you can map each dimension member to a specific custom shape.
I’ll put my newly created Button Swapping Dim field on the Columns Shelf to separate my marks, change the mark type to Shape, and also put the Button Swapping Dim field on the Shape Marks Card so each dimension member gets a unique shape.
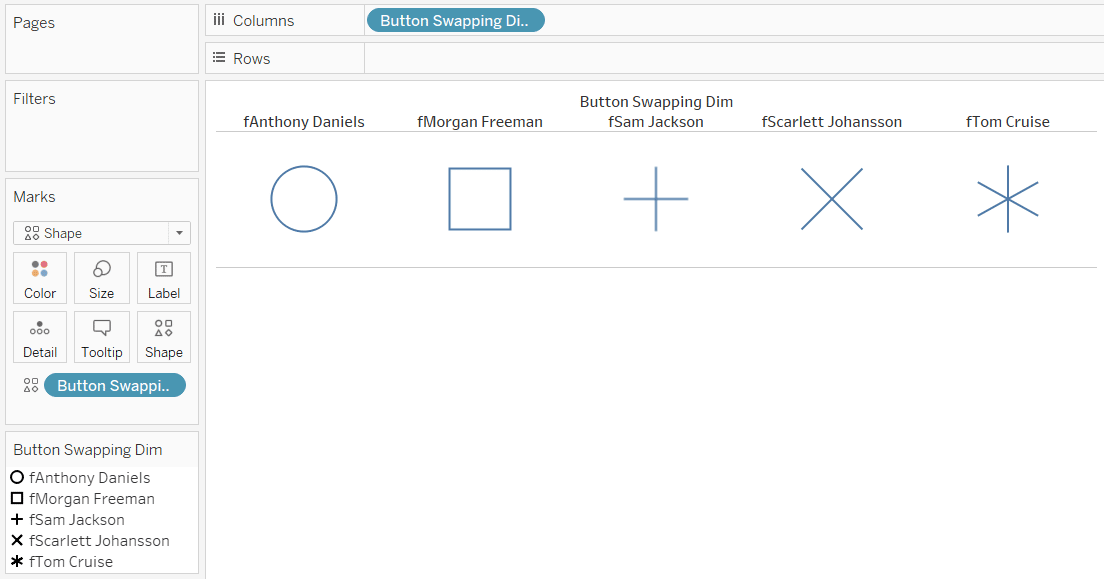
Notice how every dimension member is preceded by an “f”. That’s because nothing is selected in the set. These are our buttons in their unselected state.
Map the images
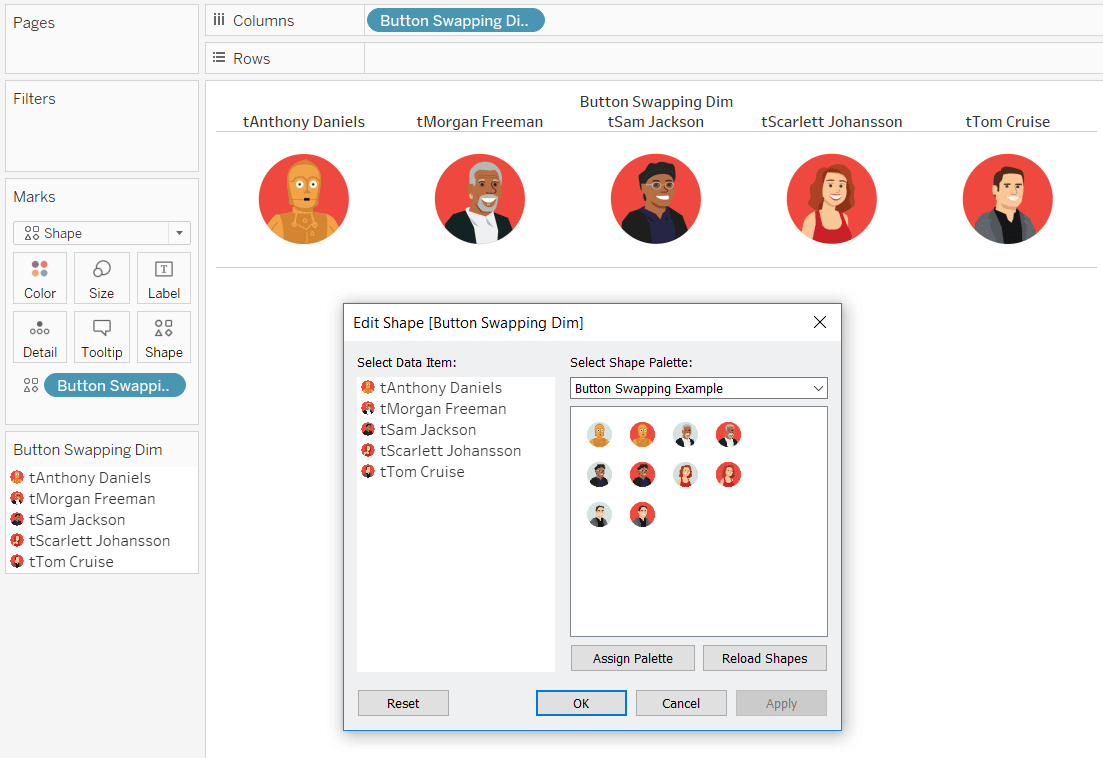
To map your custom images to each dimension member, click on the Shape Marks Card. In the dropdown that says “Select Shape Palette”, you will see your custom shape palette that you added to your Tableau Repository:
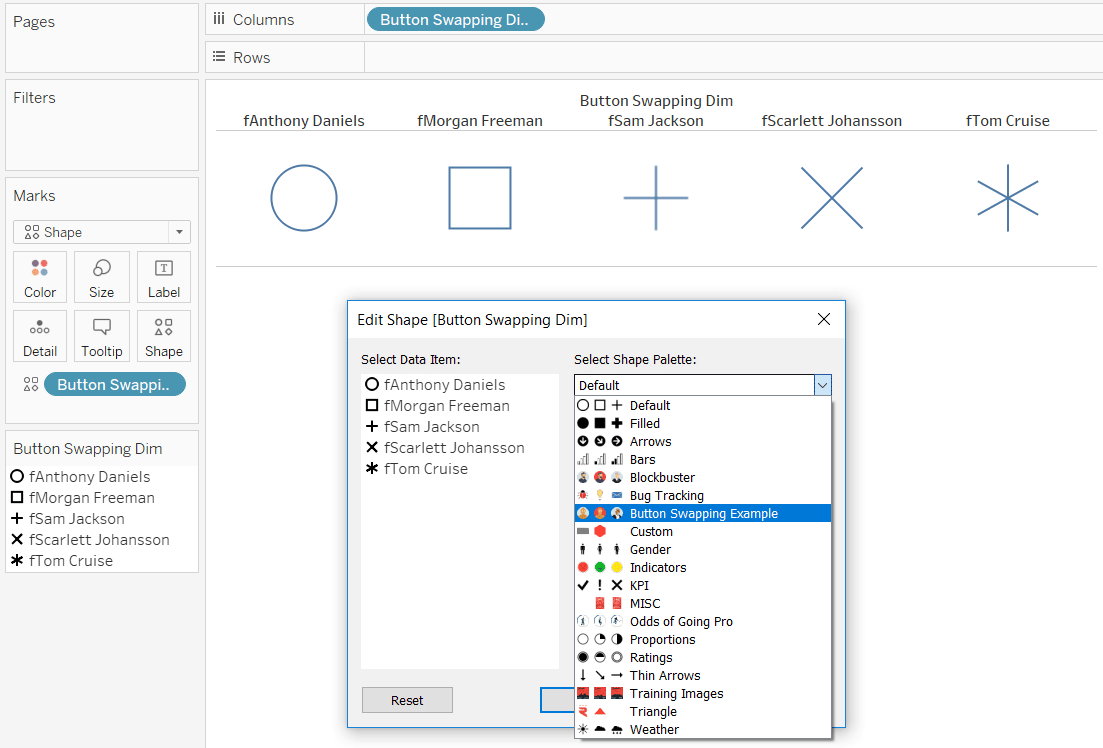
If you already had Tableau open while you were adding a folder to your Tableau Repository, you will need to click the “Reload Shapes” button before your new palette will appear.
To map the images, simply click each dimension member, then click the image that it should be mapped to. We haven’t selected anything yet, so this first set should be mapped to your images in their unselected state.
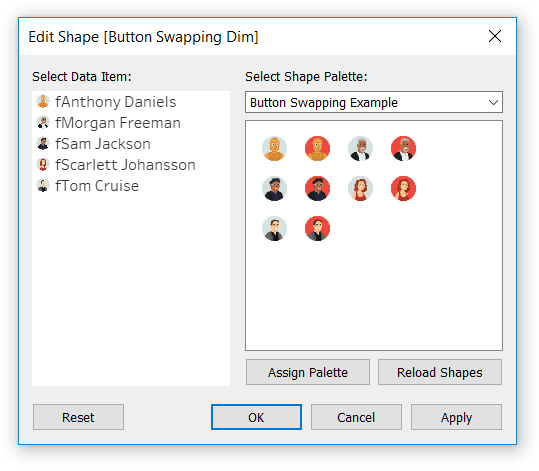
At this point, I have my navigation in its unselected state.

To map each dimension member to its selected state, edit the set so it includes every dimension member.
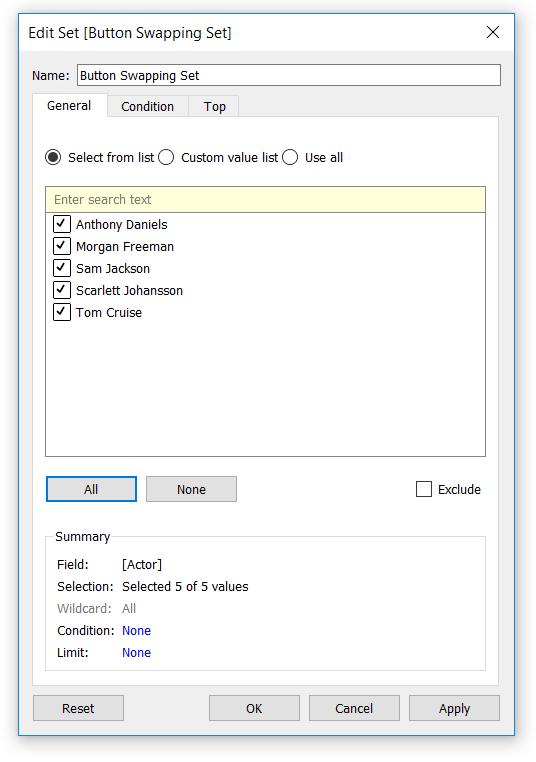
You will now see each dimension member is preceded by a “t” because it is “True” that it is in the set. We also lost the image mapping from the previous step because those images were mapped to the dimension members preceded by “f”. I will map this set to my images with the red backgrounds to highlight that they have been selected.
To get this to work with set actions in the next step, we need to ensure that all of the fields being used in the set action are on this sheet. My set is based on the Actor dimension, so I will add that to the Detail Marks Card.
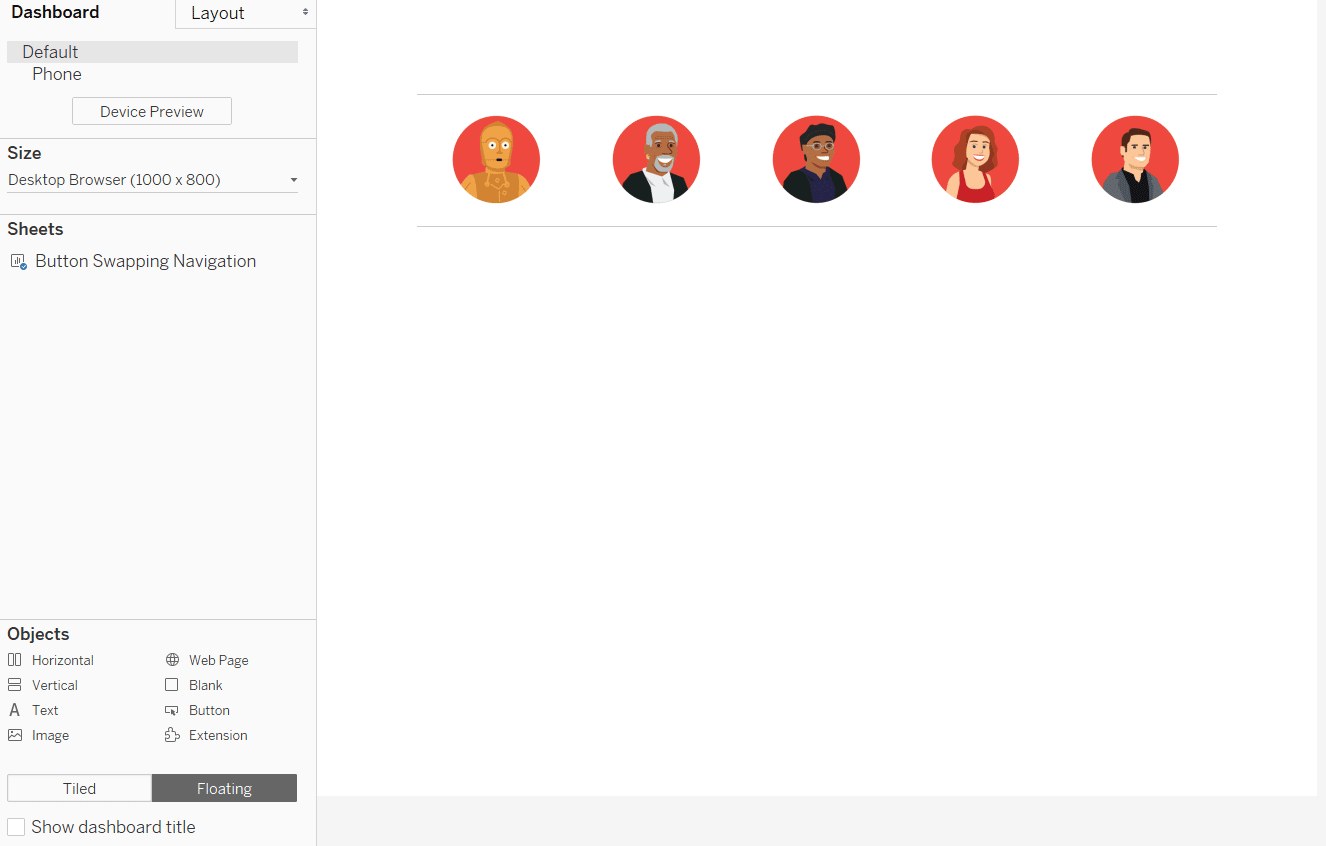
We’re now ready to use this as a dashboard navigation. First, add the sheet to a dashboard.
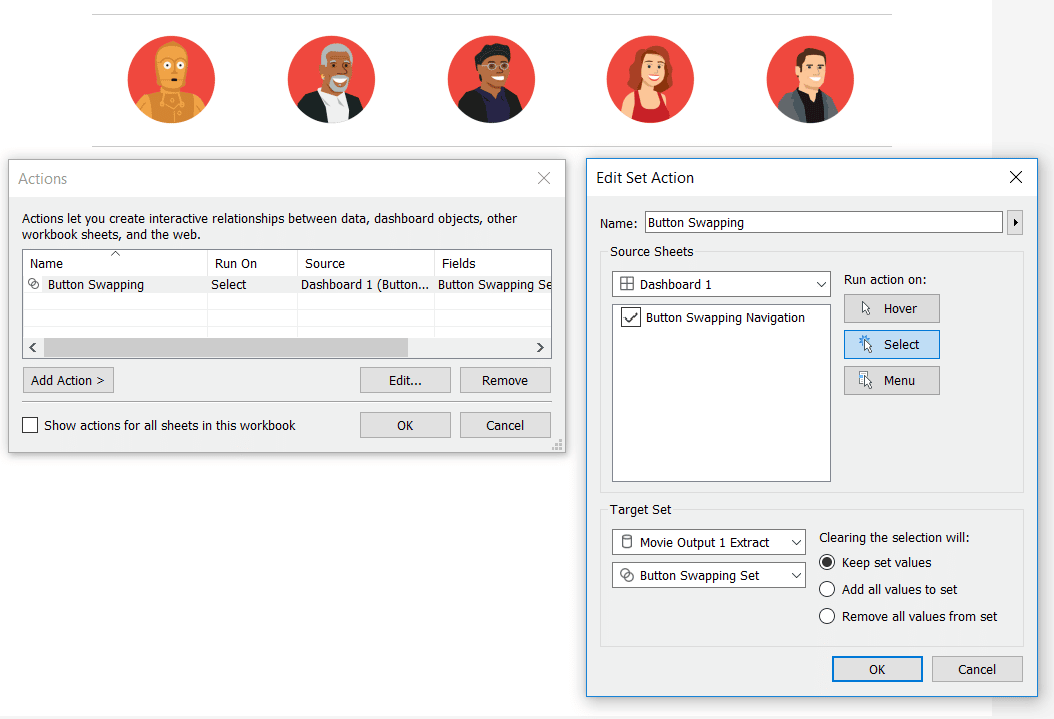
Add dashboard actions to bring button swapping to life in Tableau
Then add a set dashboard action by navigating to Dashboard > Actions… > Add Action > Change Set Values….
![]()
I like to code my set action so that it leaves the values in the set so the selection persists if you click somewhere else on the view.
Now if I click on a specific button, that dimension member overrides the selections in the underlying set. So in my case, clicking one actor will make that actor part of the set, displaying the image with the red background, while everything else has a gray background.

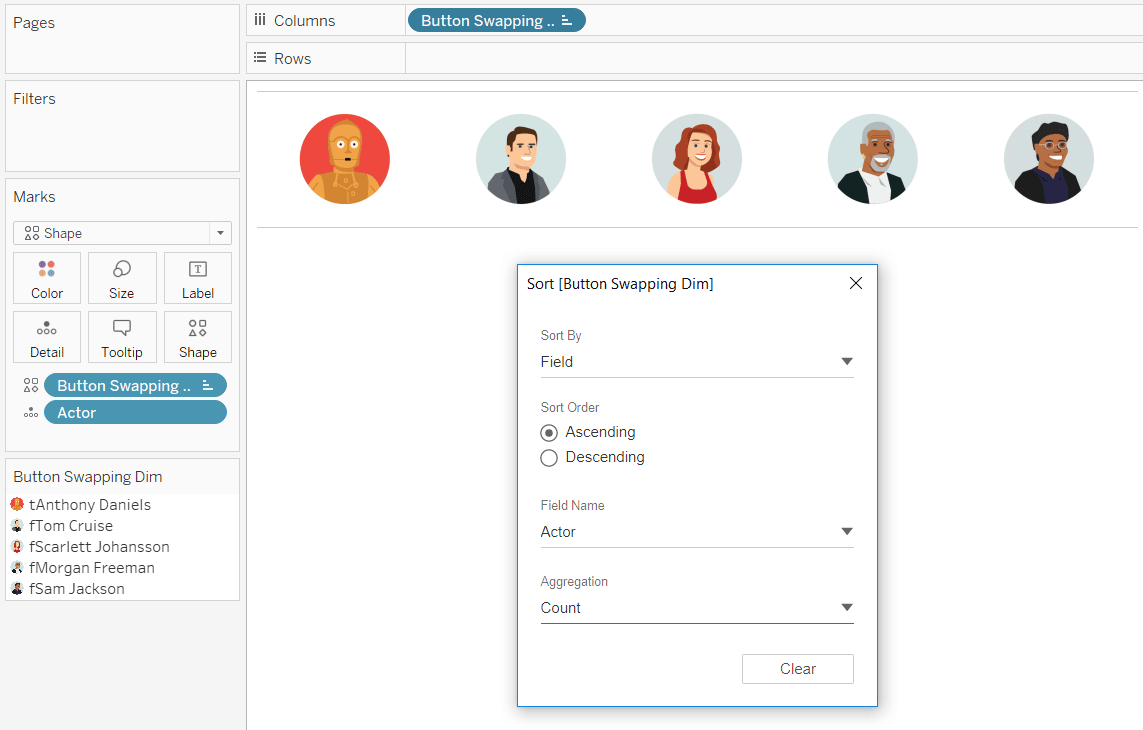
By default, these buttons are sorted in ascending data source order. Since the f letters that precede all of the dimension members that have not been selected are listed first, the highlighted button will always appear last. That’s not the best user experience because the buttons will constantly be switching places. To permanently set the sort order, go back to the sheet with your images, right-click on the dimension member on the Columns Shelf (or Rows Shelf), and click “Sort…”.
Now the buttons will stay in place and clicking an image on my dashboard will swap out the default, unselected image with the gray background for the version with the highlighted red background!

You can incorporate the Button Swapping Set on other sheets so that it acts as a filter when a selection is made and/or add a filter dashboard action so that these buttons control the marks being shown on the dashboard.
For more on this feature, watch An Introduction to Tableau Dashboard Actions on Playfair+.
Thanks for reading,
– Ryan


Written By
Ryan Sleeper
Related Content
How to Do Button Swapping with Parameters in Tableau

One of the best ways to take a dashboard to the next level is to incorporate interactivity beyond what’s available…
The Definitive Guide to Buttons in Tableau

The Button. Seemingly simple — yet so powerful. As humans, we are well versed in buttons and have been trained…

Ryan Sleeper
Multiple Options for Navigating Users Between Dashboards and Webpages How to (1) use the Button or Navigation dashboard object introduced…