The Easiest Way to Make a Toggle in Tableau
Toggles in Tableau are useful anytime you want to provide your user the ability to filter certain data points, flip between normalized and actual data, and/or show binary results (i.e. true vs. false) – all with the click of a button. Set actions, parameter actions, and calculated fields have unlocked almost complete control over how this type of user experience can be configured.
But before we get ahead of ourselves, I’m going to show you the easiest way possible to create a toggle in Tableau. I’m a big fan of the theorem, Occam’s Razor, and interpret it to mean, the simplest solution is usually the best one. This post shows you how to make a Tableau toggle without a single calculated field or dashboard action.
This is the first in a three-part series on toggles in Tableau – subscribe to receive future updates.
How to Add a Show/Hide Button to a Tableau Layout Container
How to make a toggle in Tableau using layout containers
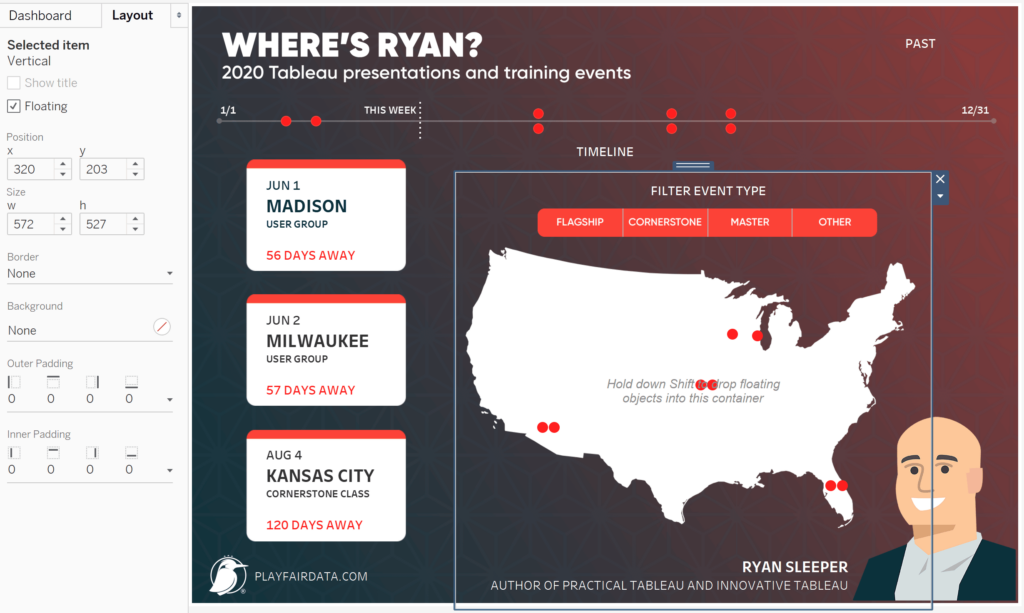
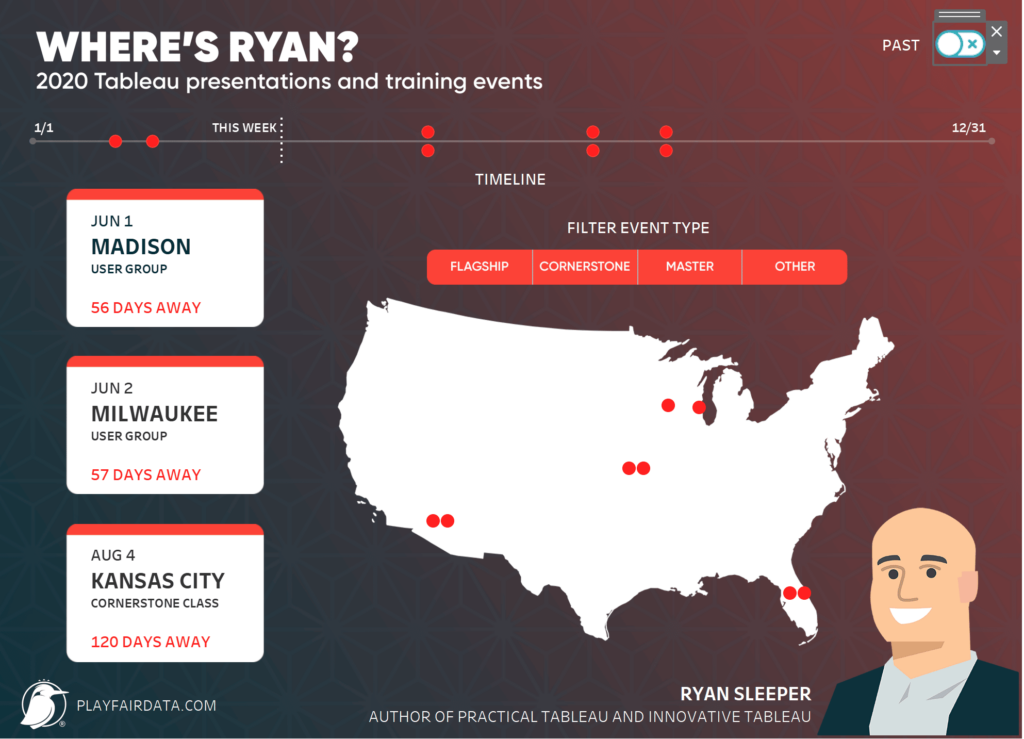
To illustrate the easy way to make a Tableau toggle, I will recreate the map view from my visualization, Where’s Ryan?. In the upper-right corner, there is a toggle that allows the user to filter my past speaking engagements on and off.
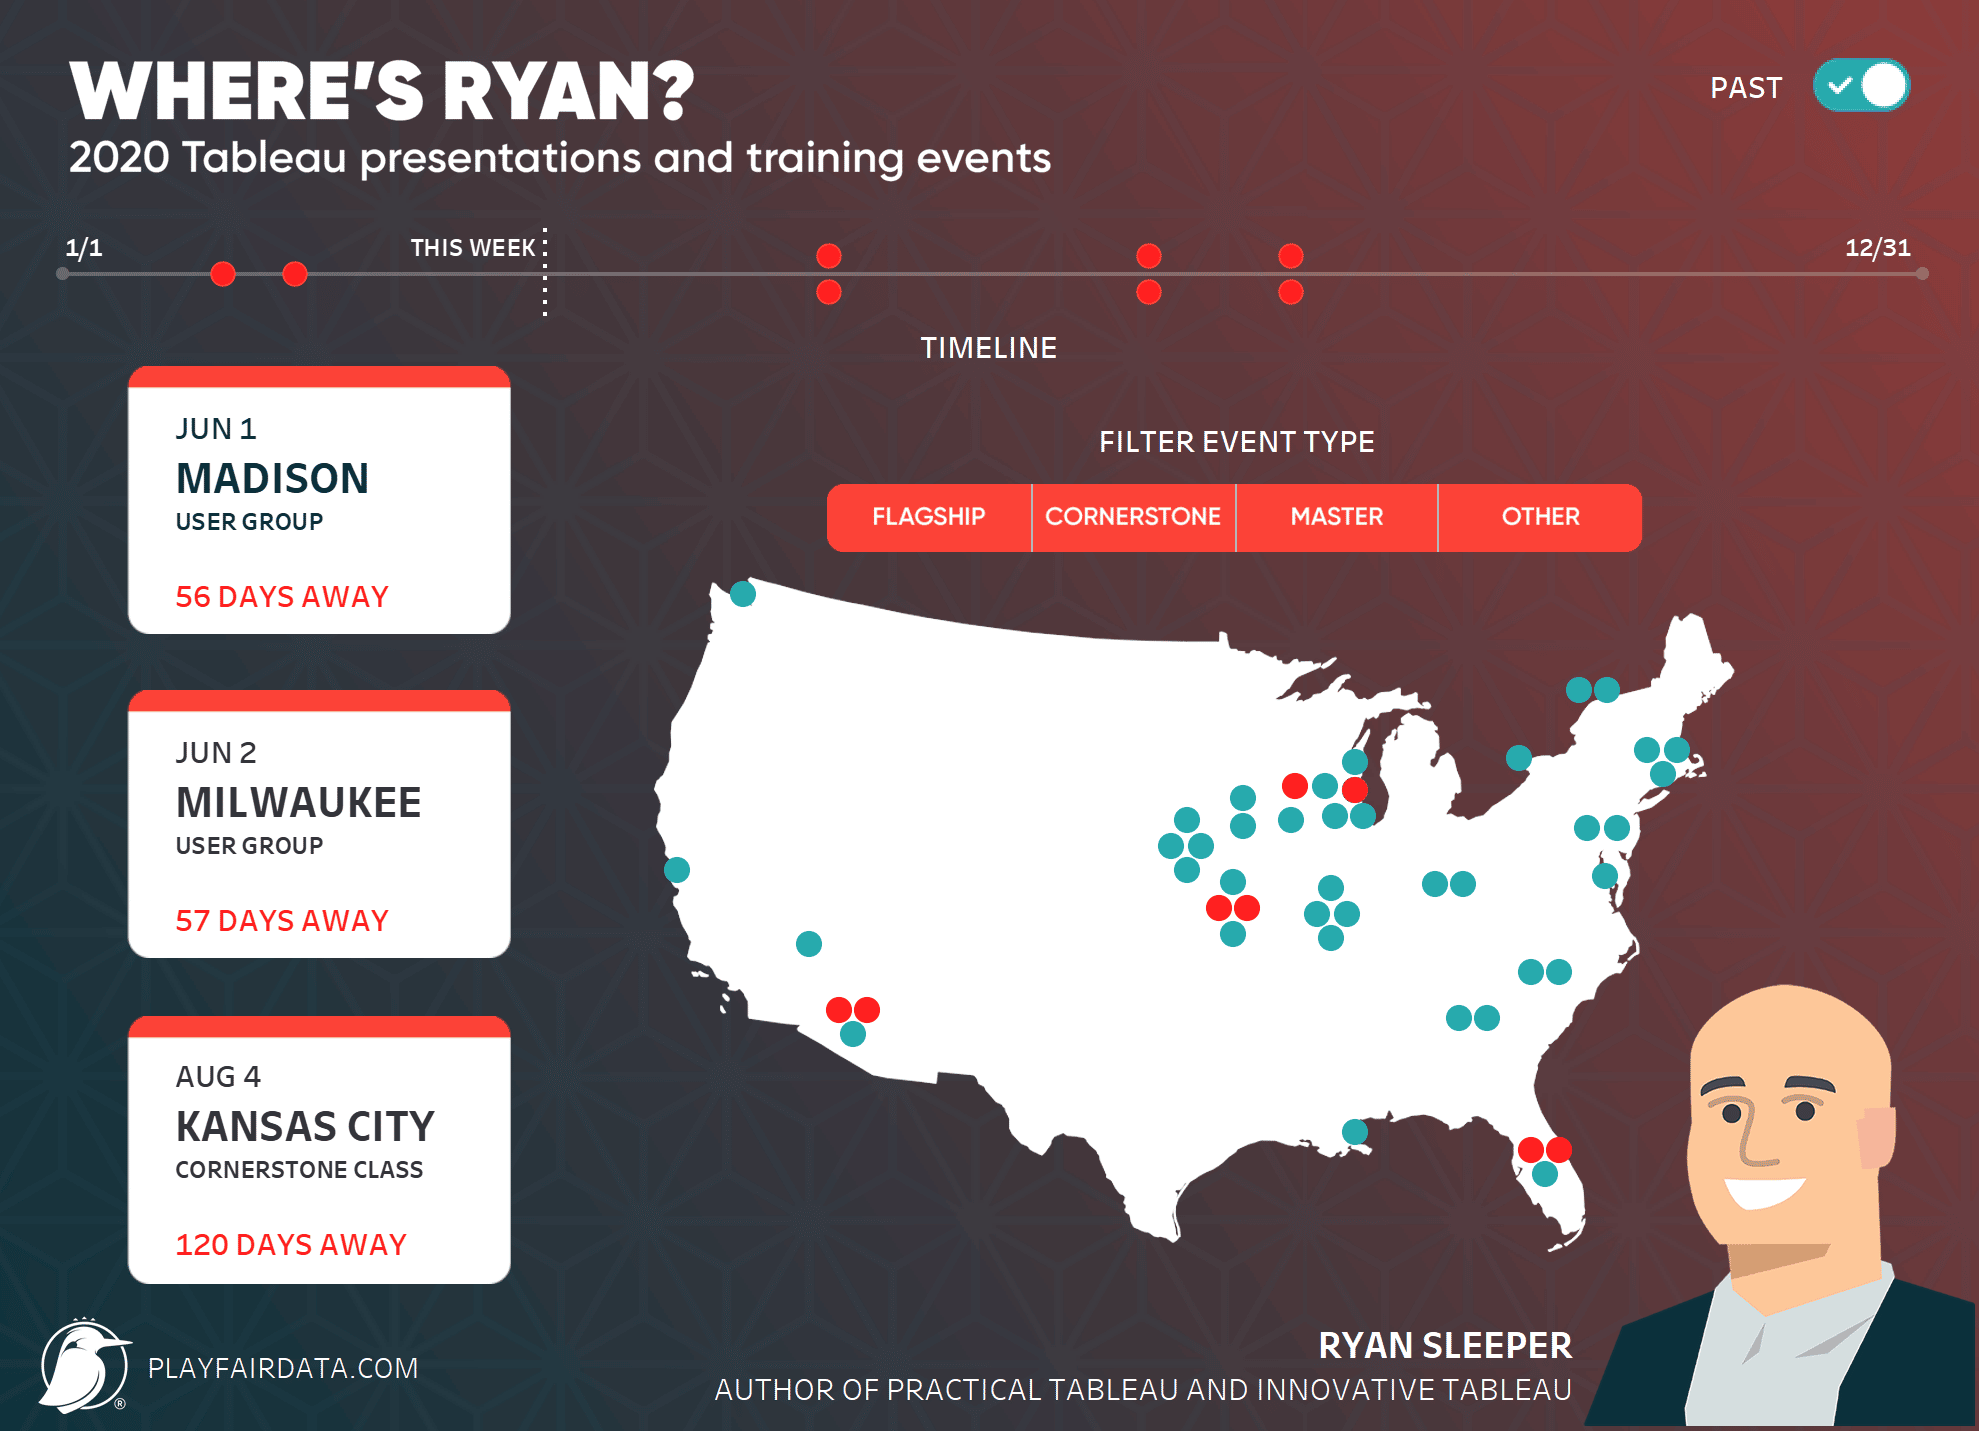
Select the toggle images
First, find an image that will represent the toggle in its unselected state and a second image that will represent the toggle in its selected state. For the most flexibility, I recommend creating / saving the images as PNG file types with transparent backgrounds. I like to use thenounproject.com to find such images because they allow me to customize the color before I download them.
![]()
Here’s the image I’m using for the unselected state:

Here’s the image I’m using for the selected state:

Continue reading with a free account, or login.
Unlock this tutorial and hundreds of other free visual analytics resources from our expert team.
Already have an account? Sign In
By continuing, you agree to our Terms of Use and Privacy Policy.
Create the worksheets for the Tableau toggle
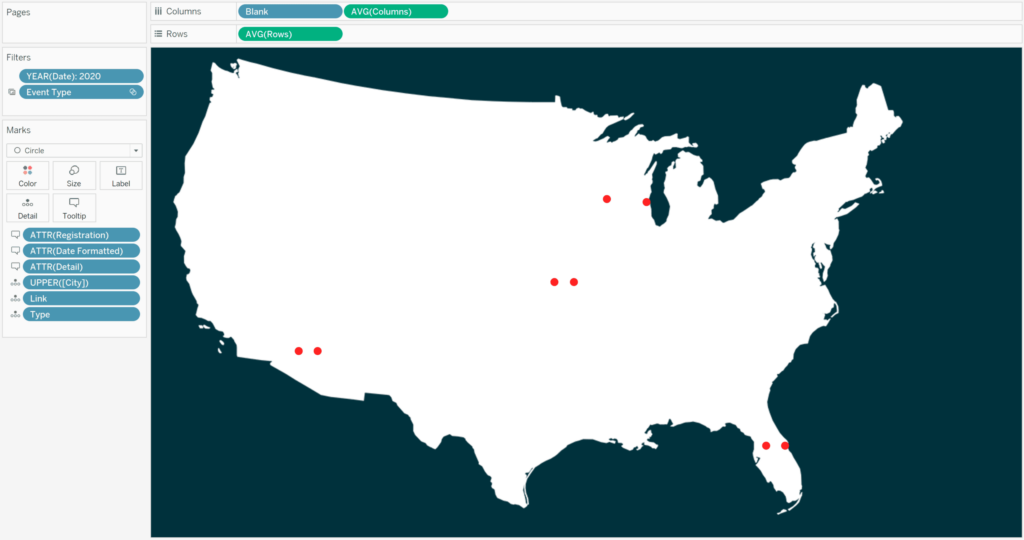
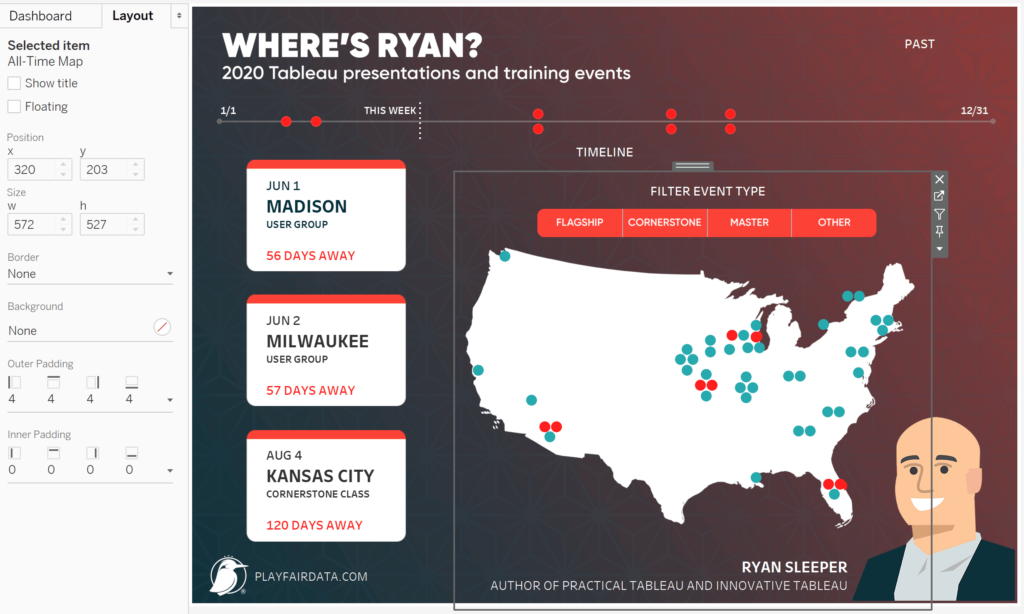
Next, create the worksheet that you want to represent the unselected state. For my example, I’m showing current (2020 only) events. Note there is a filter for year on the Filters Shelf.
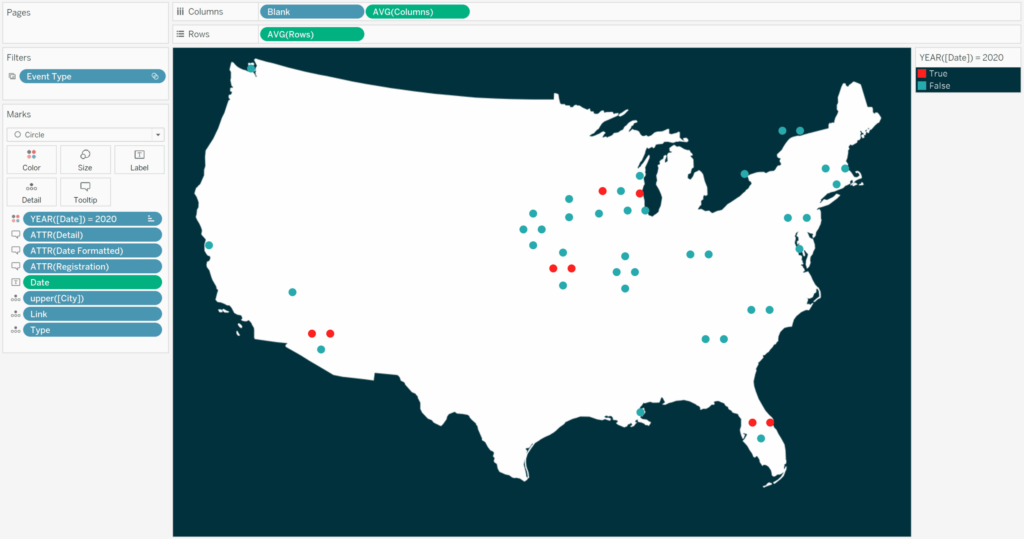
Now create a second sheet that you want to represent your selected state. For my example, when the toggle is turned on, I want to remove the filter for year and show every public event.
Add a layout container with a show/hide button
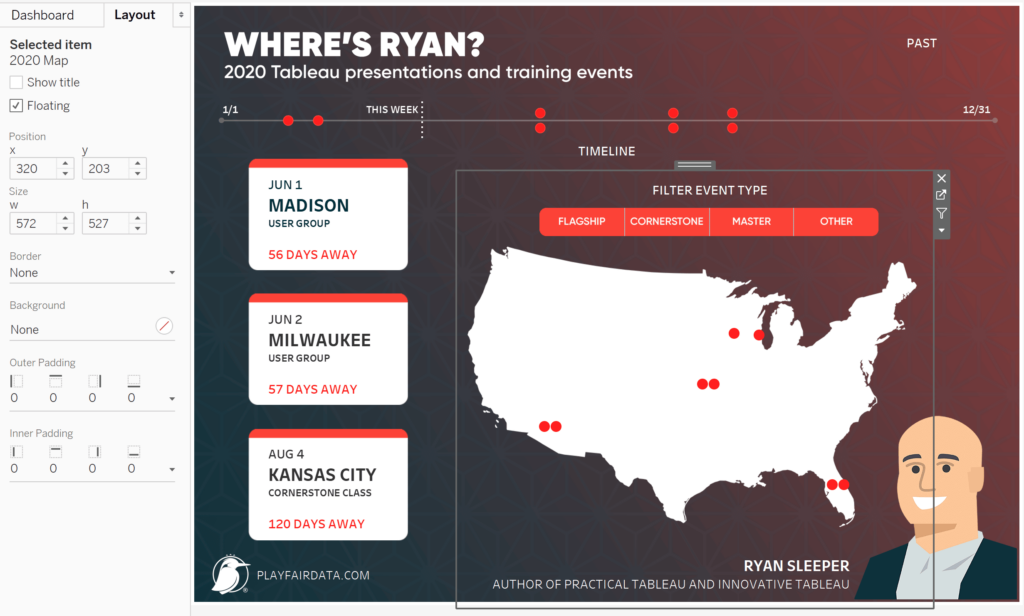
To toggle these back and forth, on a dashboard, place the sheet that represents the unselected state. For best results, float the worksheet so you can use the Layout pane to control its precise location and dimensions.
Note I’ve also made the background of this worksheet transparent so that the entire dashboard can have a nice custom background.
3 Creative Ways to Use Transparent Sheets in Tableau
Here’s where the trick comes in and what makes this so easy. Float a Horizontal (layout container) or Vertical (layout container) dashboard object over the first sheet with the exact same location and dimensions as the first sheet. As I can see on the Layout pane in the last image, the first sheet is 320 pixels in on the x-axis, 203 pixels down on the y-axis, 572 pixels wide, and 527 pixels tall.
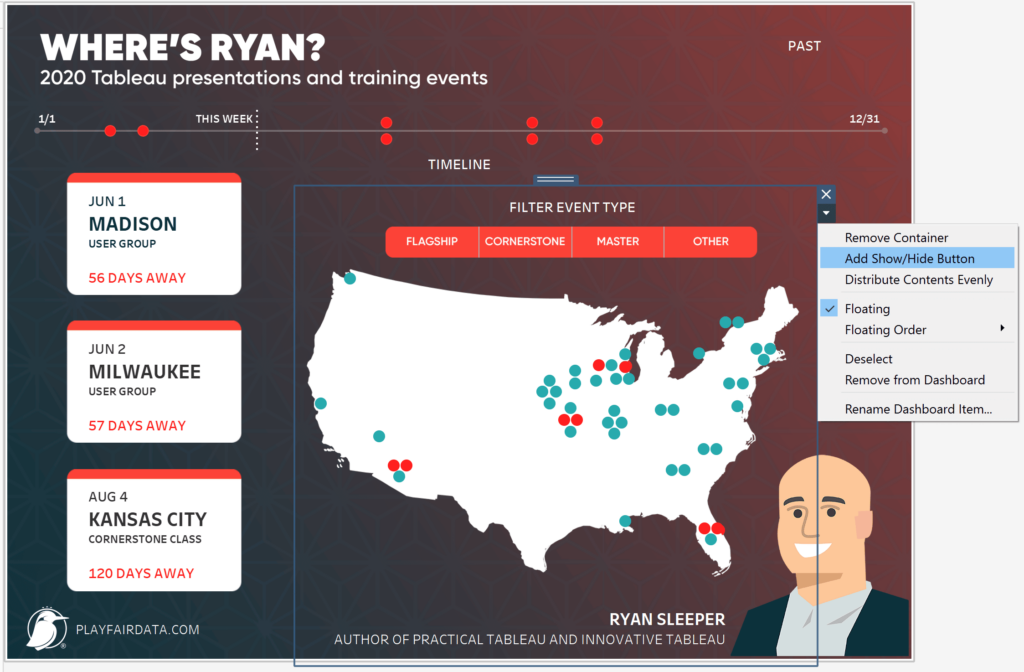
Place the worksheet that represents the selected state inside of the layout container by dragging it near the blue box while holding the Shift key. For best results, hide the default title that shows up by right-clicking on the sheet title and choosing “Hide Title”.
As of Tableau Desktop 2019.2, you can add a “Show/Hide Button” to layout containers that will toggle them on and off by clicking images. To access these options, select the worksheet that represents the selected state by clicking on it somewhere. A gray border will appear around the selected object with a small gray rectangle at the top of the selected object. If you double-click the gray rectangle, the border will turn blue indicating you have selected the entire container. Once the container is selected, click the down arrow on the right side of the selected container and choose “Add Show/Hide Button”.
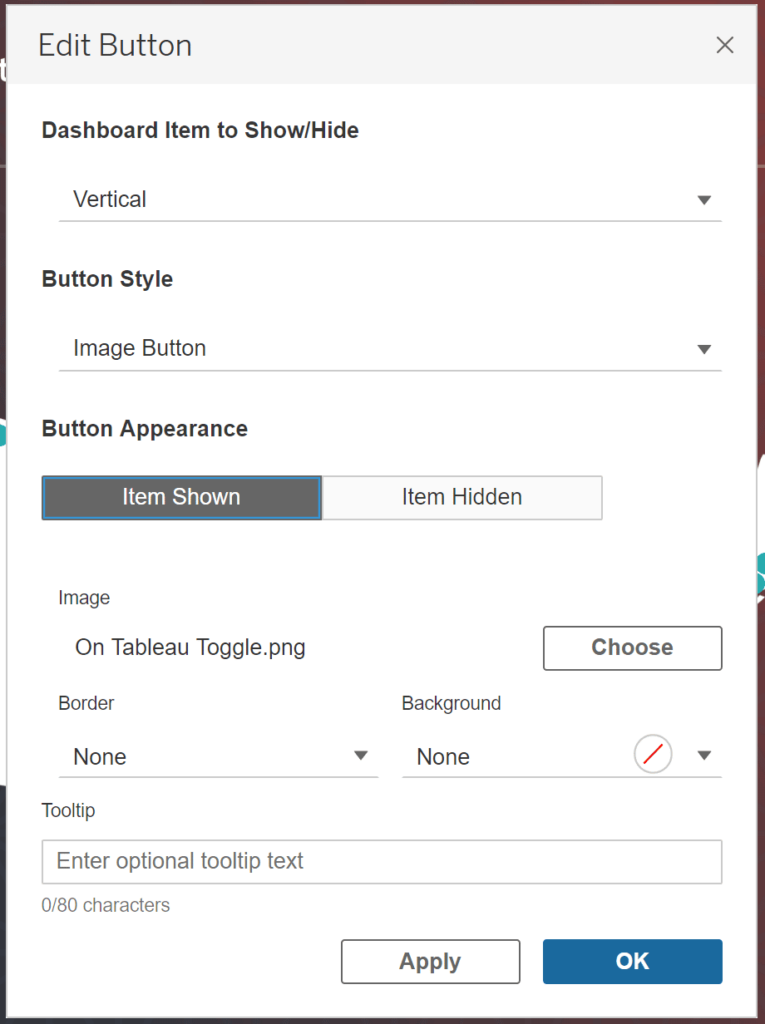
An image of an “X” will appear. By default, when the container is being shown, you will see this image of an X. When the container is closed, you will see a “hamburger” menu implying that there are options if you click the image. You can test this experience by going into Presentation mode or holding the Alt key while you click the Show/Hide button. These images can be changed quite easily by clicking the down arrow on the Show/Hide Button and choosing “Edit Button”.
![]()
Here is where the images from the first steps above come in. I can choose to show the icon that represents the selected state when the layout container is being shown, and the icon that represents the unselected state when the layout container is hidden. This is accomplished by clicking the “Button Appearance” option for each state (either “Item Shown” or “Item Hidden”) and choosing the respective image for each state.
This Show/Hide button acts as any other floating dashboard object so it can be resized and/or repositioned as needed for your dashboard. Here’s how my dashboard looks after moving the toggle to the top-right corner of the dashboard and making the image larger.

The “toggle” is turned on, showing the layout container with the worksheet in its selected state. If I click the toggle in production (or in Presentation mode or by holding the Alt key while I click on it), the toggle image reverts back to the toggle in its unselected state, the layout container disappears, and we are left with the worksheet in its unselected state.
No parameters, no integrating allowable values in calculated fields, no dashboard actions – just an easy way to make a toggle. One added benefit to this approach is you’re not actually selecting a sheet when you use the toggle, so you avoid the unwanted styling that comes with selected sheets.
This first technique in the series works best when you only need to toggle items in one chart, but theoretically, you can use a single toggle to control the marks on as many sheets as you want as long as they are in layout containers and floating over their respective unselected states.
This technique also works as an improved way to do sheet swapping.
Thanks for reading,
– Ryan

Written By
Ryan Sleeper
Related Content

Ryan Sleeper
Toggle On the Fun with 3 Techniques and 3 Practical Applications In this exclusive Playfair+ webinar, Ryan shares techniques for…
How to Do Better Sheet Swapping with Tableau’s Dynamic Zone Visibility
Tableau’s “Dynamic Zone Visibility” – released with version 2022.3 – promises to be a game changer when it comes to…
Ryan Sleeper
Flip Between Two Dashboard States with the Click of a Button In this video, Ryan shows you how to (1)…