How to Make “America’s Best Toggle” in Tableau
This is the third and final post in a series about toggles in Tableau. For other applications, see the easy way to make a toggle and how to make an integrated toggle switch.
One night at a team happy hour, someone proclaimed, “If we’re going to make a toggle, let’s make America’s best toggle,” and the following user experience was born. By the way, if this sounds like a conversation you wish you were a part of, we’re hiring.
This post shows you how to toggle on a selection from two or more choices with the click of a button. The innovation is that a unique image will be swapped in to highlight the current selection.
Watch the related video with Playfair+
How to use button swapping to create a better Tableau toggle
By the end of this post, you will be able to make a field selector that highlights the current selection.
Admittedly, I am taking some liberty with the definition of “toggle” in this example, which is typically thought of as toggling between exactly two features (i.e. a Play / Pause button). I think of the experience outlined in this post as a toggle because you can only toggle one thing on at a time and it’s either the selection or it isn’t (i.e. Boolean). Of course, you can also create this experience for only two options.
![]()
To create the selector user experience, we will use a technique called button swapping. Button swapping was developed when set actions existed, but parameter actions did not, so this tutorial will be slightly different. Parameter actions vary from set actions in that (1) something always has to be selected and (2) you cannot do a multi-select; making it a perfect option for a single select “toggle”.
Continue reading with a free account, or login.
Unlock this tutorial and hundreds of other free visual analytics resources from our expert team.
Already have an account? Sign In
By continuing, you agree to our Terms of Use and Privacy Policy.
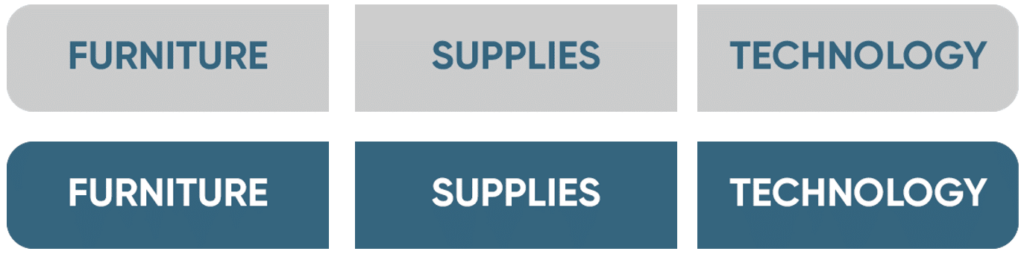
First, create two images for each option: a selected version and an unselected version. For best results, the images should be the exact same dimensions and be created as PNG file types with transparent backgrounds. If you’re able to make the backgrounds transparent, you can place the toggle on a background of any color.
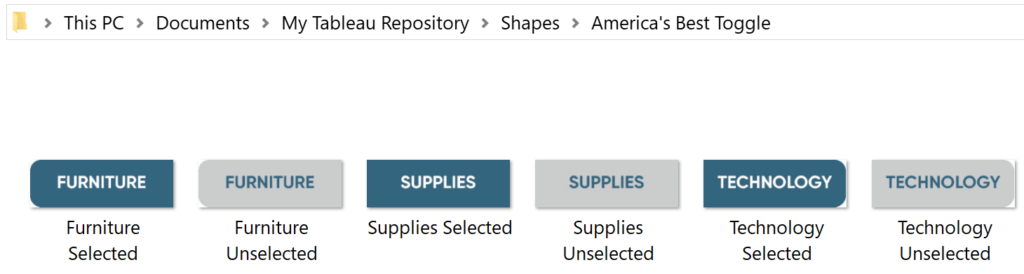
Add these images to a palette folder (or create a new one) in your Tableau Repository at Documents > My Tableau Repository > Shapes.
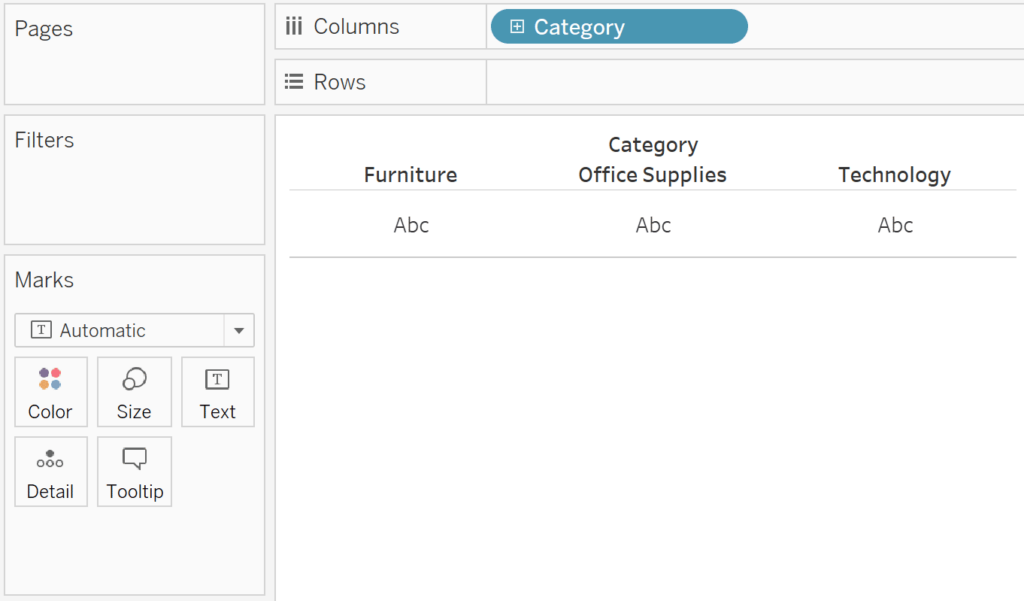
Next, create a control sheet in Tableau with your options. If the toggle choices exist as dimension members in one of the data source fields, simply place the dimension on the Columns Shelf for now.
If the choices are not in an existing dimension, you are likely better off creating a separate data source in Excel containing your toggle choices.
How to Use Control Sheets for Better Parameter Actions
Next, set up a parameter with the toggle choices. For ease of setup, ensure the toggle choices match the exact spelling and casing of the dimension members on your control sheet.
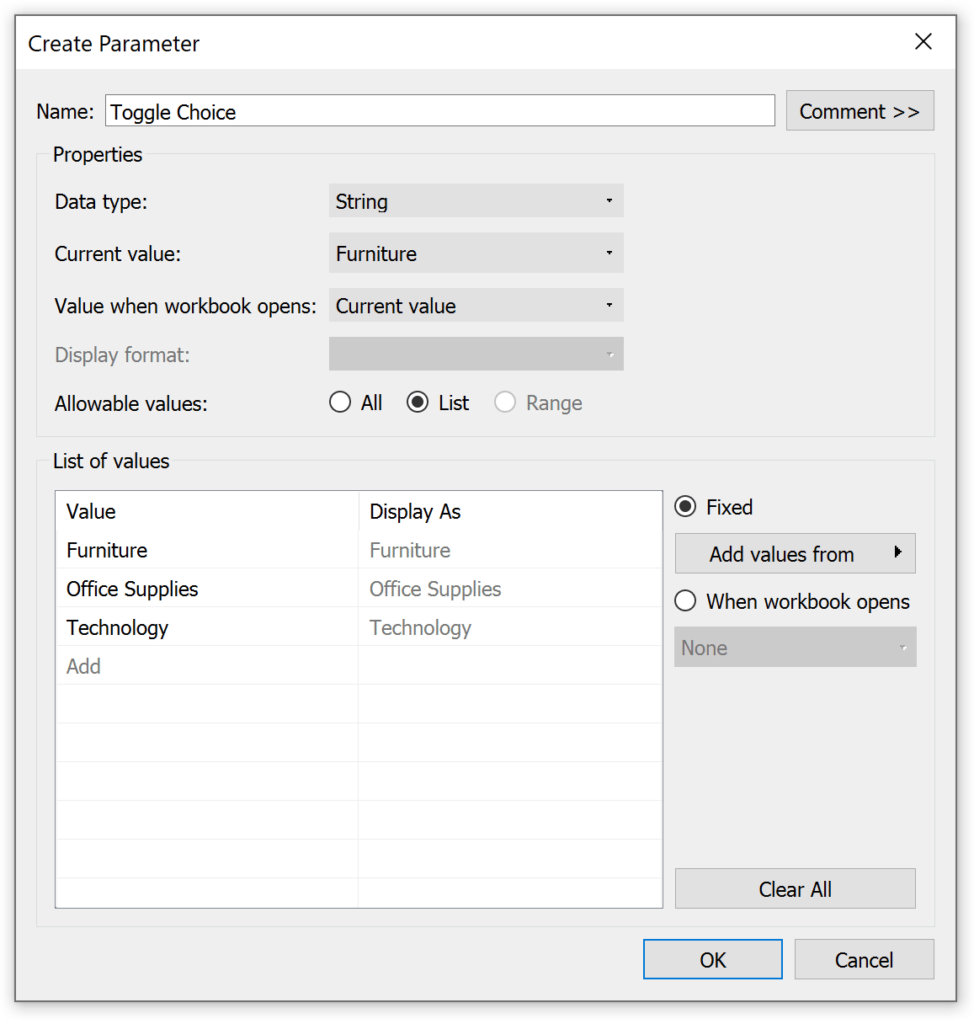
Now here is the formula that makes this whole technique go. We’re going to classify each toggle choice as either matching the parameter selection or not matching the parameter selection; followed by the name of the toggle choice. The formula is:
STR([The dimension you are using] = [The toggle choice parameter])+[The dimension you are using]
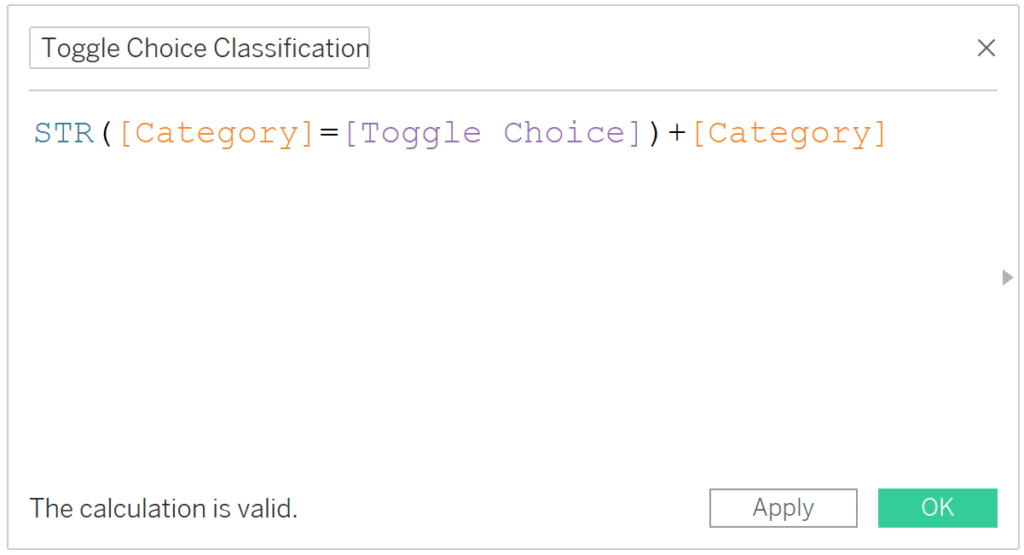
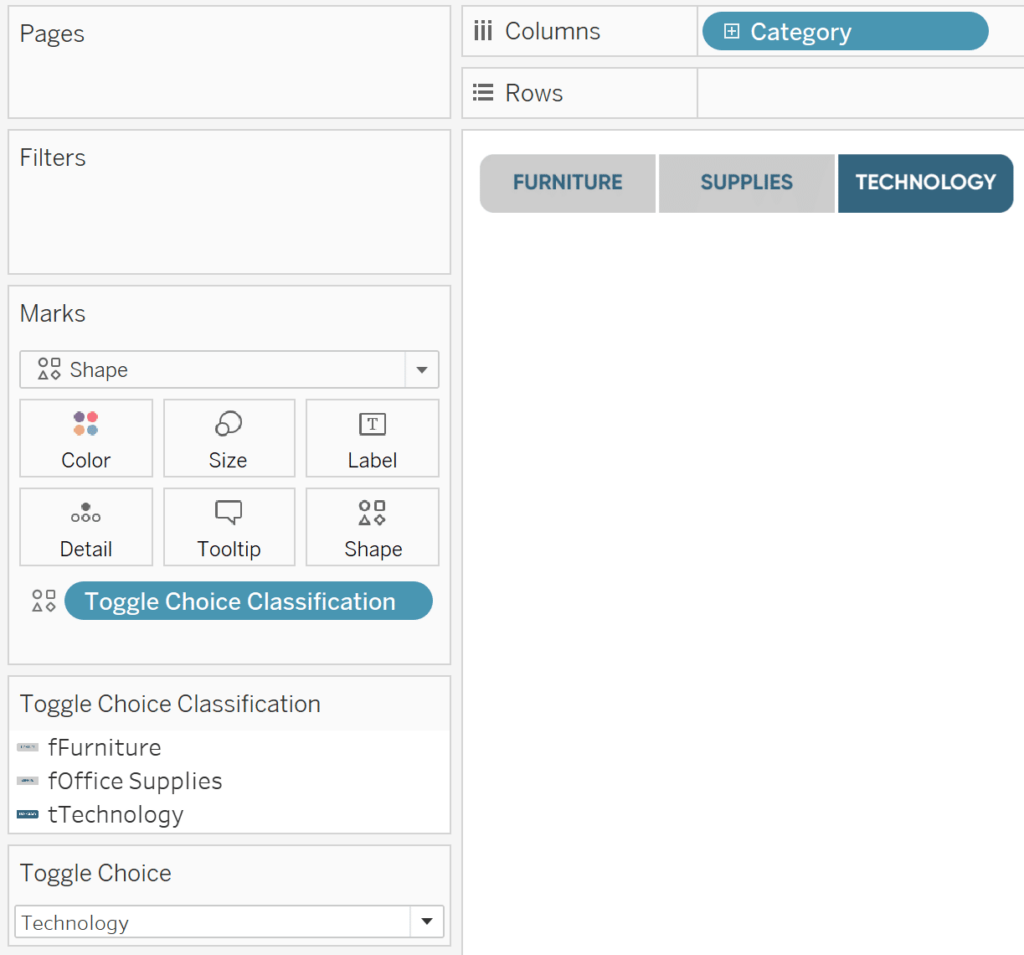
This will create a total of six dimension members that we can map unique shapes to. In my case, the six members are:
tFurniture
tOffice Supplies
tTechnology
fFurniture
fOffice Supplies
fTechnology
Note the lowercase t or f preceding the Category names are the Boolean portion of our calculated field, indicating the single current selection.
To map the custom images, change the mark type of your control sheet to Shape and place this newly created classification calculated field on the Shape Marks Card.
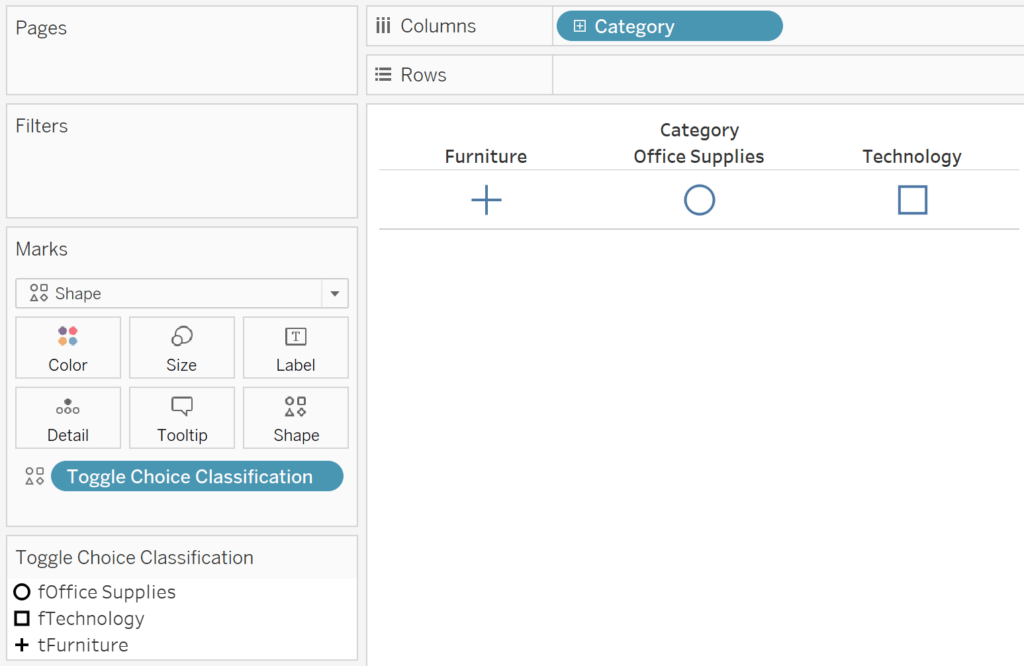
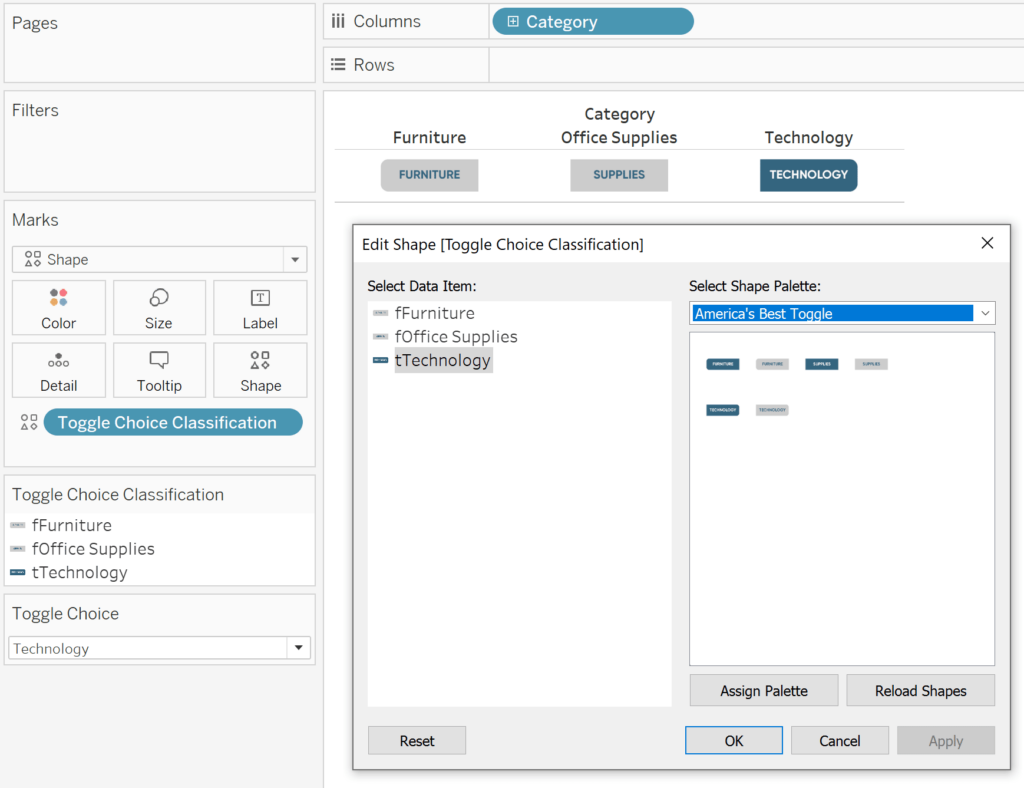
As you can see, the only option with a “t” preceding it is Furniture because that is the current value of the Toggle Choice parameter. Now that our classification calculated field is on the Shape Marks Card, we can map these results to the custom images we placed in our Tableau Repository by clicking the Shape Marks Card or double-clicking any image on the Shape legend.

To ensure you’ve mapped every possible outcome, show the Toggle Choice parameter control by right-clicking the parameter from the Parameters area of the Data pane and choosing “Show Parameter Control”. You can now easily change the current value of the parameter and finish mapping your custom images.
To finalize the control sheet, use the Size Marks Card to change the size of the “buttons” and/or resize the sheet until the control sheet looks like one cohesive unit. I’ve also hidden all headers and lines.
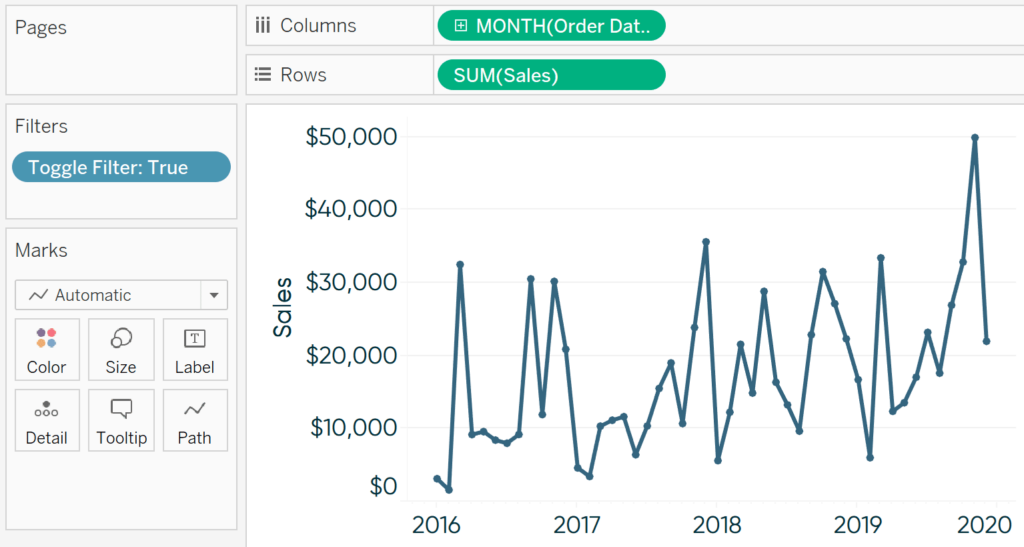
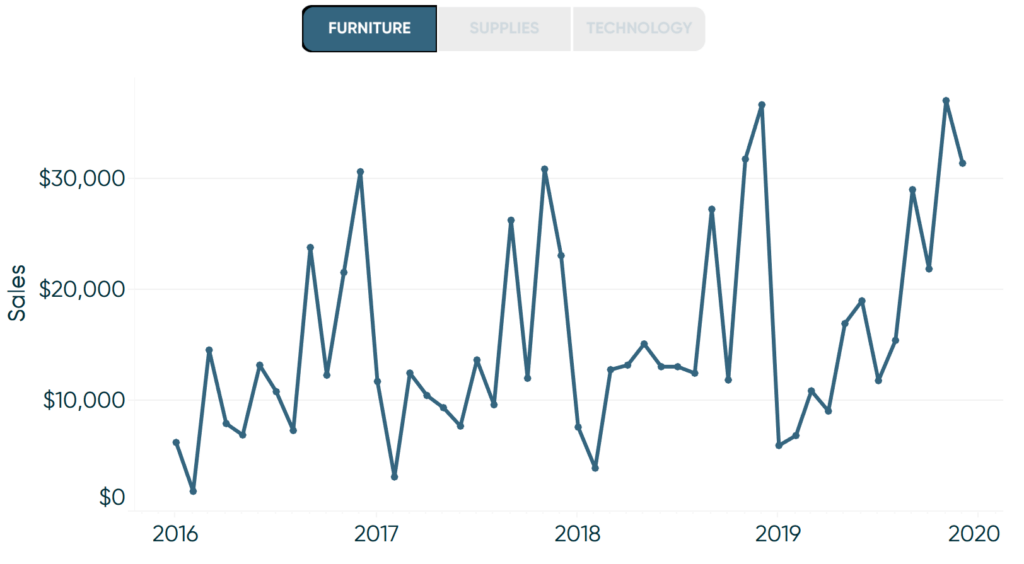
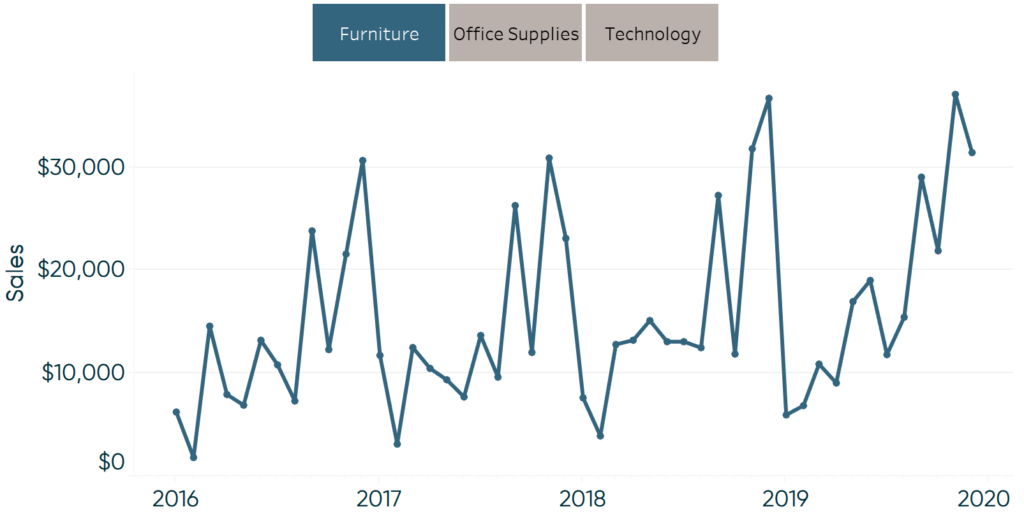
This sheet is now ready to control the selection for any sheets on a dashboard. As one example, I’ll make a sales-by-month line graph. The key is anytime you want the filtered results in the sheet to be controlled by the toggle selector we set up, you must add a filter to the Filters Shelf with the formula “[The dimension you are using]=[The toggle choice parameter]”. This will filter the result to one thing at a time: the current value of the Toggle Choice parameter.
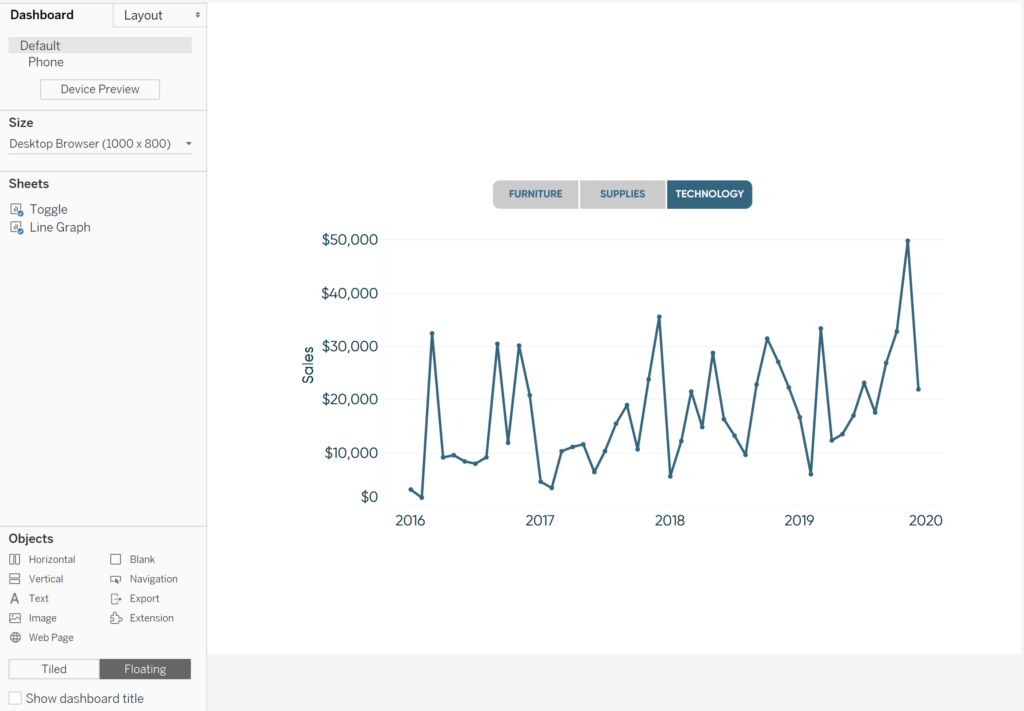
Place the toggle control sheet and every sheet you want it to control on a dashboard.
Lastly, set up a parameter action that passes the value of the dimension member from your control sheet to the Toggle Choice parameter.
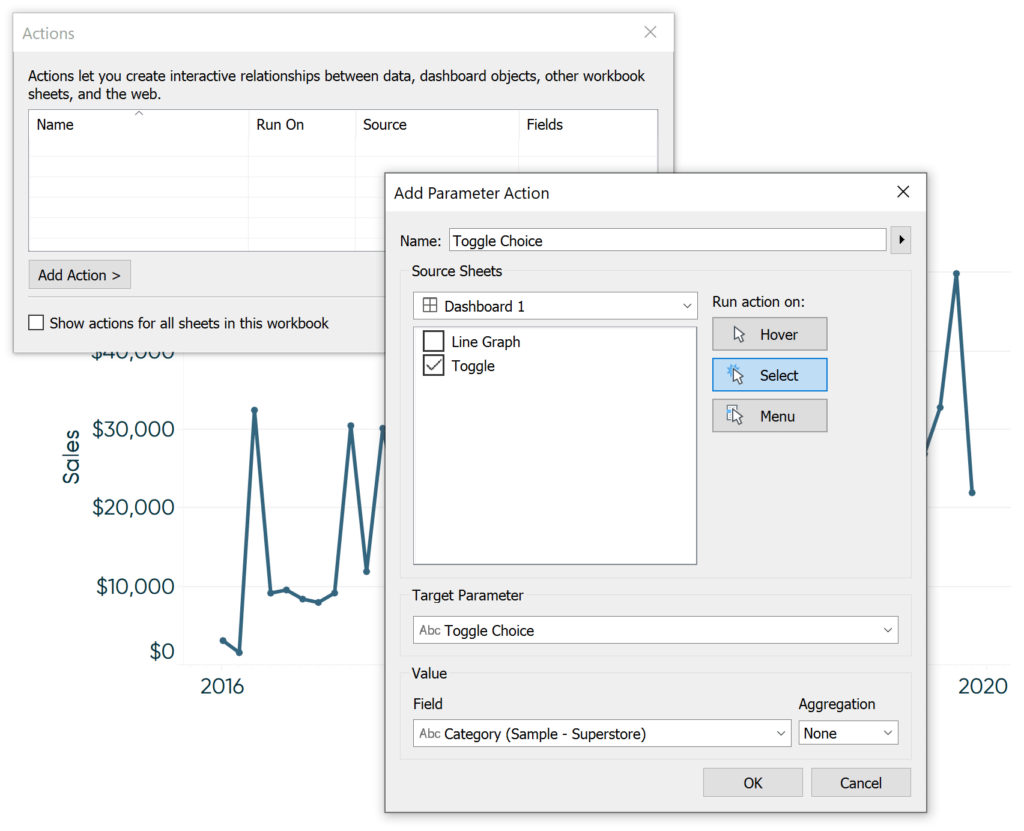
How to Use Tableau Parameter Dashboard Actions
This parameter action overwrites the current value of the Toggle Choice parameter which is integrated with the Toggle Choice Classification calculated field controlling our control sheet images and the Toggle Filter calculated field controlling the line graph. This means that now if I click the Furniture toggle option, the toggle updates to show the selected Furniture image and the chart updates to display sales for Furniture!
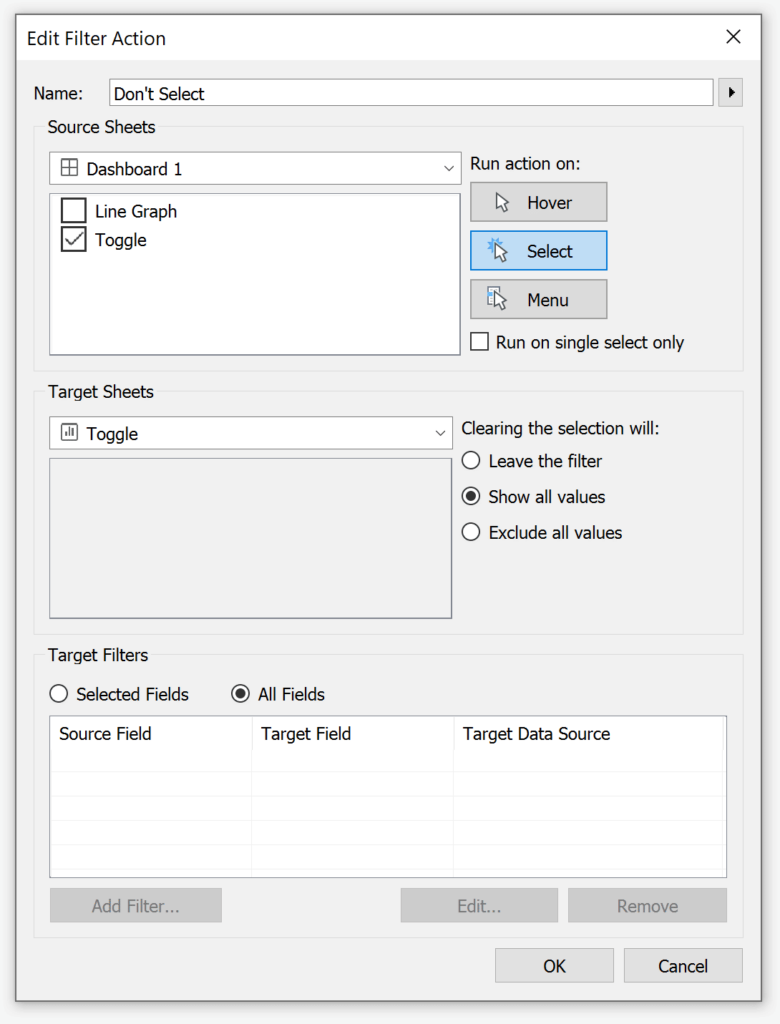
This is an awesome user experience, but there are two small things bugging me. By default, Tableau is highlighting the selected image. This defeats the purpose of making my custom images because they are faded until the user deselects the toggle. Also, there’s a black border around the current selection which I’ve never been a fan of. Both of these styles can be removed by adding a Filter dashboard action with the Toggle sheet as the target.
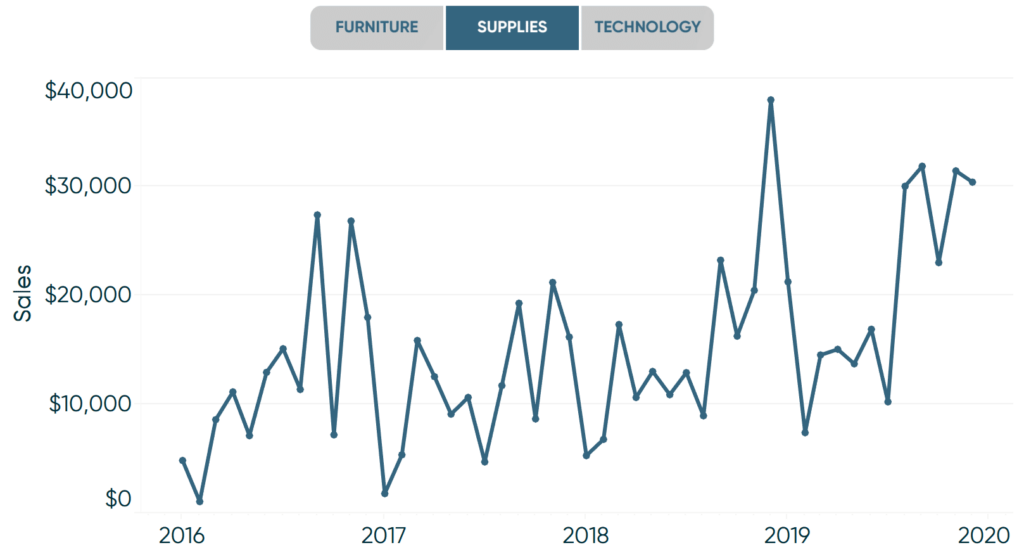
Here’s how the final view looks after selecting Supplies.
How to make “America’s okay-ist toggle”
If creating the custom images isn’t for you, I have an easier approach that will provide most of the value of the first approach in much less time.
![]()
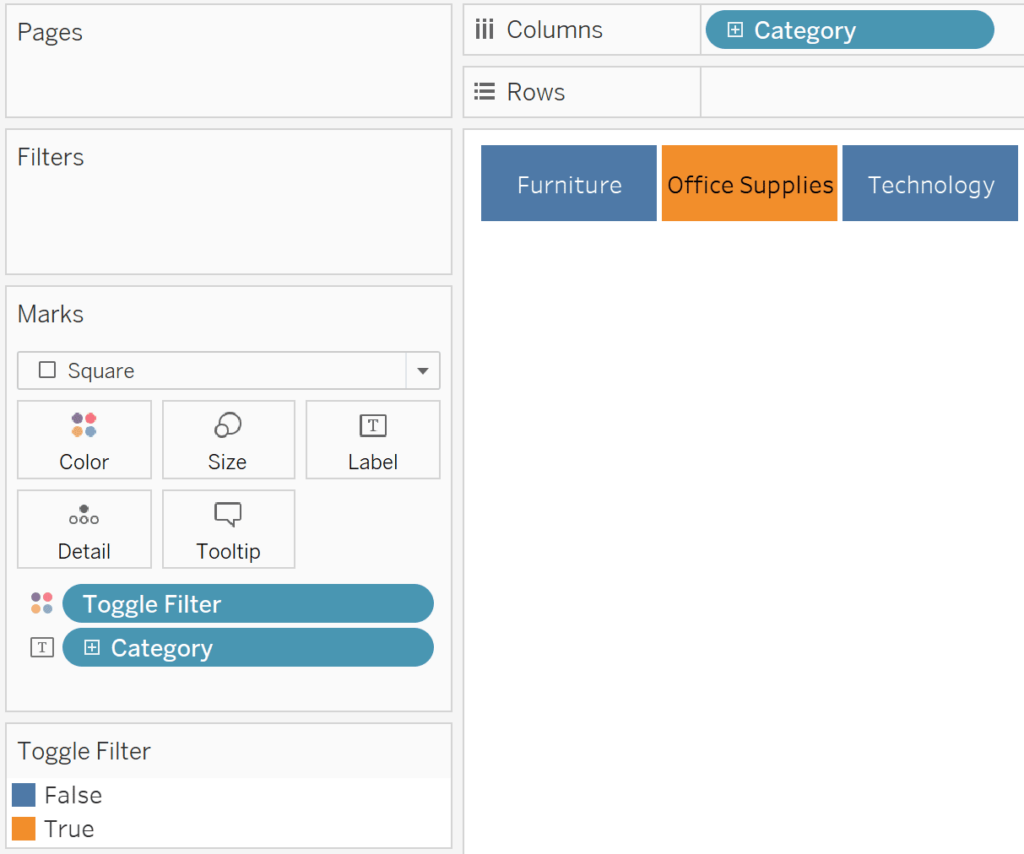
Instead of using a mark type of Shape on your control sheet, use a mark type of Square. Instead of displaying the toggle choice names on images, you can add the dimension containing your toggle choices to the Label Marks Card.

Next, place the calculated field being used to filter the individual sheets onto the Color Marks Card of your control sheet. Remember, the formula for this calculated field is “[The dimension you are using]=[The toggle choice parameter]”. In my case, that’s [Category] = [Toggle Choice]. Since only one category matches the current value of the parameter, we get one color for the current selection and a second color for the two unselected options. Of course, you can remap the colors to your liking.
Everything else works the same way as the first approach. The parameter action controls the current value of the Toggle Choice parameter, which both colors the toggle and filters the line graph. Here’s the dashboard after selecting Furniture again.
No custom rounded images and fonts in this version, but an easy way to provide a nice user experience.
Thanks for reading,
– Ryan


Written By
Ryan Sleeper
Related Content

Ryan Sleeper
Dynamically change images in a navigation to highlight choices Ryan shares an innovative technique for highlighting dashboard selections in Tableau.…
Ryan Sleeper
Toggle On the Fun with 3 Techniques and 3 Practical Applications In this exclusive Playfair+ webinar, Ryan shares techniques for…
How to Make a Boolean Toggle in Tableau
Last week, I showed you how to filter marks on and off using a Show/Hide button on layout containers. That…