Tableau Tip: Single Row Drilldown “Deluxe”

I’ve shown you before how to drill into a single row of a Tableau crosstab. I find this to be an incredibly useful tactic for detailed text reports because while Tableau provides a hierarchical drilldown capability, it is all or nothing. This means that if you click the first level of a hierarchy to get to the second, every single row from the first hierarchy expands; making the table over-inflated with rows you’re not focused on. This post will aim to provide you with a multi level drill down method in Tableau.
This post builds on the single row drilldown technique and shows you how to (1) drill into a single row two or more levels deep, and (2) allow users to customize the hierarchy levels with any combination of dimensions.
This is the second in a three-post series about innovative uses of text in Tableau. For the first post, see How to Do Pagination.
Learn more user experience tricks with Playfair+
How to expand a single selection in a Tableau text table
By the end of this post, you will be able to display only selected rows for two or more levels in a custom hierarchy.
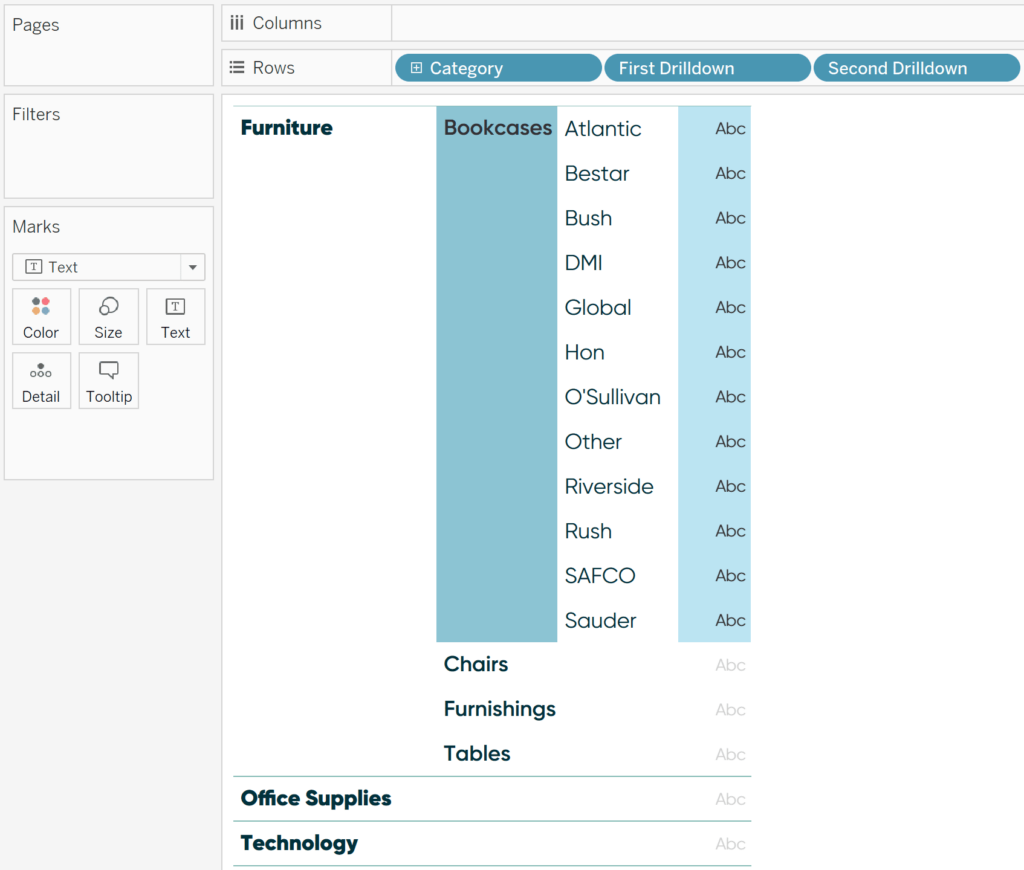
Before I show you the foundation for the deluxe version of the single row drilldown technique, let’s look at why this is needed. As I mentioned, Tableau comes out-of-the-box with a hierarchy feature and you can click a Plus button at the top of a crosstab to drill into the next level. Here’s one example from the Sample – Superstore dataset that goes from Category, to Sub-Category, to the Manufacturer group, to Product Name.
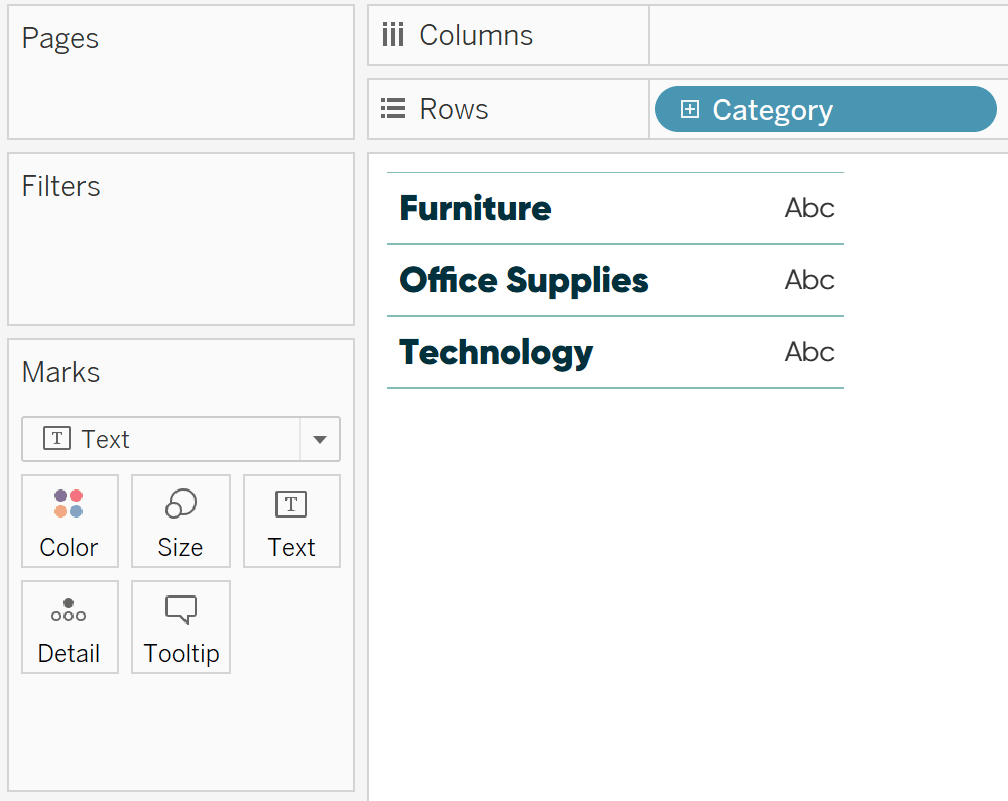
Now if I click the plus sign on either the Category field on the Rows Shelf or that appears when you hover near the top of the first column, the hierarchy will expand to the second level.
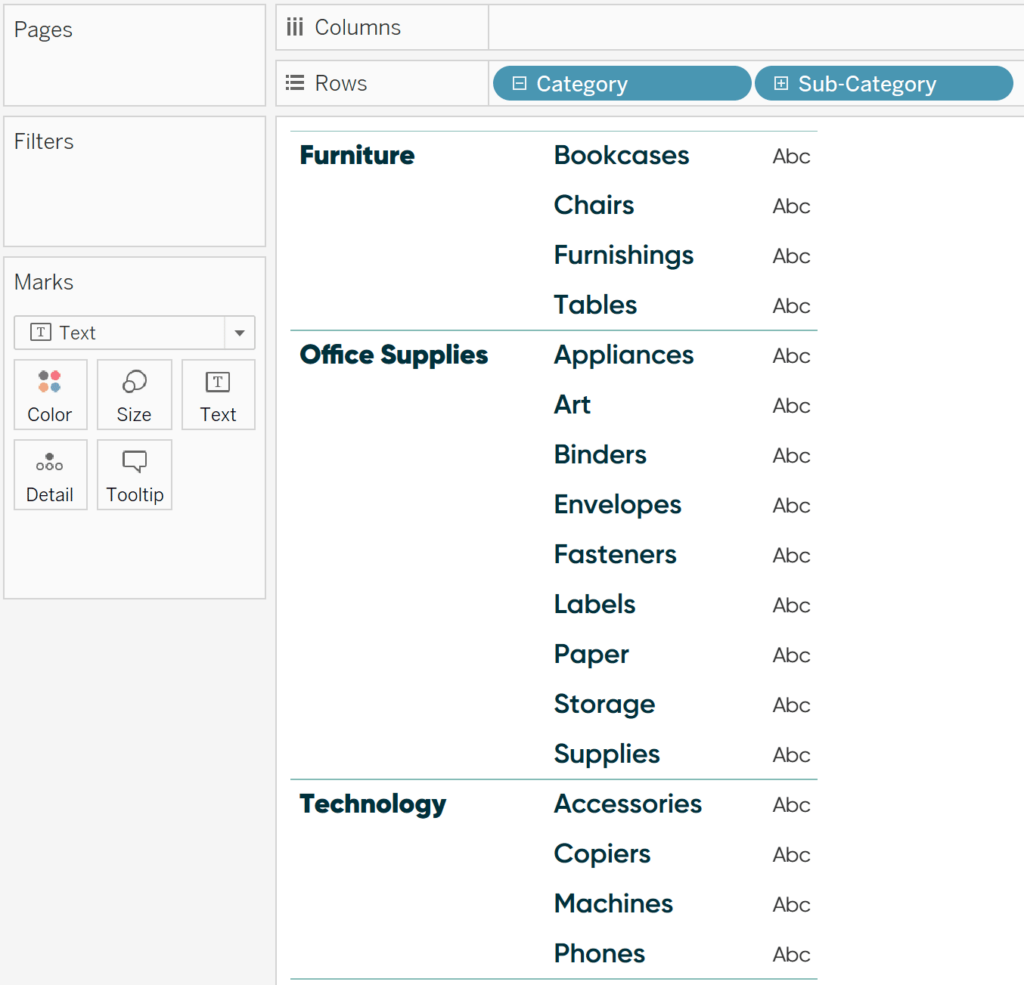
See the problem? Every category expanded to show every sub-category in the second column. If I wanted to explore only the Furniture category, which has just four rows, I still have to expand the table to see 17 rows. If I drilled into the next level, Manufacturer, I would see 265 rows instead of only the relevant 60 rows. And if I wanted to look at the product names in the Furniture category, I would see 1,850 rows instead of 380 – yikes!
![]()
Continue reading with a free account, or login.
Unlock this tutorial and hundreds of other free visual analytics resources from our expert team.
Already have an account? Sign In
By continuing, you agree to our Terms of Use and Privacy Policy.
To improve the user experience and drill into only the selected row requires just three things:
- A set made from the dimension the user clicks on
- A calculated field that displays the second level of the hierarchy when the first is selected
- A set action that passes the selection to the set from the first bullet
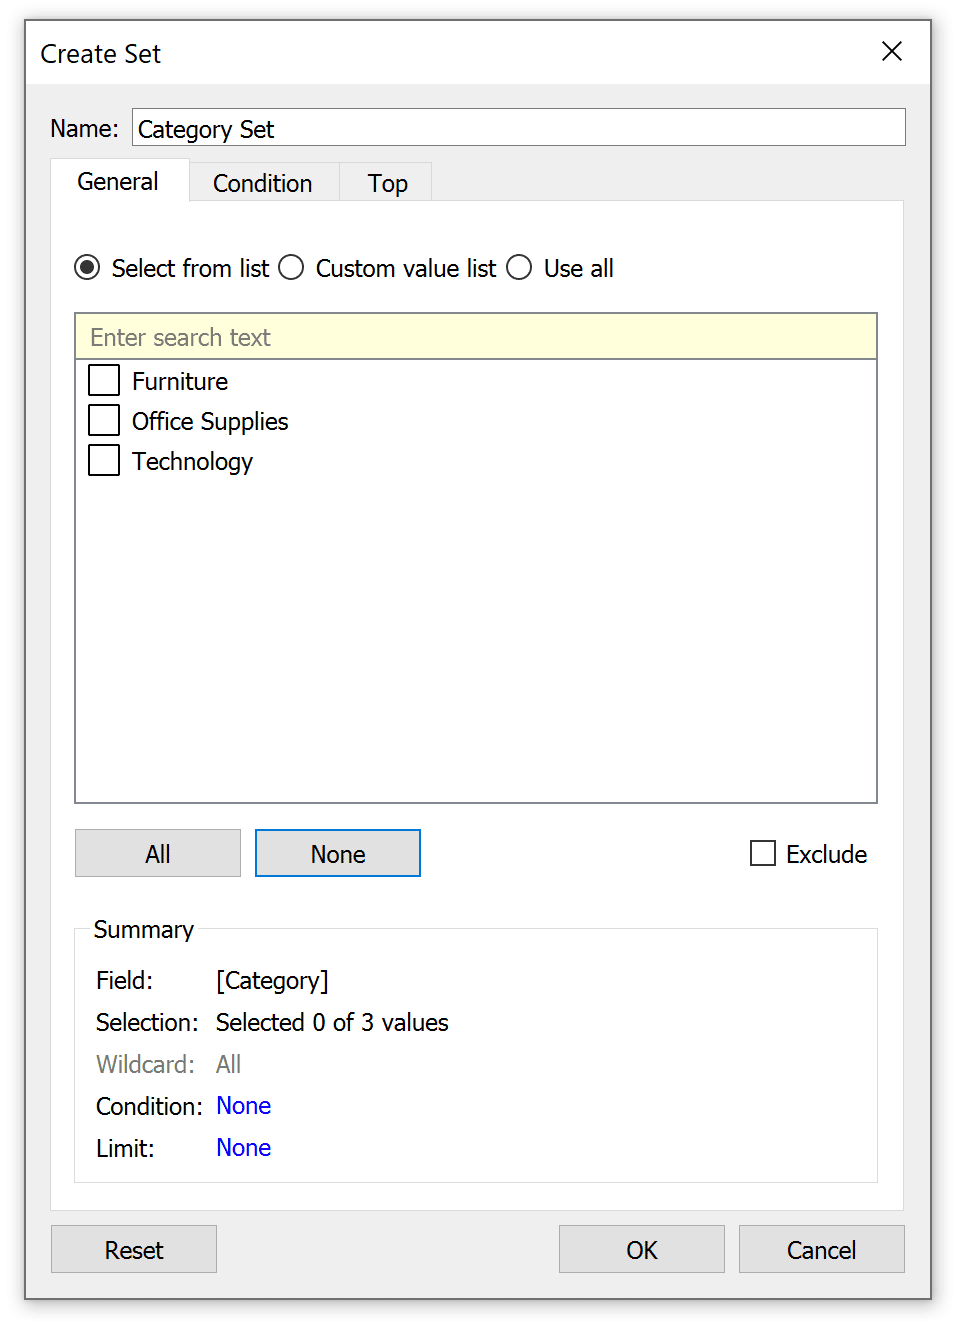
To create the set for the use case covered to this point, right-click on the Category dimension, hover over Create, and choose Set.
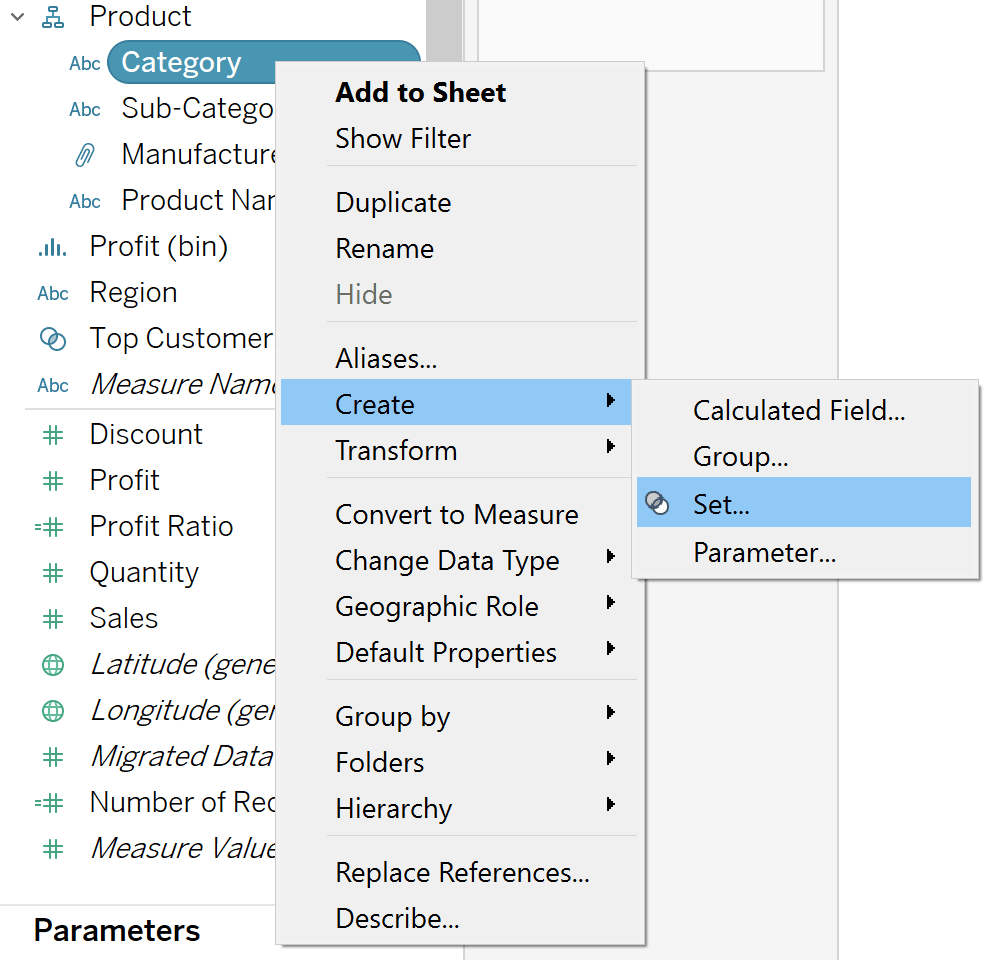
This will open the Set dialog. Give the set a name, but leave it empty for now. Click the OK button to close the dialog.
An Introduction to Tableau Sets
Now we need to create a calculated field that displays the second level of the hierarchy for the dimension members in the set; the formula is:
IIF([Category Set],[Sub-Category],””)
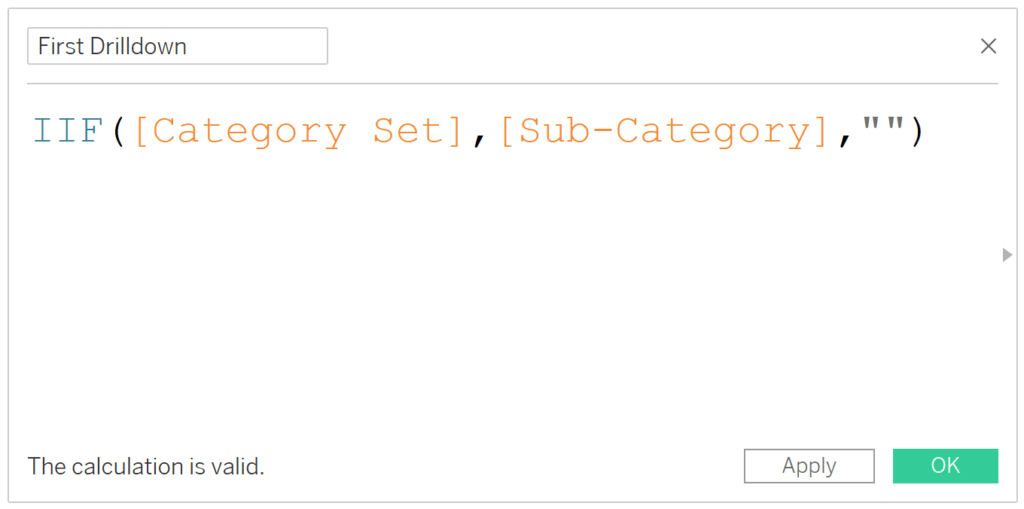
This logic tells Tableau that if a dimension member is in the Category Set, show the Sub-Category dimension; otherwise show a blank space.
An Introduction to Tableau Calculated Fields
Next, place the newly created calculated field immediately after the first level of the hierarchy on the Rows Shelf.
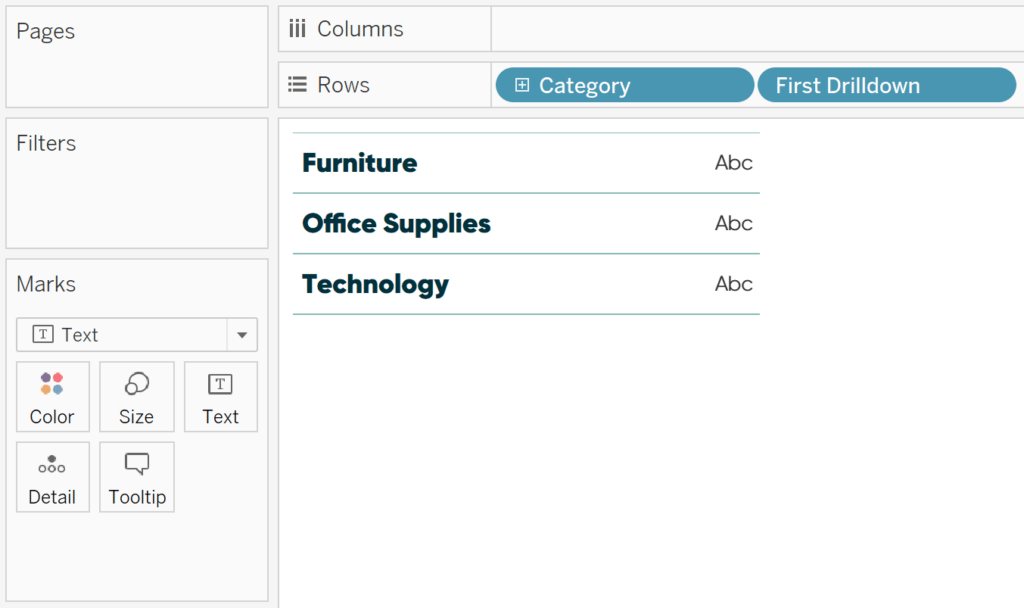
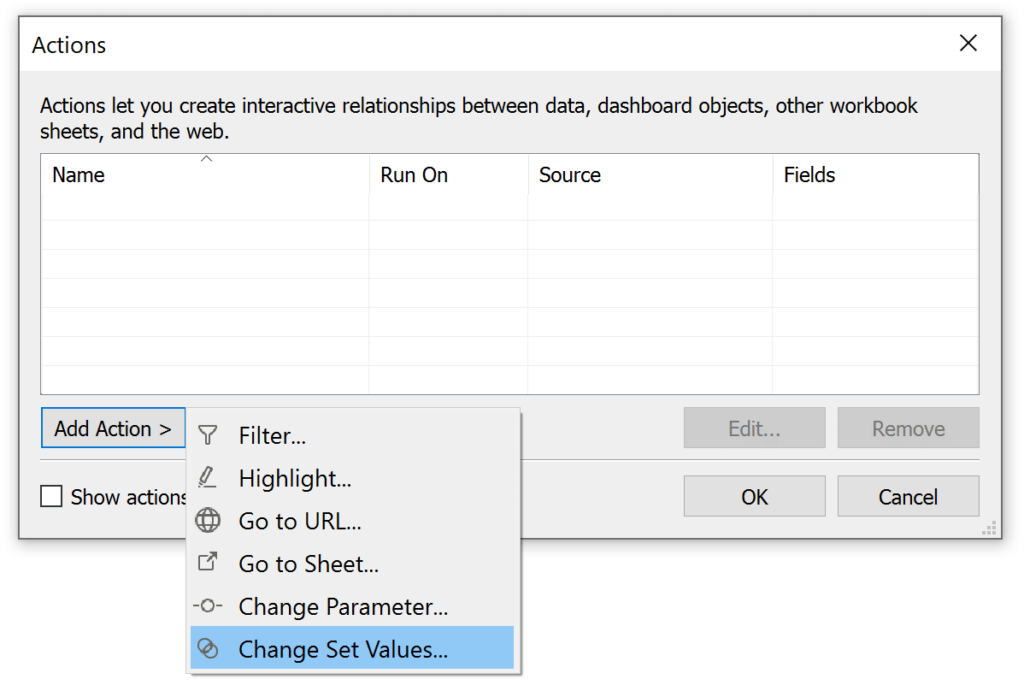
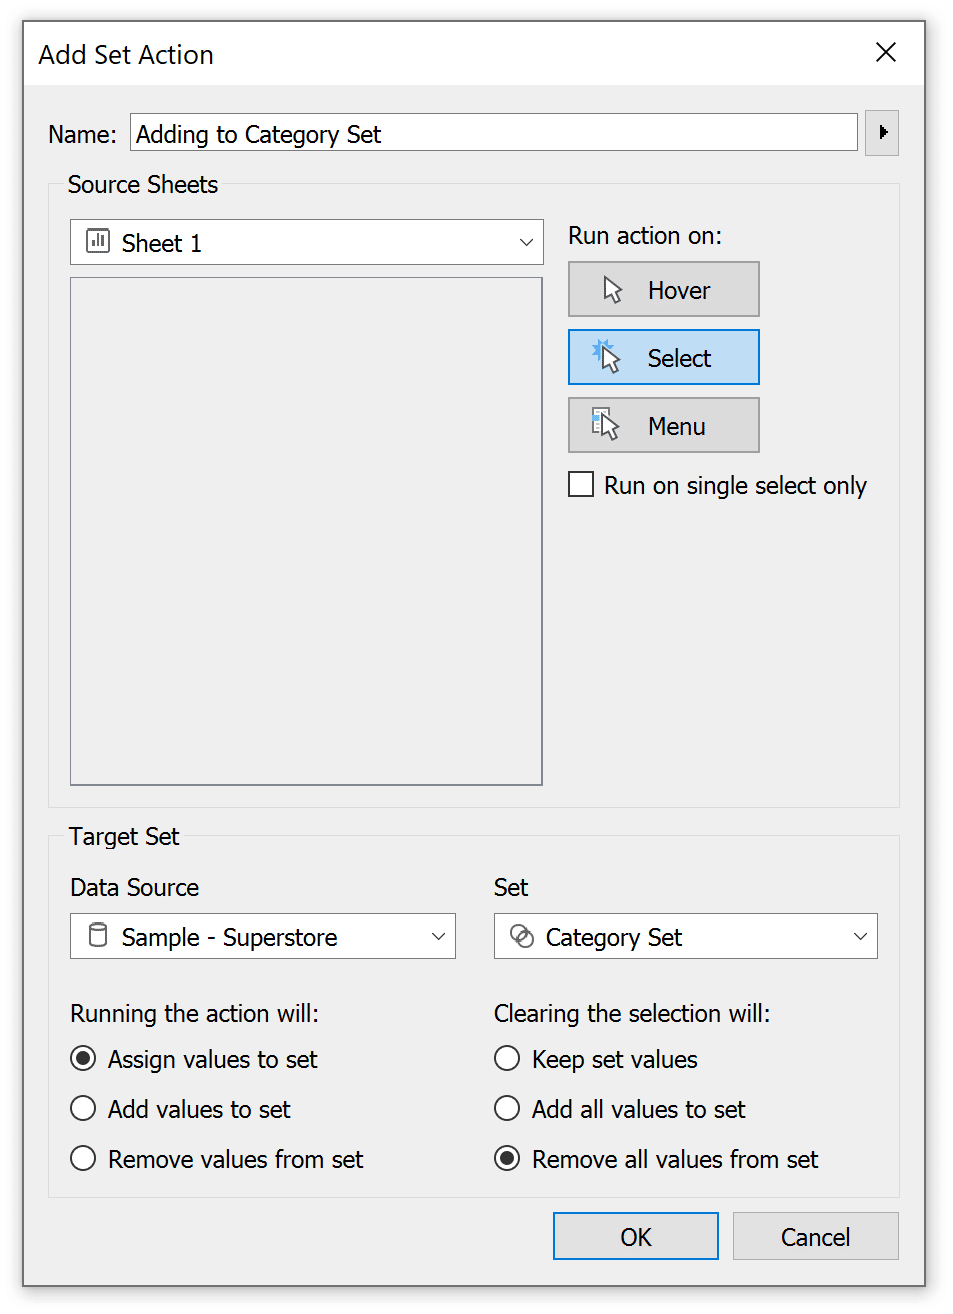
Since there are no dimension members in our Category Set, we see a blank space for all three rows. To add dimension members to the Category Set, I will add a set action to this worksheet by navigating to Worksheet > Actions. This needs to be a set action, so I will click the Add Action button and choose “Change Set Values”.
A dialog will appear where I can provide settings for the worksheet action. In this case, I’m assigning values to the Category Set. For best results, I recommend setting this up to “Remove all values from set” when the selection is cleared; this returns the table to it’s original state as if nothing happened.
After clicking the OK buttons to close the dialogs, clicking a single row in the table expands only that row to show the underlying sub-categories.
How to drill into a single row for multiple levels of a hierarchy
Now for the new stuff. The capability to drill into one level of a hierarchy for a single row is useful, but you can add as many levels as you want. The trick is that for each level, you must create a set from the calculated field from the previous level. This logic can get tricky, but here’s an example if we wanted to add to our Category > Sub-Category drilldown, and go from Sub-Category to Manufacturer.
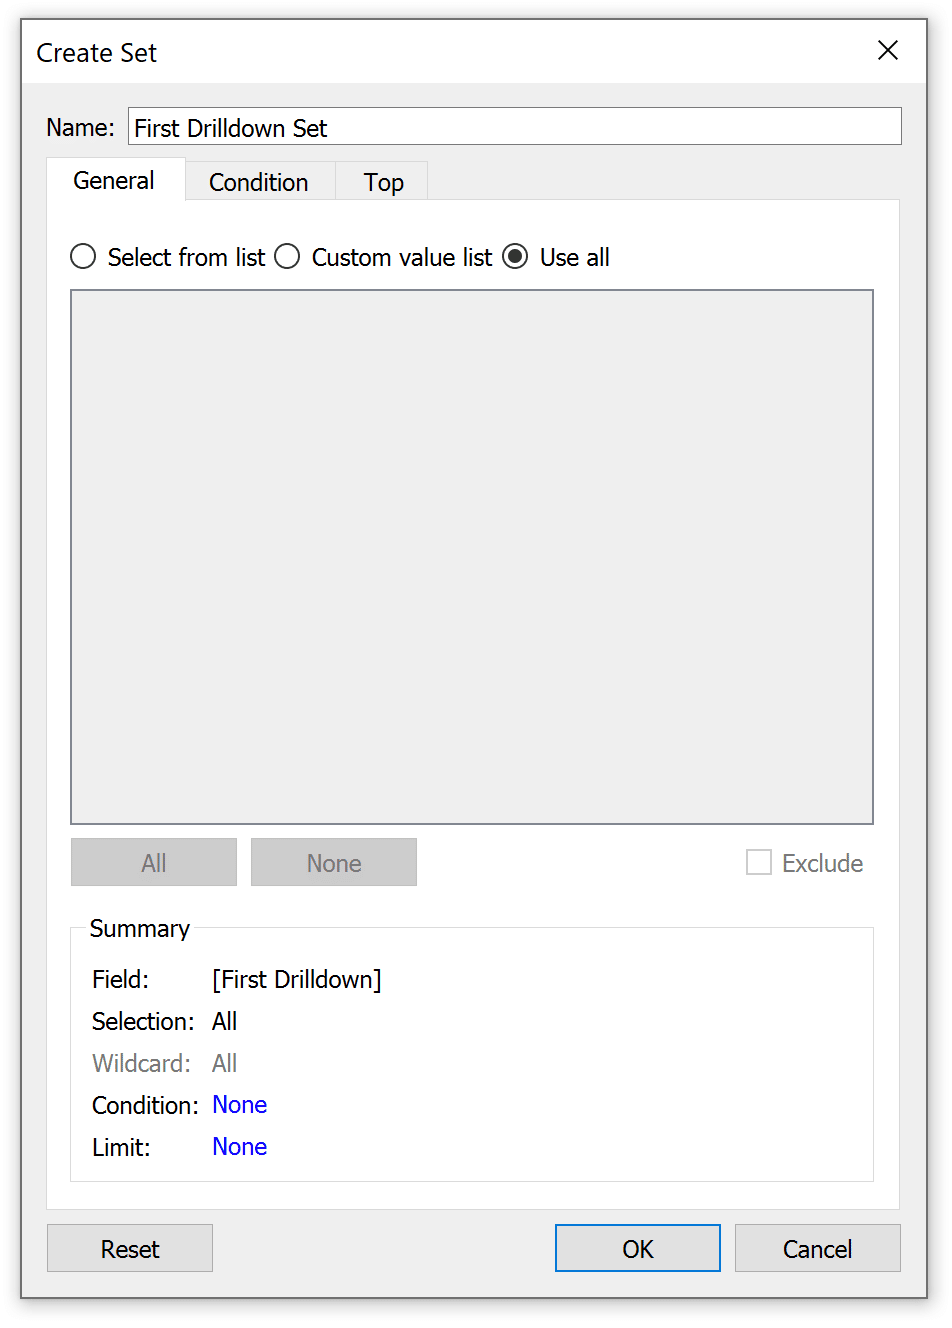
To create the set, I will right-click on the “First Drilldown” calculated field we made in the previous example, hover over Create, and choose Set. This time click the “Use all” radio button because the dimension members in this set will be dynamic.
Just like the single level drilldown, we also need a calculated field that will show the next level of the drilldown when a specific dimension member from this newly created First Drilldown Set is selected. The formula is the same except for the addition of an AND statement which ensures a dimension member is in both the first AND second level of the hierarchy before the third level is displayed. The formula in my case is:
IIF([Category Set] AND [First Drilldown Set],[Manufacturer],””)

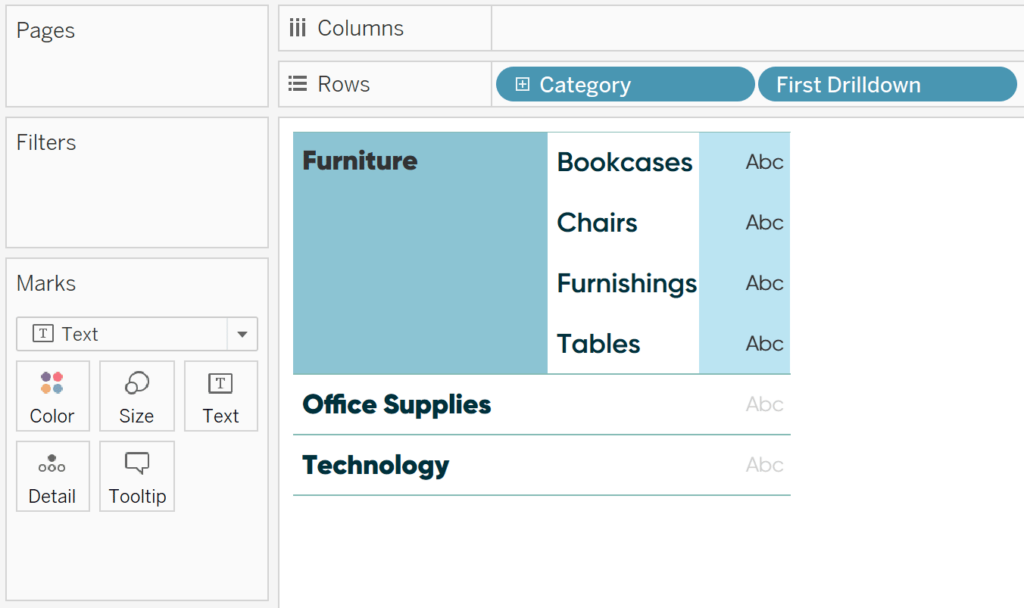
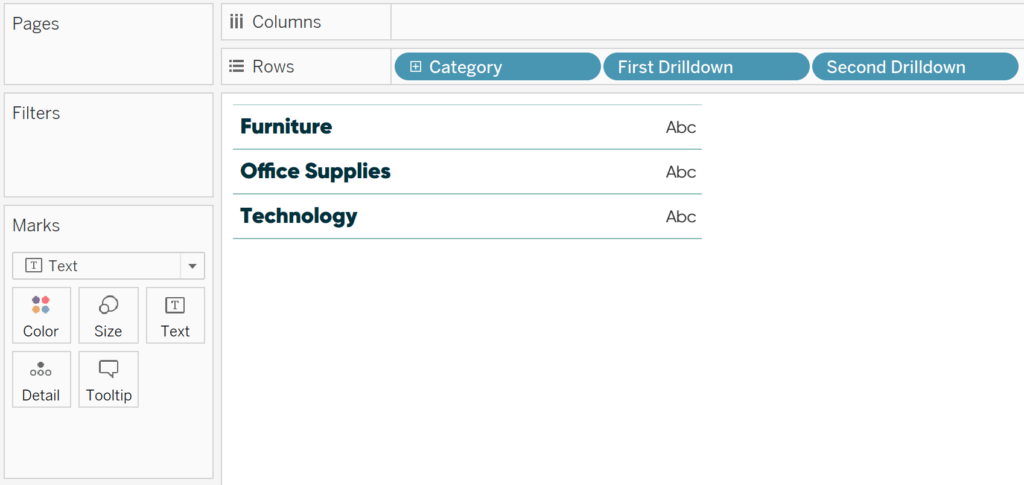
Place this calculated field on the Rows Shelf after the first two levels. If we did this correctly, we should not see anything in the second or third column yet because no dimension members are in the Category Set, and therefore, no dimension members are in both our Category Set and First Drilldown Set (the logic that produces the third column).
Lastly, we need a set action that sends the selection from the First Drilldown calculated field (the second level of the hierarchy) to the First Drilldown Set, which will activate the third column.
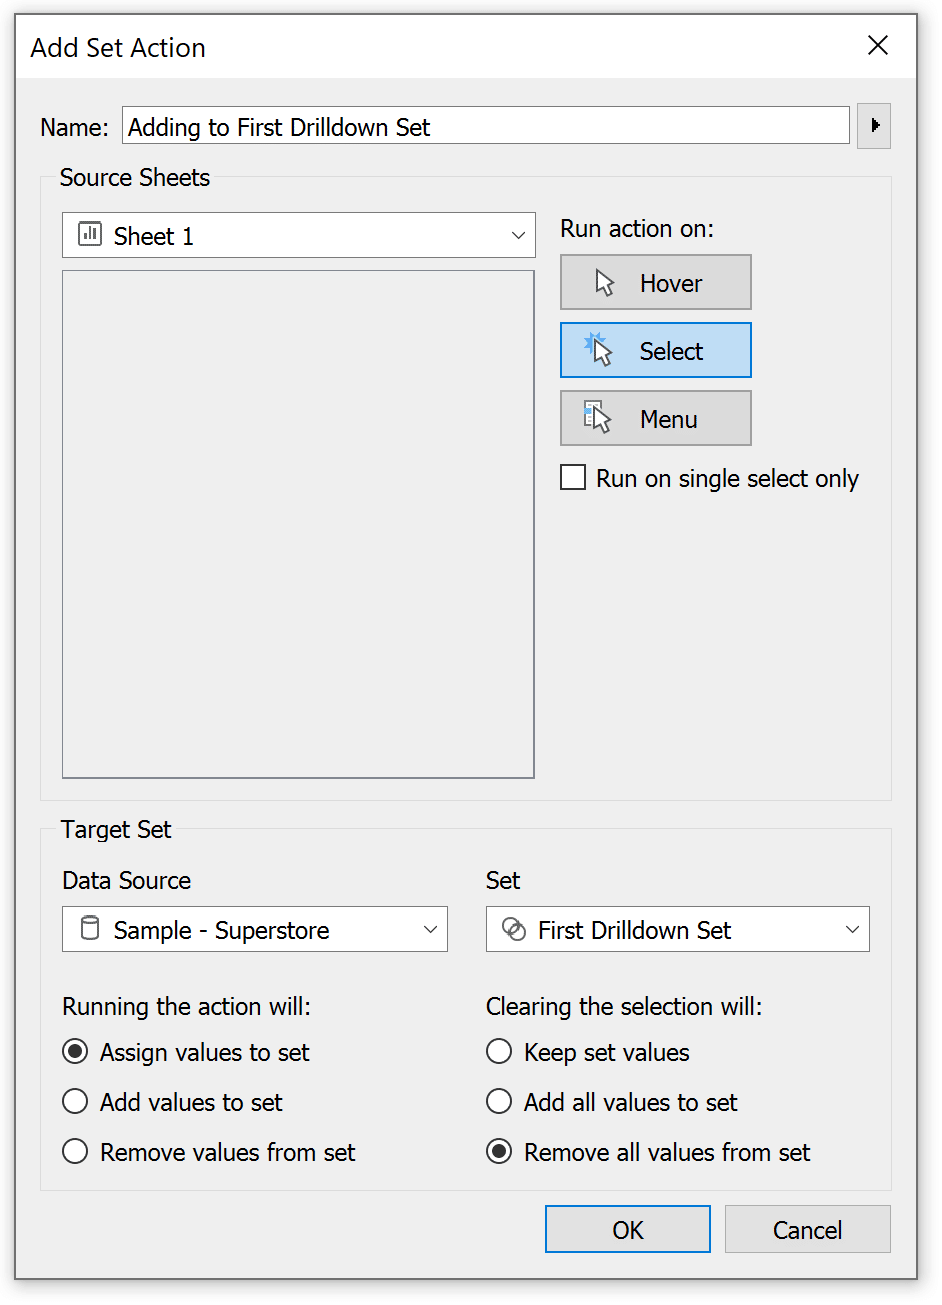
Now clicking a category from the first column displays the sub-categories for that single category and clicking a sub-category in the second column displays only the manufacturers for that single sub-category!
How to customize the multi level drill down in a Tableau crosstab
This is great, but to make your Tableau text tables help you lock in your next promotion, we’ll use this tactic for creating and comparing segments. This will allow the user to populate the three columns with any dimensions they want!
First, create a parameter with a data type of String and a list of allowable values with all of the dimension choices. For this example, I’ll allow the user to populate any of the three columns with Category, Sub-Category, Manufacturer, Product Name, Segment, Ship Mode, or Region.
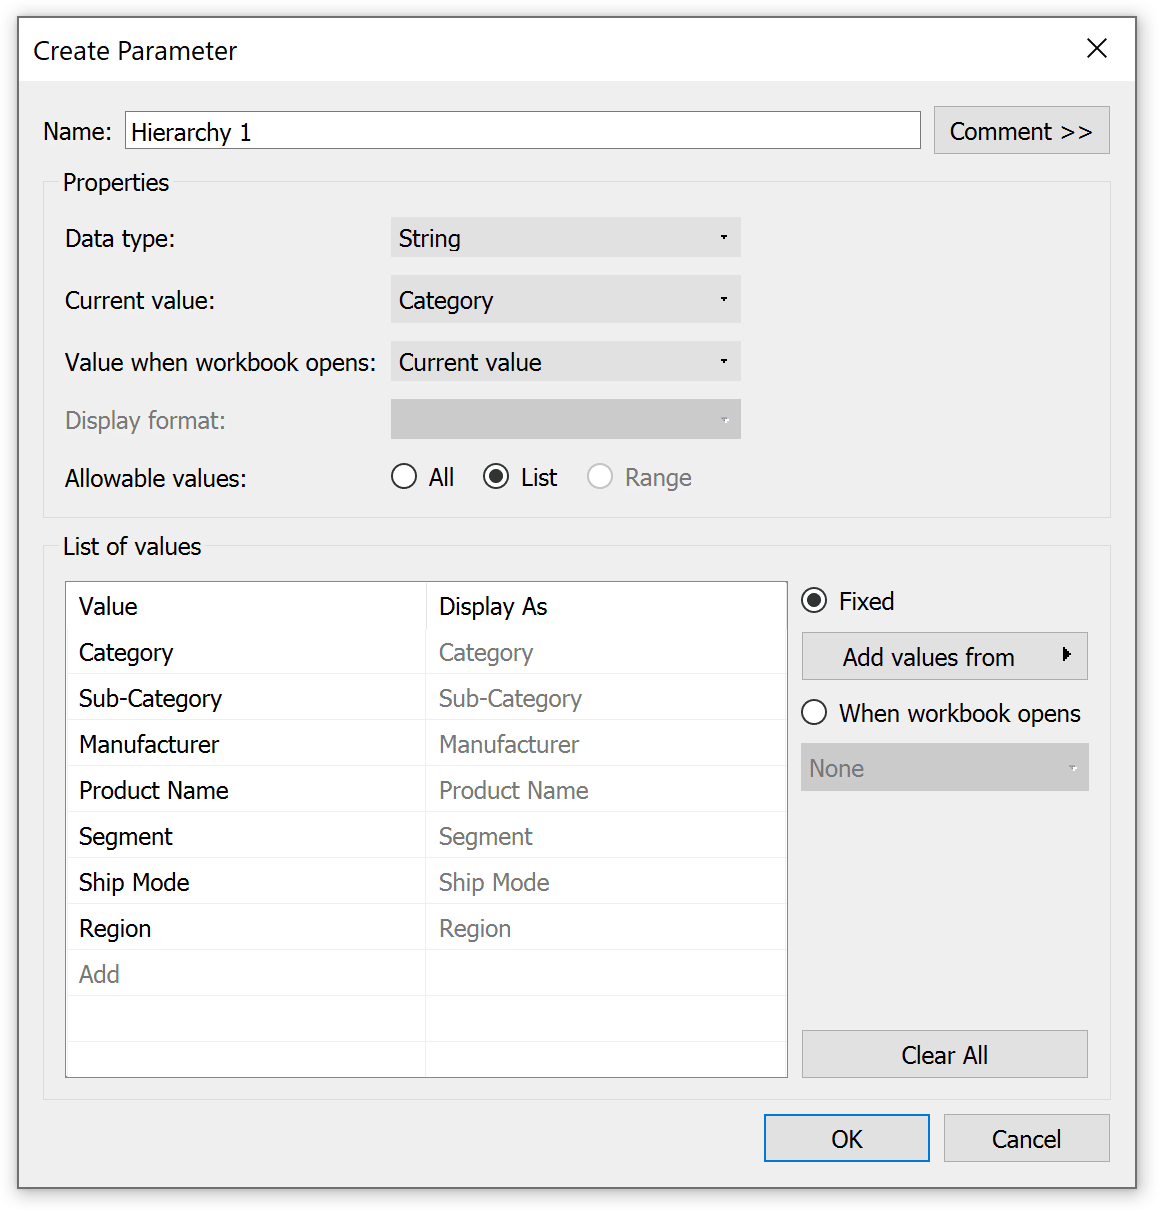
Repeat this step for both the second and third columns; just ensure you clearly name each of the three parameters to ensure you’re using the correct version for each column (i.e. Hierarchy 1 should go with column 1, Hierarchy 2 should go with column 2, and so on). You can duplicate parameters to create them more efficiently by right-clicking on a parameter and choosing “Duplicate”.
Next, create a calculated field for the first column that gives Tableau instructions for which dimension to display when each Hierarchy 1 allowable value is selected. In my case, the calculated field looks like this:
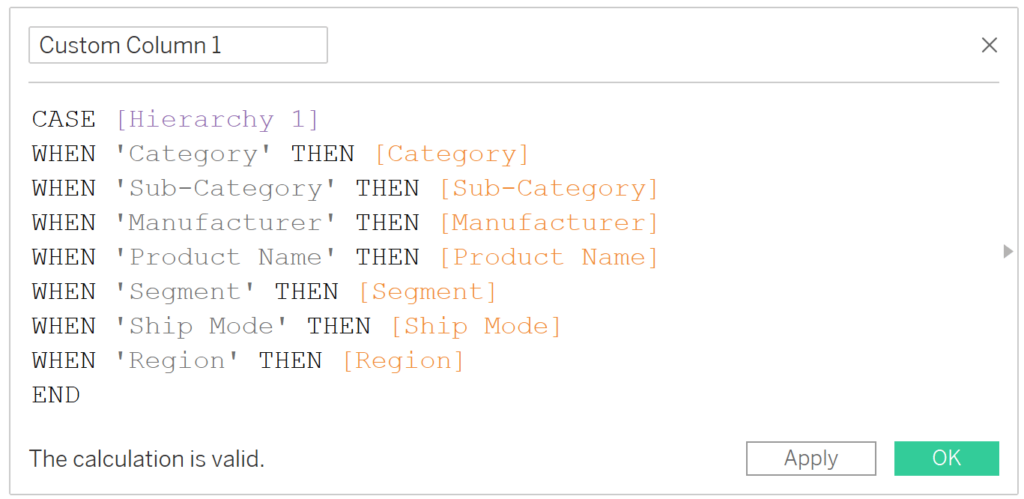
Once again, we need to duplicate these calculated fields to create a version for the second and third columns. The only two changes in each will be the title and pointing the calculated field to the respective parameter. For example, Custom Column 2 will start with CASE [Hierarchy 2] and Custom Column 3 will start with CASE [Hierarchy 3].
![]()
From here, you would set up the single row drilldown exactly as we did in the preceding section.
– Instead of using the Category dimension as the first field on the Rows Shelf, we would use the Custom Column 1 calculated field.
– Make a set out of Custom Column 1 and only show Custom Column 2 when a dimension member is in that set.
– Make a set out of the calculated field being used to generate the second column and only display Custom Column 3 when a dimension member is in both the first and second column.
Here is how my table looks after setting everything up with the custom columns and showing the parameter controls.
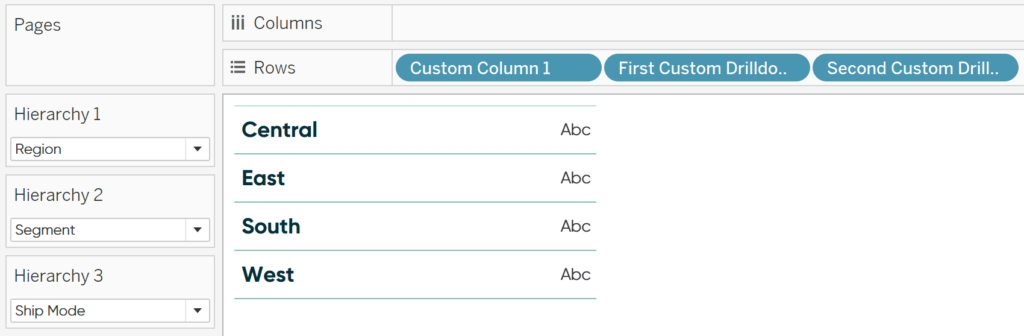
Since I’ve selected the Region value in the first hierarchy parameter, the table is showing each of the four regions in the first column. If I click a single region, it drills into the dimension selected in the second parameter: Segment.

And because Ship Mode is selected in the third hierarchy parameter, clicking a single segment in the second column drills down to the ship modes from that single selection.
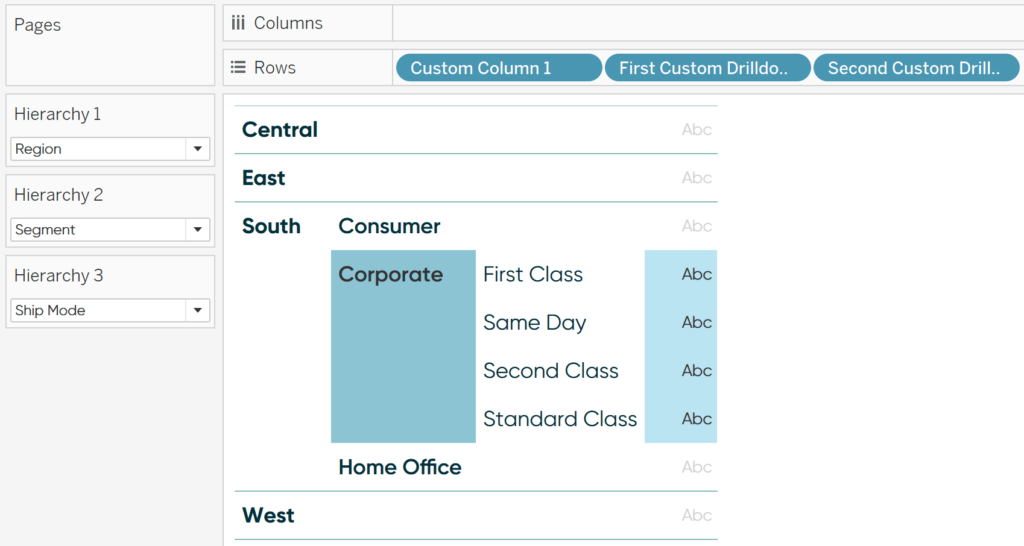
There are seven choices for each column, which means not only did we create a single row drilldown user experience, but there are 343 possible combinations of hierarchies!
Thanks for reading,
– Ryan

Written By
Ryan Sleeper
Related Content
How to Drill into a Bar Chart Using Sets in Tableau

There are many times when we create a view that makes our users want to dive deeper into the data…
3 More Ways to Overcome the Excel Barrier to Tableau Adoption
Yikes – I’m getting old in Tableau years. This week I clicked on a Tableau Public post I thought sounded…
How to Drill into a Single Row of a Text Table in Tableau
Have you ever wanted to drill down into a single row of a text table in Tableau? Tableau has some…